Introduction
This is a collection of articles about how to do stuff, mostly technical. Learn more.
Note
If an operating system is not specified, it should be assumed that instructions in a given article are for Linux, Debian-based.
Recently Added
| Title | Added |
|---|---|
| Check and Update .NET 10 Project Templates | March 15, 2026 |
| User Limit On Inotify Instances | March 13, 2026 |
| Gradle Quick Start | January 30, 2026 |
| Get Path For Executable (.NET/C#) | November 30, 2025 |
| Manual Installation of .NET SDK in Linux | November 14, 2025 |
| Generating Thumbnails for Video and Audio Files In Ubuntu | November 6, 2025 |
| Neovim Qt Startup Error | October 11, 2025 |
| Maven Example | September 28, 2025 |
Pinned
Learning Paths
Articles for specific topics.
Embedded and IoT
| Title | Description |
|---|---|
| Arduino / Raspberry Pi Remote Sensor | |
| Basic Arduino Uno Dev Setup in Linux (Debian-based) | |
| Command-Line Arduino | Using the arduino-cli command line tool to work with Arduino boards. |
| .NET IoT | Accessing IoT devices from .NET/C#. |
| MicroPython on ESP32 | Configuring and using the MicroPython environment on ESP32 boards. |
| Online IoT/Embedded Simulators | |
| Programming Arduino (AVR) and Raspberry Pi Pico (ARM) in C | |
| Remote Access for Raspberry Pi | Configuring and using SSH with Raspberry Pi. |
| Sense HAT | Working with the Sense HAT multi-sensor peripheral board. |
| Simple Raspberry Pi Control With .NET IoT and Python |
Low-Level
| Title | Description |
|---|---|
| 6502 Programming in C | Programming some really old hardware in C. |
| Complex Object Collections in C++ | |
| Enumeration Scoping in C++ | |
| GDB and GPROF | Using the Gnu Debugger and Profiler. |
| Programming Arduino (AVR) and Raspberry Pi Pico (ARM) in C |
Mainframe
| Title | Description |
|---|---|
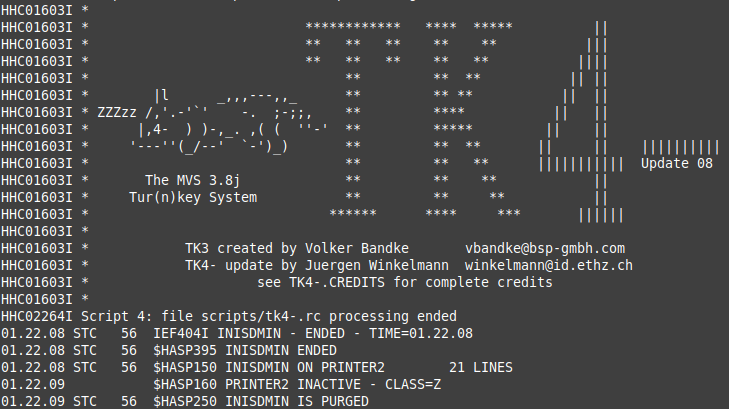
| Mainframe Emulation on Raspberry Pi Zero | Covers setup of the MVS 3.8j Turnkey system, 3270 terminal, logon, and logoff. (Uses Raspberry Pi Zero for the hardware, but the instructions can easily be adapted for other targets.) |
| JCL and Programming On the MVS Turnkey System | Using JCL to run jobs and programming in COBOL, FORTRAN, PL/1, and C on the MVS system. |
| MVS Turnkey in Docker | Set up and run the MVS Turnkey system in a Docker container. |
Terms
- Initial Program Load (IPL)
- Job Control Language (JCL)
- Multiple Virtual Storage (MVS)
- Resource Access Control Facility (RACF)
- Time Sharing Option (TSO)
About
My name is Jim Carr. I’m a software engineer, and I live near Dayton, Ohio.
I started this knowledge base to collect technical how-tos, walkthroughs, etc, that are of interest to me and which I hope will be helpful for others.
.NET
Add Settings File to .NET Console Application
App Settings File
Create appsettings.json file in project root. Example contents:
{
  "Settings": {
    "Title": "My Application",
    "Timeout": 30
  }
}
Packages / Project Output
Add the following packages to the project’s .csproj file:
<ItemGroup>
  <PackageReference Include="Microsoft.Extensions.Configuration.Binder" Version="7.0.4" />
  <PackageReference Include="Microsoft.Extensions.Configuration.EnvironmentVariables" Version="7.0.0" />
  <PackageReference Include="Microsoft.Extensions.Configuration.Json" Version="7.0.0" />
</ItemGroup>
Add the following directive to copy the appsettings file with the binary:
<ItemGroup>
  <Content Include="appsettings.json">
    <CopyToOutputDirectory>Always</CopyToOutputDirectory>
  </Content>
</ItemGroup>
Settings Class
Create a class to hold the settings:
public sealed class AppSettings
{
  public required string Title { get; set; }
  public required int Timeout { get; set; }
}
Initialize Configuration
Initialize the configuration, and retrieve the settings:
IConfiguration config = new ConfigurationBuilder()
  .AddJsonFile("appsettings.json")
  .AddEnvironmentVariables()
  .Build();

AppSettings appSettings = config.GetRequiredSection("Settings").Get<AppSettings>();
Access Settings
Access the settings:
var title = appSettings.Title;
var timeout = appSettings.Timeout;
Alternate Access Method
Tip
If you use this method exclusively, you don’t need the settings class.
var title = config.GetValue<string>("Settings:Title");
var timeout = config.GetValue<int>("Settings:Timeout");
API Key in .NET WebAPI Project
Create a webapi project, e.g.:
dotnet new webapi -o MyMicroservice
Add a middleware class:
public class ApiKeyMiddleware
{
    private readonly string _apiKeyName;
    private readonly string _apiKeyValue;

    private readonly RequestDelegate _next;

    public ApiKeyMiddleware(RequestDelegate next, string apiKeyName, string apiKeyValue)
    {
        _next = next;
        _apiKeyName = apiKeyName;
        _apiKeyValue = apiKeyValue;
    }

    public async Task InvokeAsync(HttpContext context)
    {
        if (!context.Request.Headers.TryGetValue(_apiKeyName, out var extractedApiKey))
        {
            context.Response.StatusCode = 401;
            await context.Response.WriteAsync("API Key was not provided.");
            return;
        }

        if (!_apiKeyValue.Equals(extractedApiKey))
        {
            context.Response.StatusCode = 403;
            await context.Response.WriteAsync("Unauthorized client.");
            return;
        }

        await _next(context);
    }
}
Handle the API key check in Program.cs with the following code. Place this before the app.MapControllers() call:
string? apiKeyName = "My-Api-Key-Name";
string? apiKeyValue = "85a80751-cc34-4a6e-9ad9-4d9c9bea403c";  // Do NOT store your actual key value inline!
                                                               // Retrieve it from a protected
                                                               // location, e.g., an Azure key vault.

// Validate the request:
app.UseMiddleware<ApiKeyMiddleware>(apiKeyName, apiKeyValue);
Calls to the API look like this:
GET https://your_webservice_url/some_endpoint
Accept: application/json
My-Api-Key-Name: 85a80751-cc34-4a6e-9ad9-4d9c9bea403c
Call Async Method from Non-Async Method in C#
When you call an asynchronous method with an await, the method you’re calling from must also be asynchronous. But, sometimes that’s problematic: Perhaps you’re working with existing code, or you’re implementing code in a context where it’s difficult to make it asynchronous.
You can “localize” the management of asynchronous calls using Task.Run(). In the following code, look at the two instances of Task.Run(), Wait(), and Result to see how to do it:
using (HttpContent content = new StringContent(text, Encoding.UTF8, "text/xml"))
using (HttpRequestMessage request = new HttpRequestMessage(HttpMethod.Post, url))
{
    request.Headers.Add("SOAPAction", "");
    request.Content = content;
    var task1 = Task.Run(() => httpClient.SendAsync(request, HttpCompletionOption.ResponseHeadersRead));
    task1.Wait();
    var response = task1.Result;

    var task2 = Task.Run(() => response.Content.ReadAsStreamAsync());
    task2.Wait();
    var stream = task2.Result;

    using var reader = new StreamReader(stream);
    return reader.ReadToEnd();
}
Check and Update .NET 10 Project Templates
List all installed templates, all columns (this will not show update status, though):
dotnet new list --columns-all
Show templates that have updates available, but don’t update them:
dotnet new update --check-only
Update all templates to latest version(s):
dotnet new update
Connect To MySQL From .NET
https://dev.mysql.com/doc/connector-net/en/
https://dev.mysql.com/doc/connector-net/en/connector-net-installation-binary-nuget.html
https://www.nuget.org/packages/MySql.Data
dotnet add package MySql.Data --version 8.2.0
https://dev.mysql.com/doc/connector-net/en/connector-net-connections-string.html
https://dev.mysql.com/doc/connector-net/en/connector-net-programming-mysqlcommand.html
Create Code Behind File for Razor Page In Blazor Application
This example will use the Counter.razor page in the default Blazor WebAssembly App project.
Default Counter.razor page contains this:
Counter.razor
@page "/counter"

<PageTitle>Counter</PageTitle>

<h1>Counter</h1>

<p role="status">Current count: @currentCount</p>

<button class="btn btn-primary" @onclick="IncrementCount">Click me</button>

@code {
    private int currentCount = 0;

    private void IncrementCount()
    {
        currentCount++;
    }
}
In the same directory, create a new class file named Counter.razor.cs with this content:
Counter.razor.cs
namespace BlazorCodeBehind.Pages
{
    public partial class Counter
    {

    }
}
(Change BlazorCodeBehind.Pages to match the namespace for your project)
Copy and paste the contents of the @code block from Counter.razor into the class file so that it looks like this:
Counter.razor.cs
namespace BlazorCodeBehind.Pages
{
    public partial class Counter
    {
        private int currentCount = 0;

        private void IncrementCount()
        {
            currentCount++;
        }
    }
}
Remove the code block from Counter.razor so that it looks like this:
Counter.razor
@page "/counter"

<PageTitle>Counter</PageTitle>

<h1>Counter</h1>

<p role="status">Current count: @currentCount</p>

<button class="btn btn-primary" @onclick="IncrementCount">Click me</button>
C# Language Versioning
| Target | Version | C# language version default |
|---|---|---|
| .NET | 10.x | C# 14 |
| .NET | 9.x | C# 13 |
| .NET | 8.x | C# 12 |
| .NET | 7.x | C# 11 |
| .NET | 6.x | C# 10 |
| .NET | 5.x | C# 9.0 |
| .NET Core | 3.x | C# 8.0 |
| .NET Core | 2.x | C# 7.3 |
| .NET Standard | 2.1 | C# 8.0 |
| .NET Standard | 2.0 | C# 7.3 |
| .NET Standard | 1.x | C# 7.3 |
| .NET Framework | all | C# 7.3 |
source: https://learn.microsoft.com/en-us/dotnet/csharp/language-reference/configure-language-version
Dependency Injection in .NET/C#
Dependency injection - .NET | Microsoft Learn
Use dependency injection - .NET | Microsoft Learn
Dependency Injection By Hand · ninject/Ninject Wiki
Deploy Blazor WebAssembly to GitHub Pages
Create a Blazor webassembly project, e.g.:
dotnet new blazorwasm -o BlazorWasmTest
Publish:
dotnet publish -c Release -o output
The base tag in output/wwwroot/index.html needs to be updated. Change this tag:
<base href="/" />
To this:
<base href="https://root-of-github-page/" />
For example, if your GitHub username is johndoe, and your repo name is my-cool-repo, then your GitHub page URL tag will be this:
<base href="https://johndoe.github.io/my-cool-repo/" />
If you want to simplify this, e.g., in a Makefile, use these commands in a Makefile target:
dotnet publish -c Release -o output
cd output/wwwroot; sed -i 's|<base href="/" />|<base href="https://johndoe.github.io/my-cool-repo/" />|' index.html
In the repo, enable GitHub pages and add a Static HTML GitHub action as the deployment method. Update the static.yml file for the action as follows: In jobs, deploy, steps, with, path, change path: '.' to path: 'output/wwwroot'.
When you commit, the contents of output/wwwroot will automatically be deployed.
Determine path to web.config at runtime
In C#, you can determine which web.config is being used with this:
String pathToConfig = System.Web.HttpContext.Current.Server.MapPath("/Web.config");
Entity Framework
Model Generation
Instructions are for .NET 7
MySQL
dotnet new console –o applicationName

cd applicationName

dotnet add package MySql.EntityFrameworkCore --version 7.0.2

dotnet add package Microsoft.EntityFrameworkCore.Tools --version 7.0.14
If the Entity Framework tool is not already installed:
dotnet tool install --global dotnet-ef --version 7.*
Then, generate the model files in the models directory:
dotnet ef dbcontext scaffold "server=127.0.0.1;port=3306;uid=jimc;pwd=password;database=database_name" MySql.EntityFrameworkCore -o models -f
SQL Server
dotnet new console –o applicationName

cd applicationName

dotnet add package Microsoft.EntityFrameworkCore.SqlServer --version 7.0.14

dotnet add package Microsoft.EntityFrameworkCore.Tools --version 7.0.14
If the Entity Framework tool is not already installed:
dotnet tool install --global dotnet-ef --version 7.*
Then, generate the model files in the models directory:
dotnet ef dbcontext scaffold "Server=server_ip_address;User Id=sa;Password=password;Database=database_name;Encrypt = No" Microsoft.EntityFrameworkCore.SqlServer -o models -f
More Info
Data Annotations - Column Attribute in EF 6 & EF Core
FluentUI Configuration In Blazor Application
Project File
<ItemGroup>
   <PackageReference Include="Microsoft.FluentUI.AspNetCore.Components" Version="4.10.4" />
   <PackageReference Include="Microsoft.FluentUI.AspNetCore.Components.Icons" Version="4.10.4" />
</ItemGroup>
Program.cs
using Microsoft.FluentUI.AspNetCore.Components;
builder.Services.AddRazorComponents()
   .AddInteractiveServerComponents();

builder.Services.AddFluentUIComponents();  // add this

var app = builder.Build();
_Imports.razor
@using Microsoft.FluentUI.AspNetCore.Components
Links
Get Path For Executable (.NET/C#)
To get the path that a .NET console executable resides in, regardless of where the executable was launched from:
var exePath = Path.GetDirectoryName(Environment.ProcessPath ?? "")
This is useful in a scenario where you want to access a file that resides in the same directory, e.g., a configuration file:
IConfiguration config = new ConfigurationBuilder()
    .AddJsonFile(Path.Join(Path.GetDirectoryName(Environment.ProcessPath ?? ""), "my-app-config.json"))
    .AddEnvironmentVariables()
    .Build();
Install .NET From Microsoft Feed in Ubuntu
Remove Existing Installs
sudo apt remove 'dotnet*' 'aspnet*' 'netstandard*'
Create /etc/apt/preferences, if it doesn’t already exist:
touch /etc/apt/preferences
Open /etc/apt/preferences in an editor and add the following settings, which prevents packages that start with dotnet, aspnetcore, or netstandard from being sourced from the distribution’s repository:
Package: dotnet* aspnet* netstandard*
Pin: origin "<your-package-source>"
Pin-Priority: -10
Replace <your-package-source> with your distribution’s package source. You can determine what it is with this:
apt-cache policy '~ndotnet.*' | grep -v microsoft | grep '/ubuntu' | grep updates | cut -d"/" -f3 | sort -u
Reinstall .NET From the Microsoft Package Feed
Open a terminal and run the following commands:
# Get Ubuntu version
declare repo_version=$(if command -v lsb_release &> /dev/null; then lsb_release -r -s; else grep -oP '(?<=^VERSION_ID=).+' /etc/os-release | tr -d '"'; fi)

# Download Microsoft signing key and repository
wget https://packages.microsoft.com/config/ubuntu/$repo_version/packages-microsoft-prod.deb -O packages-microsoft-prod.deb

# Install Microsoft signing key and repository
sudo dpkg -i packages-microsoft-prod.deb

# Clean up
rm packages-microsoft-prod.deb

# Update packages
sudo apt update
Install the SDK you want, e.g., 8.0:
sudo apt install dotnet-sdk-8.0
Manual Installation of .NET SDK in Linux
If you’ve already installed one or more .NET SDK versions via the package manager, uninstall them before proceeding.
Download the SDK versions you want to install from here. For this example, I’ll be installing .NET 8 and .NET 10, downloaded as dotnet-sdk-8.0.416-linux-x64.tar.gz and dotnet-sdk-10.0.100-linux-x64.tar.gz, respectively.
Open a terminal.
If ~/.dotnet already exists (from a previous installation), remove it:
rm -rf ~/.dotnet
Create a new, empty .dotnet directory:
mkdir ~/.dotnet
Extract the SDK archive(s) into the .dotnet directory:
tar zxf dotnet-sdk-8.0.416-linux-x64.tar.gz -C ~/.dotnet/

tar zxf dotnet-sdk-10.0.100-linux-x64.tar.gz -C ~/.dotnet/
Add to .profile:
export DOTNET_ROOT=$HOME/.dotnet

export PATH=$PATH:$DOTNET_ROOT:$DOTNET_ROOT/tools
Restart to apply the new .profile settings.
Open a new terminal and verify that the dotnet CLI is working correctly:
dotnet --list-sdks
You should see something like this:
8.0.416 [/home/username/.dotnet/sdk]
10.0.100 [/home/username/.dotnet/sdk]
Taken from here: https://learn.microsoft.com/en-us/dotnet/core/install/linux-scripted-manual#manual-install
Microservice Notes
Microservices architecture design
Tutorial: Create a web API with ASP.NET Core
Creating POST method in Web API
No Frameworks Were Found error
Error when executing dotnet cli in Linux:
No frameworks were found
To fix this, first remove the existing dotnet installation:
sudo apt remove 'dotnet*'

sudo apt remove 'aspnetcore*'

sudo apt remove 'netstandard*'
Then, reinstall each SDK:
sudo apt install dotnet-sdk-6.0

sudo apt install dotnet-sdk-7.0
Package and Publish To NuGet
Create a NuGet package with the dotnet CLI
Full article: https://learn.microsoft.com/en-us/nuget/create-packages/creating-a-package-dotnet-cli
Set Properties
Set (at least) the following properties in the .csproj file:
<Project Sdk="Microsoft.NET.Sdk">
  <PropertyGroup>
    <TargetFramework>netstandard2.0</TargetFramework>
    <PackageId>UniqueID</PackageId>
    <Version>1.0.0</Version>
    <Authors>Author Name</Authors>
    <Company>Company Name</Company>
    <Product>Product Name</Product>
  </PropertyGroup>
</Project>
PackageId will be used as the identifier on nuget.org. For example, if you give PackageId the value MyFancyLib, then the published nuget will be at https://www.nuget.org/packages/MyFancyLib.
PackageId must be unique, and not used by anyone else previously. Moreover, each time you publish an update the PackageId / Version combination must be unique. (You cannot overwrite a previously published version.)
Run the pack command
To build the NuGet package or .nupkg file, run the dotnet pack command from the project folder, which also builds the project automatically.
dotnet pack
The output shows the path to the .nupkg file:
MSBuild version 17.3.0+92e077650 for .NET
  Determining projects to restore...
  Restored C:\projects\MyFancyLib\MyFancyLib.csproj (in 97 ms).
  Successfully created package 'C:\MyFancyLib\bin\Debug\MyFancyLib.1.0.0.nupkg'.
Publish NuGet packages
Full article: https://learn.microsoft.com/en-us/nuget/nuget-org/publish-a-package
To publish on nuget.org, sign in to nuget.org with a Microsoft account, and use it to create a free nuget.org account.
Create an API key
- Sign into your nuget.org account or create an account if you don’t have one already.
- Select your user name at upper right, and then select API Keys.
- Select Create, and provide a name for your key.
- Under Select Scopes, select Push.
- Under Select Packages > Glob Pattern, enter *.
- Select Create.
- Select Copy to copy the new key.
Use the dotnet CLI to publish
From the folder that contains the .nupkg file, run the following command. Specify your .nupkg filename, and replace the key value with your API key.
dotnet nuget push MyFancyLib.1.0.0.nupkg --api-key qz2jga8pl3dvn2akksyquwcs9ygggg4exypy3bhxy6w6x6 --source https://api.nuget.org/v3/index.json
The output shows the results of the publishing process:
Pushing MyFancyLib.1.0.0.nupkg to 'https://www.nuget.org/api/v2/package'...
  PUT https://www.nuget.org/api/v2/package/
warn : All published packages should have license information specified. Learn more: https://aka.ms/nuget/authoring-best-practices#licensing.
  Created https://www.nuget.org/api/v2/package/ 1221ms
Your package was pushed.
Remove Duplicates From List Collection
A couple of examples of removing duplicate entries in list collections in C#.
Implemented As a Method
using System;
using System.Collections.Generic;
using System.Collections.ObjectModel;
using System.Linq;

namespace Console1
{
    class Program
    {

        static IEnumerable<T> RemoveDuplicates<T>(List<T> inputList)
        {
            inputList.Sort();

            return inputList.Distinct();
        }

        static void Main(string[] args)
        {
            var myList = new List<string> {
                "John",
                "Andrew",
                "James",
                "Jack",
                "Andrew",
                "Bob",
                "Jack"
            };

            var newList = RemoveDuplicates(myList);

            foreach (var item in newList)
            {
                Console.WriteLine(item);
            }
        }
    }
}
Implemented As An Extension
using System;
using System.Collections.Generic;
using System.Collections.ObjectModel;
using System.Linq;

namespace Console1
{
    public static class ListExtension
    {
        public static IEnumerable<T> RemoveDuplicates<T>(this List<T> inputList)
        {
            inputList.Sort();

            return inputList.Distinct();
        }
    }

    class Program
    {
        static void Main(string[] args)
        {
            var myList = new List<string> {
                "John",
                "Andrew",
                "James",
                "Jack",
                "Andrew",
                "Bob",
                "Jack"
            };

            var newList = myList.RemoveDuplicates();

            foreach (var item in newList)
            {
                Console.WriteLine(item);
            }
        }
    }
}
Side-by-Side .NET Core Installations
Setup
This describes a setup where .NET Core 3.1 was installed first, then .NET Core 2.2 was installed later.
Since .NET Core 3.1 is the newest version, issuing a command like this:
dotnet new console -o MyConsoleApp
…creates a console application that targets v3.1. If you look at the .csproj file, you’ll see this:
<TargetFramework>netcoreapp3.1</TargetFramework>
Project Level
There are a couple of ways to target v2.2. Different templates support different methods.
For a console app, simply edit the .csproj to reflect the version you want:
<TargetFramework>netcoreapp2.2</TargetFramework>
…and then restore:
dotnet restore
Some templates, like webapi and mvc, allow you to target an alternate version when you create the project:
dotnet new webapi -f netcoreapp2.2 -o MyWebService
Framework Level
You can also control the default framework used by the CLI. We’ll continue using our example described above, where .NET Core 3.1 was installed first, then .NET Core 2.2 was installed later.
Since 2.2 was installed last, that makes it the default SDK:
dotnet --version
Result:
2.2.108
To change the default SDK version, first list your installed versions, and note the version you want to use as the default:
dotnet --list-sdks
Result:
2.2.108
3.1.301
(We’ll change our default to 3.1.301)
Create a global.json file. The setting in the global.json file will affect the dotnet cli when it’s invoked in any subdirectory under the location of the global.json file, so you’ll probably want to create it in a location like $HOME (for Linux), or C:\ (for Windows):
dotnet new globaljson
Then, edit the new global.json file, and update the “version” value to reflect the version you wish to be the default:
{
  "sdk": {
    "version": "3.1.301"
  }
}
Then, the version reported by the CLI will match:
dotnet --version
Result:
3.1.301
More Information
How to install multiple versions of .NET Core side by side on ubuntu - Stack Overflow
Switching between .NET Core SDK Versions
Single-File / Multi-OS / Multi-Architecture Publishing in .NET
Walkthrough
Assumes .NET 5 or 6. Earlier versions of .NET Core support single file publishing as well, but it’s markedly improved in v5 and v6.
Single file publishing is controlled by three arguments to the dotnet publish command:
| Argument | Description |
|---|---|
| -r | Runtime Identifier. Specifies which operating system, operating system version, and architecture to target. |
| –self-contained true | Include all dependencies. This removes the need to have the associated .NET runtime installed on the target machine. |
| /p:PublishSingleFile=true | Bundle the output into a single file. |
For example, the command for publishing to a single file, targeting Windows 10 (64-bit), looks like this:
dotnet publish -c Release -r win10-x64 --self-contained true -p:PublishSingleFile=true
Targeting other OS/architecture combinations is as simple as replacing the RID value in the command with the RID you want to target.
I’ve tested the following RIDs:
| RID | Operating System | Architecture |
|---|---|---|
| linux-x64 | Linux | 64-bit AMD |
| linux-arm | Linux | 32-bit ARM (This can be used to target Raspberry Pi) |
| osx.10.14-x64 | macOS 10.14 Mojave | 64-bit ARM |
| win10-x64 | Windows 10 | 64-bit AMD |
You can find more information about RIDs in the .NET Core RID Catalog article.
Results for .NET 5
Technically speaking, the publish command does not produce a “single file” in all cases. Starting with a simple console project named “SingleFilePublish”, the following outputs are produced:
Linux
One executable:
SingleFilePublish
Windows
5 files, including the executable:
clrcompression.dll
clrjit.dll
coreclr.dll
mscordaccore.dll
SingleFilePublish.exe
macOS
8 files, including the executable:
libclrjit.dylib
libcoreclr.dylib
libSystem.IO.Compression.Native.dylib
libSystem.Native.dylib
libSystem.Net.Security.Native.dylib
libSystem.Security.Cryptography.Native.Apple.dylib
libSystem.Security.Cryptography.Native.OpenSsl.dylib
SingleFilePublish
Raspberry Pi (32-bit ARM)
One executable:
SingleFilePublish
Results for .NET 6
With .NET 6, it looks like true single-file publishing has been achieved.
Linux
One executable:
SingleFilePublish
Windows
One executable:
SingleFilePublish.exe
macOS
One executable:
SingleFilePublish
Raspberry Pi (32-bit ARM)
One executable:
SingleFilePublish
Deployment
When you run the dotnet publish command, outputs are written to the bin/Release/net5.0/publish directory. To deploy, simply copy the contents of this directory to your target machine.
The publish directory includes a .pdb file, but it’s not required. It just contains debugging information.
Sample Makefile
Simplifies the steps described above.
LINUX_RID = linux-x64
LINUX_RID_ARM = linux-arm
MAC_RID = osx.10.14-x64
WINDOWS_RID = win10-x64
CONFIGURATION_ARGS = Release
PUBLISH_ARGS = --self-contained true /p:PublishSingleFile=true

default:
    @echo 'Targets:'
    @echo '  run'
    @echo '  run-win'
    @echo '  copy-pi'
    @echo '  publish'
    @echo '  publish-win'
    @echo '  publish-mac'
    @echo '  publish-arm'
    @echo '  clean'

run: publish
    ./bin/Release/net5.0/linux-x64/publish/SingleFilePublish

run-win: publish-win
    wine ./bin/Release/net5.0/win10-x64/publish/SingleFilePublish

copy-pi: publish-arm
    scp ./bin/Release/net5.0/linux-arm/publish/SingleFilePublish pi@raspi4-main:/home/pi

publish:
    dotnet publish -c $(CONFIGURATION_ARGS) -r $(LINUX_RID) $(PUBLISH_ARGS)

publish-win:
    dotnet publish -c $(CONFIGURATION_ARGS) -r $(WINDOWS_RID) $(PUBLISH_ARGS)

publish-arm:
    dotnet publish -c $(CONFIGURATION_ARGS) -r $(LINUX_RID_ARM) $(PUBLISH_ARGS)

publish-mac:
    dotnet publish -c $(CONFIGURATION_ARGS) -r $(MAC_RID) $(PUBLISH_ARGS)

clean:
    -rm -rf bin/
    -rm -rf obj/
Supporting Material for ‘.NET and Linux’ tech talk
Code Snippets
Unguarded Code
var registryValue =
	Registry.GetValue("HKEY_CURRENT_USER", "value", "blarg");

Console.WriteLine(registryValue);
This code will raise a type initializer exception if run on a non-Windows system.
It will also generate a compile-time warning: “warning CA1416: This call site is reachable on all platforms. ‘Registry.GetValue(string, string?, object?)’ is only supported on: ‘windows’”
Guarded Code
var registryValue = (OperatingSystem.IsWindows())
	? Registry.GetValue("HKEY_CURRENT_USER", "value", "blarg")
	: $"Registry does not exist in {Environment.OSVersion}";

Console.WriteLine(registryValue);
This code will run successfully on all platforms. It will not generate a compile-time warning, as the compiler will see that the code is guarded.
Simple IoT Example
This is a simple code example for blinking an LED on a breakout board attached to a Raspberry Pi.
using System;
using System.Device.Gpio;
using System.Threading;

Console.WriteLine("Blinking LED. Press Ctrl+C to end.");
int pin = 18;
using var controller = new GpioController();
controller.OpenPin(pin, PinMode.Output);
bool ledOn = true;
while (true)
{
    controller.Write(pin, ((ledOn) ? PinValue.High : PinValue.Low));
    Thread.Sleep(1000);
    ledOn = !ledOn;
}
Full example is here.
Links
Download .NET - Downloads for .NET, including ASP.NET Core.
Install .NET on Linux Distributions
.NET Runtime Identifier (RID) catalog
.NET IoT - Develop apps for IoT devices with the .NET IoT Libraries.
Writing cross platform P/Invoke code
Language Comparison - Go
go.dev - Go home page
Go by Example - Annotated example programs.
Go GOOS and GOARCH - Platform targeting values.
Language Comparison - Rust
Rust Programming Language - Rust home page
Rust by Example - Collection of runnable example programs illustrating various Rust concepts.
Rust Cookbook - Collection of simple examples that demonstrate good practices to accomplish common programming tasks.
TUI Frameworks for .NET
Terminal.Gui
Terminal.Gui - Cross Platform Terminal UI toolkit for .NET
Spectre.Console
WCF Export
Given the URL of a WCF service (along with a output prefix and target namespace), this Python script generates C# proxy source and config files. These files can then be imported/copied to a .NET project and used directly to consume the web service.
import os
import string
import subprocess
import sys

class WCFExporter:
	def __init__(self, serviceURL, outputPrefix, targetNamespace):
		self.serviceURL = serviceURL
		self.outputPrefix = outputPrefix
		self.targetNamespace = targetNamespace

		self.svcUtilCmd = 'C:\\PROGRA~1\\MI2578~1\\Windows\\v6.0A\\Bin\\SvcUtil.exe'

	def DropGeneratedCodeAttribute(self):
		try:
			mySourceFile = self.outputPrefix + '.temp.cs'
			myTargetFile = self.outputPrefix + '.cs'

			mySourceHandle = open(mySourceFile, 'r')
			myTargetHandle = open(myTargetFile, 'w')

			for inputLine in mySourceHandle:
				if 'GeneratedCodeAttribute' not in inputLine:
					myTargetHandle.write(inputLine)

			myTargetHandle.close()
			mySourceHandle.close()

			os.remove(mySourceFile)

		except Exception as ex:
			print '[ERROR] ' + str(ex)

	def GenerateFiles(self):
		try:
			retcode = -1

			myCommandString = self.svcUtilCmd + ' /t:code ' + self.serviceURL + ' /out:' + self.outputPrefix + '.temp.cs /config:' + self.outputPrefix + '.config /namespace:*,' + self.targetNamespace

			retcode = subprocess.call(myCommandString)

		except Exception as ex:
			print '[ERROR] ' + str(ex)

		return retcode

	def UsageMessage(self):
		print '\nUSAGE: wcfexport.py <wcf service url> <output prefix> <target namespace>'
		print '\n\n\tEXAMPLE: wcfexport.py http://CoolService:9030 MyNewProxy MyCompany.MyPkg'
		print '\n\n\tOUTPUT: MyNewProxy.cs and MyNewProxy.config'

### MAIN starts here ###

myWCFExporter = WCFExporter('','','')

if len(sys.argv) != 4:
	myWCFExporter.UsageMessage()
	sys.exit(1)

myWCFExporter.serviceURL = sys.argv[1]
myWCFExporter.outputPrefix = sys.argv[2]
myWCFExporter.targetNamespace = sys.argv[3]

print '\n'

retcode = myWCFExporter.GenerateFiles()

if retcode == 0:
	myWCFExporter.DropGeneratedCodeAttribute()
Web API with ASP.NET
Tutorial: Create a web API with ASP.NET Core – Microsoft Learn
Call a Web API From a .NET Client (C#) - ASP.NET 4.x – Microsoft Learn
Create a web API with ASP.NET Core controllers - Training – Microsoft Learn
json - HttpClient not supporting PostAsJsonAsync method C# - Stack Overflow
C / C++
Complex Object Collections in C++
C++ Example
In C++, vectors act as dynamic arrays, with the ability to resize themselves as elements are inserted or deleted.
To make them available:
#include <vector>
Most vector examples show simple data elements, e.g., to create a vector of int values:
// Initialize
vector<int> numberList;

// Add new elements to the vector:
vector.push_back(1);
vector.push_back(2);
vector.push_back(3);
But, how to add complex objects, when you need something like a dataset? It’s actually pretty straightforward. This example will use planetary data.
First, create a class to hold an individual data element:
class PlanetData {
public:
  string planetName;
  double tp_PeriodOrbit;
  double long_LongitudeEpoch;
  double peri_LongitudePerihelion;
  double ecc_EccentricityOrbit;
  double axis_AxisOrbit;
  double incl_OrbitalInclination;
  double node_LongitudeAscendingNode;
  double theta0_AngularDiameter;
  double v0_VisualMagnitude;

  PlanetData() {}

  PlanetData(string planetName, double tp_PeriodOrbit,
             double long_LongitudeEpoch, double peri_LongitudePerihelion,
             double ecc_EccentricityOrbit, double axis_AxisOrbit,
             double incl_OrbitalInclination, double node_LongitudeAscendingNode,
             double theta0_AngularDiameter, double v0_VisualMagnitude) {
    this->planetName = planetName;
    this->tp_PeriodOrbit = tp_PeriodOrbit;
    this->long_LongitudeEpoch = long_LongitudeEpoch;
    this->peri_LongitudePerihelion = peri_LongitudePerihelion;
    this->ecc_EccentricityOrbit = ecc_EccentricityOrbit;
    this->axis_AxisOrbit = axis_AxisOrbit;
    this->incl_OrbitalInclination = incl_OrbitalInclination;
    this->node_LongitudeAscendingNode = node_LongitudeAscendingNode;
    this->theta0_AngularDiameter = theta0_AngularDiameter;
    this->v0_VisualMagnitude = v0_VisualMagnitude;
  }
};
Create a vector object, using the class as the vector type:
vector<PlanetData> planetData;
Add elements to the vector using instances of the class:
planetData.push_back(PlanetData("Mercury", 0.24085, 75.5671, 77.612, 0.205627, 0.387098, 7.0051, 48.449, 6.74, -0.42));
Then, you can loop through the vector, looking for an individual element:
// This example assumes it's being called inside a
// function, and returning an instance of the
// found element.

for (int i = 0; i < planetData.size(); i++)
  if (planetData[i].planetName == planetName)
    return planetData[i];
Complete Example
example.cpp
#include <iostream>
#include <vector>

using namespace std;

class PlanetData {
public:
    string planetName;
    double tp_PeriodOrbit;
    double long_LongitudeEpoch;
    double peri_LongitudePerihelion;
    double ecc_EccentricityOrbit;
    double axis_AxisOrbit;
    double incl_OrbitalInclination;
    double node_LongitudeAscendingNode;
    double theta0_AngularDiameter;
    double v0_VisualMagnitude;

    PlanetData() {}

    PlanetData(string planetName, double tp_PeriodOrbit,
    double long_LongitudeEpoch, double peri_LongitudePerihelion,
    double ecc_EccentricityOrbit, double axis_AxisOrbit,
    double incl_OrbitalInclination, double node_LongitudeAscendingNode,
    double theta0_AngularDiameter, double v0_VisualMagnitude) {
    this->planetName = planetName;
    this->tp_PeriodOrbit = tp_PeriodOrbit;
    this->long_LongitudeEpoch = long_LongitudeEpoch;
    this->peri_LongitudePerihelion = peri_LongitudePerihelion;
    this->ecc_EccentricityOrbit = ecc_EccentricityOrbit;
    this->axis_AxisOrbit = axis_AxisOrbit;
    this->incl_OrbitalInclination = incl_OrbitalInclination;
    this->node_LongitudeAscendingNode = node_LongitudeAscendingNode;
    this->theta0_AngularDiameter = theta0_AngularDiameter;
    this->v0_VisualMagnitude = v0_VisualMagnitude;
    }
};

PlanetData planetLookup(string planetName) {
    vector<PlanetData> planetData;

    planetData.push_back(PlanetData("Mercury", 0.24085, 75.5671, 77.612, 0.205627, 0.387098, 7.0051, 48.449, 6.74, -0.42));
    planetData.push_back(PlanetData("Venus", 0.615207, 272.30044, 131.54, 0.006812, 0.723329, 3.3947, 76.769, 16.92, -4.4));
    planetData.push_back(PlanetData("Earth", 0.999996, 99.556772, 103.2055, 0.016671, 0.999985, -99.0, -99.0, -99.0, -99.0));
    planetData.push_back(PlanetData("Mars", 1.880765, 109.09646, 336.217, 0.093348, 1.523689, 1.8497, 49.632, 9.36, -1.52));
    planetData.push_back(PlanetData("Jupiter", 11.857911, 337.917132, 14.6633, 0.048907, 5.20278, 1.3035, 100.595, 196.74, -9.4));
    planetData.push_back(PlanetData("Saturn", 29.310579, 172.398316, 89.567, 0.053853, 9.51134, 2.4873, 113.752, 165.6, -8.88));
    planetData.push_back(PlanetData("Uranus", 84.039492, 356.135400, 172.884833, 0.046321, 19.21814, 0.773059, 73.926961, 65.8, -7.19));
    planetData.push_back(PlanetData("Neptune", 165.845392, 326.895127, 23.07, 0.010483, 30.1985, 1.7673, 131.879, 62.2, -6.87));

    for (int i = 0; i < planetData.size(); i++)
    if (planetData[i].planetName == planetName)
        return planetData[i];

    return PlanetData("NoMatch", 0, 0, 0, 0, 0, 0, 0, 0, 0);
}

void printDetails(PlanetData planetDetails) {
    cout << planetDetails.planetName << " " << planetDetails.tp_PeriodOrbit << " "
    << planetDetails.long_LongitudeEpoch << " "
    << planetDetails.peri_LongitudePerihelion << " "
    << planetDetails.ecc_EccentricityOrbit << " "
    << planetDetails.axis_AxisOrbit << " "
    << planetDetails.incl_OrbitalInclination << " "
    << planetDetails.node_LongitudeAscendingNode << " "
    << planetDetails.theta0_AngularDiameter << " "
    << planetDetails.v0_VisualMagnitude << endl;
}

int main() {
    printDetails(planetLookup("Mercury"));
    printDetails(planetLookup("Venus"));
    printDetails(planetLookup("Earth"));
    printDetails(planetLookup("Mars"));
    printDetails(planetLookup("Jupiter"));
    printDetails(planetLookup("Saturn"));
    printDetails(planetLookup("Uranus"));
    printDetails(planetLookup("Neptune"));
    printDetails(planetLookup("Pluto")); // won't be found -> not in the dataset

    return (0);
}
Enumeration Scoping in C++
The Problem
I spent way too much time trying to figure out what was wrong with this code:
#include <iostream>

using namespace std;

enum enum_1 { ok, warning, error };

enum enum_2 { ok, warning, error };

int main() {
  enum_1 my_value1 = enum_1::ok;
  enum_2 my_value2 = enum_2::error;

  if (my_value1 == enum_1::ok) {
    cout << "my_value1 is OK!" << endl;
  } else {
    cout << "my_value1 is not OK!" << endl;
  }

  if (my_value2 == enum_2::ok) {
    cout << "my_value2 is OK!" << endl;
  } else {
    cout << "my_value2 is not OK!" << endl;
  }

  return (0);
}
Trying to build this code produces the following errors:
main.cpp:9:15: error: redefinition of enumerator 'ok'
enum enum_2 { ok, warning, error };
              ^
main.cpp:6:15: note: previous definition is here
enum enum_1 { ok, warning, error };
              ^
main.cpp:9:19: error: redefinition of enumerator 'warning'
enum enum_2 { ok, warning, error };
                  ^
main.cpp:6:19: note: previous definition is here
enum enum_1 { ok, warning, error };
                  ^
main.cpp:9:28: error: redefinition of enumerator 'error'
enum enum_2 { ok, warning, error };
                           ^
main.cpp:6:28: note: previous definition is here
enum enum_1 { ok, warning, error };
                           ^
main.cpp:13:30: error: no member named 'error' in 'enum_2'
enum_2 my_value2 = enum_2::error;
                   ~~~~~~~~^
main.cpp:21:20: error: no member named 'ok' in 'enum_2'; did you mean simply 'ok'?
if (my_value2 == enum_2::ok) {
                 ^~~~~~~~~~
                 ok
main.cpp:6:15: note: 'ok' declared here
enum enum_1 { ok, warning, error };
              ^
A quick search of StackOverflow, and I learned that “old style” enumerations in C++ are unscoped. Since the individual members in enums are global, the member names have to be unique.
Solution 1 (C++11)
If your compiler supports the C++11 standard, the fix is easy. Just add “class” to your enum declarations:
#include <iostream>

using namespace std;

enum class enum_1 { ok, warning, error };

enum class enum_2 { ok, warning, error };

int main() {
  enum_1 my_value1 = enum_1::ok;
  enum_2 my_value2 = enum_2::error;

  if (my_value1 == enum_1::ok) {
    cout << "my_value1 is OK!" << endl;
  } else {
    cout << "my_value1 is not OK!" << endl;
  }

  if (my_value2 == enum_2::ok) {
    cout << "my_value2 is OK!" << endl;
  } else {
    cout << "my_value2 is not OK!" << endl;
  }

  return (0);
}
Solution 2
Alternatively, you can wrap your enums in namespaces:
namespace scope1 {
  enum enum_1 { ok, warning, error };
}

namespace scope2 {
  enum enum_2 { ok, warning, error };
}
Then, you can access the members as scope1::enum_1::ok, scope2::enum_2::warning, etc.
GDB and GPROF
GPROF Tutorial – How to use Linux GNU GCC Profiling Tool
How to Debug C Program using gdb in 6 Simple Steps
Learning C with gdb - Blog - Recurse Center
stdio.h: No such file or directory
As a part of testing out Linux Mint XFCE 16, I created a simple “hello world” in C:
#include <stdio.h>

main()
{
 printf ("Hello, world!\n");
}
But, when I tried to compile it:
gcc hello.c
I got this:
stdio.h: No such file or directory
It seems that there are a few libraries that are not installed by default. It’s easy to add them, though:
sudo apt-get install build-essential
After doing this, the code compiles.
Database / SQL
Boilerplate Date Definitions for SQL
DECLARE @today DATETIME = CAST('7/21/2014' AS DATETIME)

DECLARE @firstDayCurrMnth DATETIME =
 Dateadd(dd,CASE
  WHEN DAY(@today) > 1 THEN ( ( DAY(@today) - 1 ) * -1 )
  ELSE 0
 END, @today)

DECLARE @firstDayPrevMnth DATETIME = Dateadd(mm, -1, @firstDayCurrMnth)

DECLARE @firstDayNextMnth DATETIME = Dateadd(mm, 1, @firstDayCurrMnth)

DECLARE @lastDayCurrMnth DATETIME = Dateadd(dd, -1, @firstDayNextMnth)

DECLARE @lastDayNextMnth DATETIME = Dateadd(dd, -1, @firstDayNextMnth)

DECLARE @lastDayPrevMnth DATETIME = Dateadd(dd, -1, @firstDayCurrMnth)
Conditions on aggregates in SQL
You cannot apply a where condition to an aggregate in SQL. For example, this does not work:
SELECT CustID, SUM(OrderAmt)
FROM Orders
GROUP BY CustID
WHERE SUM(OrderAmt) > 100  -- Doesn't work
There are a couple of ways to deal with this.
First, there’s the having clause, which specifically handles this requirement:
SELECT CustID, SUM(OrderAmt)
FROM Orders
GROUP BY CustID
HAVING SUM(OrderAmt) > 100
If the having clause doesn’t work for you, or you’d just prefer not to use it, you can also do some nested selecting and accomplish the same thing:
SELECT * FROM (
  SELECT CustID, SUM(OrderAmt) AS OrderSum
  FROM Orders
  GROUP BY CustID
) AS OrderGrp
WHERE OrderGrp.OrderSum > 100
Find Duplicate Rows By Specific Columns
Consider a table, MyTable, with four columns: KeyCol, NameCol, IsActive, RowVersion. If you wanted to find all rows where NameCol and IsActive have the same values, you could do it as follows:
SELECT * FROM
 (SELECT NameCol, IsActive, COUNT(*) AS DupCount
 FROM MyTable
 GROUP BY NameCol,IsActive) AS ResultSet
WHERE ResultSet.DupCount > 1
MySQL command line – quick tips
From Bash
Login (localhost access)
mysql -u <userid> -p
From the MySQL command prompt
List all databases on the current server
mysql> show databases;
Switch to a database
mysql> use <db name>;
Show all tables in the currently selected database
mysql> show tables;
View a table’s schema
mysql> describe <table name>;
Issue a select statement (example)
mysql> select * from <table name>;
Limit number of rows returned in a select
Note
TOP doesn’t work in MySQL…
mysql> select * from <table name> limit 0,10;
SQL Server in Linux
Installation
Server Control
Check status of SQL Server Service:
systemctl status mssql-server
Stop the SQL Server Service:
sudo systemctl stop mssql-server
Start the SQL Server Service:
sudo systemctl start mssql-server
Restart the SQL Server Service:
sudo systemctl restart mssql-server
Disable the SQL Server Service:
sudo systemctl stop mssql-server

sudo systemctl disable mssql-server
Enable the SQL Server Service:
sudo systemctl enable mssql-server

sudo systemctl start mssql-server
(You can get a script to simplify these commands here.)
Log Files
| Type | Location |
|---|---|
| SQL Server engine | /var/opt/mssql/log/errorlog |
| Installer | /var/opt/mssql/setup-< time stamp representing time of install> |
Log files are UTF-16 encoded. If needed (e.g., for ‘more’ or ‘less’ commands), you can encode in UTF-8 as follows:
sudo iconv –f UTF-16LE –t UTF-8 <errorlog> -o <output errorlog file>
SQL Transaction Template
BEGIN TRY
   BEGIN TRANSACTION

   -- Do stuff

   COMMIT
END TRY
BEGIN CATCH
   PRINT '[ERROR] ' + ERROR_MESSAGE();
   PRINT '[SEVERITY] ' + CAST(ERROR_SEVERITY() AS VARCHAR);
   PRINT '[STATE] ' + CAST(ERROR_STATE() AS VARCHAR);

   ROLLBACK
END CATCH
Safe Way to Test
BEGIN TRY
   BEGIN TRANSACTION

   -- 1. SELECT statement to check the "pre" state.

   -- 2. UPDATE to make the change.

   -- 3. SELECT statement to check the "post" state.

   ROLLBACK -- Change back to a COMMIT when you're ready for production.
END TRY
BEGIN CATCH
   PRINT '[ERROR] ' + ERROR_MESSAGE();
   PRINT '[SEVERITY] ' + CAST(ERROR_SEVERITY() AS VARCHAR);
   PRINT '[STATE] ' + CAST(ERROR_STATE() AS VARCHAR);

   ROLLBACK
END CATCH
Docker
Docker In Linux
Tested in Ubuntu.
Installation
This is a summarization of the full article found here.
I usually add a repo to the package manager for stuff like this, but I decided to use a standalone .deb file this time.
Since Linux Mint 19 is built on Ubuntu 18.04 (Bionic Beaver), I downloaded the latest .deb file from here.
After installation, the Docker daemon starts automatically.
Tip
If you don’t want to require ‘sudo’ with every docker command, add your userid to the ‘docker’ group.
Verify the Docker installation with the following command:
sudo docker run hello-world
If the Docker installation is valid, the hello-world image will be downloaded from Docker Hub, and will run. It will print out an informational message similar to this:

Hello from Docker!
This message shows that your installation appears to be working correctly.

To generate this message, Docker took the following steps:
 1. The Docker client contacted the Docker daemon.
 2. The Docker daemon pulled the "hello-world" image from the Docker Hub.
    (amd64)
 3. The Docker daemon created a new container from that image which runs the
    executable that produces the output you are currently reading.
 4. The Docker daemon streamed that output to the Docker client, which sent it
    to your terminal.

To try something more ambitious, you can run an Ubuntu container with:
 $ docker run -it ubuntu bash

Share images, automate workflows, and more with a free Docker ID:
 https://hub.docker.com/

For more examples and ideas, visit:
 https://docs.docker.com/engine/userguide/
…and then exit.
Manage Containers
You can display a list of all your installed images and their associated containers with this command:
sudo docker ps -a
The results list will look something like this:
| CONTAINER ID | IMAGE | COMMAND | CREATED | STATUS | PORTS | NAMES |
|---|---|---|---|---|---|---|
| 3467bc449fe9 | hello-world | “/hello” | 24 hours ago | Exited (0) 24 hours ago | friendly_haibt | |
| 890e2533976a | hello-world | “/hello” | 25 hours ago | Exited (0) 25 hours ago | angry_agnesi |
If you’d like to remove a container, use the docker rm command. For example, if I wanted to remove the friendly_haibt container for the hello-world image, I’d do this:
sudo docker rm friendly_haibt
Then, when I run the docker ps command again, I’ll see this:
| CONTAINER ID | IMAGE | COMMAND | CREATED | STATUS | PORTS | NAMES |
|---|---|---|---|---|---|---|
| 890e2533976a | hello-world | “/hello” | 25 hours ago | Exited (0) 25 hours ago | angry_agnesi |
Important
After you remove a persistent container, all data associated with the container is also removed, and is not recoverable. Be careful!
Dump log file for a container:
sudo docker log <container-name>
Stop a running container:
sudo docker stop <container-name>
Restart a stopped container:
sudo docker restart <container-name>
Example: BusyBox container
A very simple example using BusyBox UNIX tools:
sudo docker run -it --rm busybox
This command drops you into a sh shell in a BusyBox environment, and the container is automatically removed when you exit.
Helper Script For Container Examples
#!/usr/bin/python3

import os
import sys

class CDockerMgr:
    dockerCmd = 'sudo docker'

    def __init__(self):
        pass

    def ExecuteBaseCommand(self, currentCommand):
        if currentCommand == 'status':
            self.ExecDocker("ps -a")
        else:
            self.ShowHelp()

    def ExecuteContainerCommand(self, currentContainer, currentCommand):
        if currentContainer == 'sql1':
            if currentCommand == 'start':
                self.ExecDocker("restart {0}".format(currentContainer))
            elif currentCommand == 'stop':
                self.ExecDocker("stop {0}".format(currentContainer))
            elif currentCommand == 'bash':
                self.ExecDocker("exec -it {0} 'bash'".format(currentContainer))
            else:
                self.ShowHelp()
        elif currentContainer == 'busybox':
            if currentCommand == 'run':
                self.ExecDocker("run -it --rm {0}".format(currentContainer))
            else:
                self.ShowHelp()
        else:
            self.ShowHelp()

    def ExecDocker(self, args):
        fullCmd = "{0} {1}".format(self.dockerCmd, args)
        os.system(fullCmd)
        exit(0)

    def ShowHelp(self):
        print("USAGE:")
        print("\tdockit <container> <command>")
        print("")
        print("Valid containers and commands:")
        print("\tstatus")
        print("\tsql1")
        print("\t\tstart")
        print("\t\tstop")
        print("\t\tbash")
        print("\tbusybox")
        print("\t\trun")

        exit(0)

myDockerMgr = CDockerMgr()

if len(sys.argv) == 2:
    myDockerMgr.ExecuteBaseCommand(sys.argv[1])
elif len(sys.argv) == 3:
    myDockerMgr.ExecuteContainerCommand(sys.argv[1], sys.argv[2])
else:
    myDockerMgr.ShowHelp()
MongoDB Quick Start in Docker
These instructions configure a server instance named mongo-test, running MongoDB version 4.4.0 in a basic Ubuntu Bionic image. My host machine is running Ubuntu. I’m assuming you’ve already installed Docker. If not, you might want to check out this article.
Tip
You’ll probably need to sudo your docker commands.
Basics
Start a server instance:
docker run -p 27017:27017 --name mongo-test -d mongo:4.4.0-bionic
Important
The port mapping (-p 27017:27017) is important. It allows you to connect to the running instance from your host machine.
A running instance can stopped with this:
docker stop mongo-test
And then started (or restarted) with this:
docker restart mongo-test
Open a bash shell in the running instance:
docker exec -it mongo-test bash
View MongoDB log files for the running instance:
docker logs mongo-test
Running Mongo Shell
You can run an interactive Mongo Shell a couple of ways.
Inside the running instance
First, open a bash shell inside the instance:
docker exec -it mongo-test bash
Then, run Mongo Shell:
mongo
From the host machine
First, install the MongoDB client tools:
sudo apt install mongodb-clients
Then, you can do this:
mongo --host localhost
Using Mongo Shell
List Databases
> show dbs
admin   0.000GB
config  0.000GB
local   0.000GB
Use Database
MongoDB doesn’t provide an explicit command for creating databases. A database will automatically be created the first time you try to use it (and add data).
Use a database called ‘testdb’:
> use testdb
switched to db testdb
In its simplest form, a database in MongoDB consists of two items:
- A document, which contains data, and,
- A collection, which is a container of documents.
A document is a data structure composed of field and value pairs. It’s a JSON object that MongoDB stores on disk in binary (BSON) format.
Drop Database
If you need to drop a database that’s already been created, you switch to it (‘use’), then issue a dropDatabase command:
> show dbs
admin   0.000GB
config  0.000GB
local   0.000GB
testdb  0.000GB

> use testdb
switched to db testdb

> db.dropDatabase()
{ "dropped" : "testdb", "ok" : 1 }

> show dbs
admin   0.000GB
config  0.000GB
local   0.000GB
Add Data
Let’s add some data documents to testdb, in a collection called ‘people’:
> use testdb
switched to db testdb

> db.people.insert( {firstName: 'John', lastName: 'Smith'} )
WriteResult({ "nInserted" : 1 })

> db.people.insert( {firstName: 'Bob', lastName: 'Jones'} )
WriteResult({ "nInserted" : 1 })

> db.people.find()
{ "_id" : ObjectId("5f4bc4dd54e2c67896143097"), "firstName" : "John", "lastName" : "Smith" }
{ "_id" : ObjectId("5f4bc4e354e2c67896143098"), "firstName" : "Bob", "lastName" : "Jones" }
The data in the insert commands is formatted as JSON, but quotes around key names are not required, and data can be single-quoted:
{
  firstName: 'John',
  lastName: 'Smith'
}
Update Data
To modify existing data, you pass two sets of data to update(): a filter, and an update action. The filter locates the document, and the update action specifies the data to modify.
In this example, we’ll change the “Bob Jones” record to “Robert Jones”:
> db.people.find()
{ "_id" : ObjectId("5f4bc4dd54e2c67896143097"), "firstName" : "John", "lastName" : "Smith" }
{ "_id" : ObjectId("5f4bc4e354e2c67896143098"), "firstName" : "Bob", "lastName" : "Jones" }

> db.people.update({ firstName: "Bob", lastName: "Jones" }, { $set: {firstName: "Robert" } } )
WriteResult({ "nMatched" : 1, "nUpserted" : 0, "nModified" : 1 })

> db.people.find()
{ "_id" : ObjectId("5f4bc4dd54e2c67896143097"), "firstName" : "John", "lastName" : "Smith" }
{ "_id" : ObjectId("5f4bc4e354e2c67896143098"), "firstName" : "Robert", "lastName" : "Jones" }
Remove Data
To remove data, you pass a filter to remove(), specifying the document (or documents) you want to remove.
In this example, we’ll add a new document to the people collection, and then remove it.
> db.people.insert( { firstName: "To", lastName: "Remove" } )
WriteResult({ "nInserted" : 1 })

> db.people.find()
{ "_id" : ObjectId("5f4bc4dd54e2c67896143097"), "firstName" : "John", "lastName" : "Smith" }
{ "_id" : ObjectId("5f4bc4e354e2c67896143098"), "firstName" : "Robert", "lastName" : "Jones" }
{ "_id" : ObjectId("5f4bf7595402b299ee512fd8"), "firstName" : "To", "lastName" : "Remove" }

> db.people.remove( { firstName: "To", lastName: "Remove"} )
WriteResult({ "nRemoved" : 1 })

> db.people.find()
{ "_id" : ObjectId("5f4bc4dd54e2c67896143097"), "firstName" : "John", "lastName" : "Smith" }
{ "_id" : ObjectId("5f4bc4e354e2c67896143098"), "firstName" : "Robert", "lastName" : "Jones" }
Managing Collections
To see the collections in a database:
> use testdb
switched to db testdb

> show collections
people
You can also use getCollectionNames(), which returns results as BSON:
> db.getCollectionNames()
[ "people" ]
Add a collection explicitly with createCollection:
> show collections
people

> db.createCollection("things")
{ "ok" : 1 }

> show collections
people
things
Drop a collection:
> show collections
people
things

> db.things.drop()
true

> show collections
people
Count of documents in a collection:
> db.people.count()
2
Retrieving Data
We’ve already employed a simple find in our add/update/delete examples: db.<collection_name>.find().
Find also accepts two optional parameters:
- Query filter: Describes how to filter the results, similar to a WHERE clause in SQL.
- Projection: Specifies which key/values from the document we want to see.
A find with no arguments retrieves up to the first 20 documents in a collection:
> db.people.find()
{ "_id" : ObjectId("5f4bc4dd54e2c67896143097"), "firstName" : "John", "lastName" : "Smith" }
{ "_id" : ObjectId("5f4bc4e354e2c67896143098"), "firstName" : "Robert", "lastName" : "Jones" }
A filter with an exact match on one key looks like this:
> db.people.find( {firstName: "John"} )
{ "_id" : ObjectId("5f4bc4dd54e2c67896143097"), "firstName" : "John", "lastName" : "Smith" }
Matching on multiple keys, similar to an AND in a SQL WHERE clause, looks like this:
> db.people.find(
... {
... $and: [
... { firstName: "John" },
... { lastName: "Smith" }
... ]
... });
{ "_id" : ObjectId("5f4bc4dd54e2c67896143097"), "firstName" : "John", "lastName" : "Smith" }
MongoDB supports the following query comparison operators: $eq, $gt, $gte, $lt, $lte, $ne, $in, and $nin, along with the following logical operators: $or, $and, $not, and $nor. Regex is also supported.
Projections can be used to limit the keys returned. For example, here’s how to return just the last names:
> db.people.find( { }, { _id: 0, lastName: 1 } );
{ "lastName" : "Smith" }
{ "lastName" : "Jones" }
The numeric values indicate whether to include (1) or exclude (0) a given field. The _id field is always returned, unless specifically excluded.
Results can also be sorted:
> db.people.find( { }, { } ).sort( { lastName: 1 });
{ "_id" : ObjectId("5f4bc4e354e2c67896143098"), "firstName" : "Robert", "lastName" : "Jones" }
{ "_id" : ObjectId("5f4bc4dd54e2c67896143097"), "firstName" : "John", "lastName" : "Smith" }
The numeric value controls whether to sort ascending (1) or descending (-1).
For large result sets, the number of results to return can be specified:
> db.people.find( { }, { } ).limit( 1 );
{ "_id" : ObjectId("5f4bc4dd54e2c67896143097"), "firstName" : "John", "lastName" : "Smith" }
MongoDB in .NET (C#)
Data in MongoDB can be accessed and manipulated in .NET (Standard and Core) applications using MongoDB.Driver. This is a simple introduction to connecting to MongoDB, retrieving data, and displaying it.
Create a .NET Core console application:
dotnet new console -o DotMongo
Add a reference to MongoDB.Driver:
cd DotMongo

dotnet add package MongoDB.Driver --version 2.11.1
Open Program.cs in your editor of choice, and replace the contents with this:
using System;
using MongoDB.Driver;
using MongoDB.Bson;

namespace DotMongo
{
    class Program
    {
        static void Main(string[] args)
        {
            try
            {
                var databaseName = "testdb";

                // Get database reference.
                var mongoDatabase = GetDatabaseReference("localhost", 27017, databaseName);
                Console.WriteLine($"Connected to database {databaseName}");

                // Get a reference to the "people" collection inside testdb.
                var collection = mongoDatabase.GetCollection<BsonDocument>("people");

                // We're retrieving all documents in the collection,
                // but we still need an empty filter.
                var filter = new BsonDocument();
                var count = 0;

                // Open a cursor with all the matching documents.
                using (var cursor = collection.FindSync<BsonDocument>(filter))
                {
                    // Iterate through the cursor
                    while (cursor.MoveNext())
                    {
                        // Get documents at the current cursor location.
                        var batch = cursor.Current;

                        foreach (var document in batch)
                        {
                            // Get values from the current document, then display them.
                            var firstName = document.GetElement("firstName").Value.ToString();
                            var lastName = document.GetElement("lastName").Value.ToString();

                            Console.WriteLine($"Full name: {firstName} {lastName}");
                            count++;
                        }
                    }
                }
                Console.WriteLine($"Total records: {count}");

            }
            catch (Exception ex)
            {
                Console.WriteLine(ex.Message);
            }
        }

        public static IMongoDatabase GetDatabaseReference(string hostName, int portNumber, string databaseName)
        {
            string connectionString = $"mongodb://{hostName}:{portNumber}";

            // Connect to MongoDB
            var mongoClient = new MongoClient(connectionString);

            // Get a reference to the specified database
            var mongoDatabase = mongoClient.GetDatabase(databaseName);

            return mongoDatabase;
        }


    }
}
Run the application:
dotnet run
You should see output that looks like this:
Connected to database testdb
Full name: John Smith
Full name: Robert Jones
Total records: 2
You can find the full project here.
Learn More
MVS Turnkey in Docker
Assumes that you already have Docker installed and running. If you don’t, you can find instructions here.
Depending on your configuration, you may have to sudo your docker commands.
Pull Ubuntu Image
Pull the latest Ubuntu image:
docker pull ubuntu
Verify image:
docker image list
Results should look something like this:
REPOSITORY   TAG       IMAGE ID       CREATED      SIZE
ubuntu       latest    597ce1600cf4   6 days ago   72.8MB
Create Container / Start a Shell
Create a container in the ubuntu image, and start a shell:
docker run --interactive --tty --name mvs_container ubuntu /bin/bash
(You can use any name you like. mvs_container is just an example.)
Get IP Address
Update your package list, install net-tools, run ifconfig, and note your IP address (you’ll need it later):
apt update

apt install net-tools

ifconfig
Retrieve the MVS Turnkey Archive
Change to /root, create a downloads directory, install wget, and retrieve the turnkey archive:
cd /root

mkdir downloads

cd downloads

apt install wget

wget https://wotho.ethz.ch/tk4-/tk4-_v1.00_current.zip
Install and Run MVS
Change to the /opt directory, create a mvs directory, install unzip, and then extract the turnkey archive into the mvs directory:
cd /opt

mkdir mvs

cd mvs

apt install unzip

unzip /root/downloads/tk4-_v1.00_current.zip
Turn on console mode:
cd unattended

./set_console_mode

cd ..
Start MVS:
./mvs
When the startup is complete:
You can open an instance of the x3270 terminal emulator, and connect to the running instance using the IP address you noted earlier. Detailed MVS operations instructions can be found here. (Just note that these instructions are for running on the Raspberry Pi, so adapt accordingly.)
After you complete your session and exit the container, you can return to it later:
docker start --interactive mvs_container
RabbitMQ in Docker
Supporting repo is here. (Includes a Celery example)
If you don’t already have Docker installed, you can find instructions here.
Setup and Run
Pull the RabbitMQ docker container:
docker pull rabbitmq
Startup for RabbitMQ docker container:
sudo docker run -d --hostname my-rabbit --name some-rabbit -p 5672:5672 rabbitmq:3
The port mapping (5672:5672) is not included in the instructions on Docker Hub, but it’s required for the Python send/receive scripts to work.
Simple Test in Python
You’ll need to install the Pika library before you run the send/receive scripts:
sudo pip3 install pika --upgrade
Python script to send a message:
send.py
#!/usr/bin/env python3
import pika

connection = pika.BlockingConnection(pika.ConnectionParameters('localhost'))
channel = connection.channel()

channel.queue_declare(queue='hello')

channel.basic_publish(exchange='', routing_key='hello', body='Hello World!')
print(" [x] Sent 'Hello World!'")
connection.close()
Python script to receive messages:
receive.py
#!/usr/bin/env python3
import pika

connection = pika.BlockingConnection(pika.ConnectionParameters('localhost'))
channel = connection.channel()

channel.queue_declare(queue='hello')

def callback(ch, method, properties, body):
    print(" [x] Received %r" % body)

channel.basic_consume(queue='hello', on_message_callback=callback, auto_ack=True)

print(' [*] Waiting for messages. To exit press CTRL+C')
channel.start_consuming()
Simple Test in Go
First, install amqp using go get:
go get github.com/streadway/amqp
Then, use this to send a message:
send.go
package main

import (
    "log"

    "github.com/streadway/amqp"
)

func failOnError(err error, msg string) {
    if err != nil {
        log.Fatalf("%s: %s", msg, err)
    }
}

func main() {
    conn, err := amqp.Dial("amqp://guest:guest@localhost:5672/")
    failOnError(err, "Failed to connect to RabbitMQ")
    defer conn.Close()

    ch, err := conn.Channel()
    failOnError(err, "Failed to open a channel")
    defer ch.Close()

    q, err := ch.QueueDeclare(
        "hello", // name
        false,   // durable
        false,   // delete when unused
        false,   // exclusive
        false,   // no-wait
        nil,     // arguments
    )
    failOnError(err, "Failed to declare a queue")

    body := "Hello World!"
    err = ch.Publish(
        "",     // exchange
        q.Name, // routing key
        false,  // mandatory
        false,  // immediate
        amqp.Publishing{
            ContentType: "text/plain",
            Body:        []byte(body),
        })
    log.Printf(" [x] Sent %s", body)
    failOnError(err, "Failed to publish a message")
}
And use this to receive messages:
receive.go
package main

import (
    "log"

    "github.com/streadway/amqp"
)

func failOnError(err error, msg string) {
    if err != nil {
        log.Fatalf("%s: %s", msg, err)
    }
}

func main() {
    conn, err := amqp.Dial("amqp://guest:guest@localhost:5672/")
    failOnError(err, "Failed to connect to RabbitMQ")
    defer conn.Close()

    ch, err := conn.Channel()
    failOnError(err, "Failed to open a channel")
    defer ch.Close()

    q, err := ch.QueueDeclare(
        "hello", // name
        false,   // durable
        false,   // delete when unused
        false,   // exclusive
        false,   // no-wait
        nil,     // arguments
    )
    failOnError(err, "Failed to declare a queue")

    msgs, err := ch.Consume(
        q.Name, // queue
        "",     // consumer
        true,   // auto-ack
        false,  // exclusive
        false,  // no-local
        false,  // no-wait
        nil,    // args
    )
    failOnError(err, "Failed to register a consumer")

    forever := make(chan bool)

    go func() {
        for d := range msgs {
            log.Printf("Received a message: %s", d.Body)
        }
    }()

    log.Printf(" [*] Waiting for messages. To exit press CTRL+C")
    <-forever
}
SQL Server in Docker
This is a summarization of the full article found here.
Setup
Get the SQL Server 2017 image from Docker Hub:
sudo docker pull mcr.microsoft.com/mssql/server:2017-latest
Start up the container image, and init SQL Server setup:
sudo docker run -e "ACCEPT_EULA=Y" -e "MSSQL_SA_PASSWORD=<YourStrong@Passw0rd>" \
   -p 1433:1433 --name sql1 --hostname sql1 \
   -d \
   mcr.microsoft.com/mssql/server:2017-latest
Important
The password must follow SQL Server default password policy, or the setup will fail: at least 8 characters long, containing characters from three of the following four sets: Uppercase letters, Lowercase letters, Base 10 digits, and Symbols.
Note
By default, this creates a container with the Developer edition of SQL Server 2017.
Detailed description of parameters from the previous example:
| Parameter | Description |
|---|---|
| -e ‘ACCEPT_EULA=Y’ | Set the ACCEPT_EULA variable to any value to confirm your acceptance of the End-User Licensing Agreement. Required setting for the SQL Server image. |
| -e ‘MSSQL_SA_PASSWORD=’ | Specify your own strong password that is at least 8 characters and meets the SQL Server password requirements. Required setting for the SQL Server image. |
| -p 1433:1433 | Map a TCP port on the host environment (first value) with a TCP port in the container (second value). In this example, SQL Server is listening on TCP 1433 in the container and this is exposed to the port, 1433, on the host. |
| –name sql1 | Specify a custom name for the container rather than a randomly generated one. If you run more than one container, you cannot reuse this same name. |
| microsoft/mssql-server-linux:2017-latest | The SQL Server 2017 Linux container image. |
Check the status of your Docker containers:
sudo docker ps -a
Change the SA password
After initial setup, the MSSQL_SA_PASSWORD environment variable you specified is discoverable by running echo $MSSQL_SA_PASSWORD in the container. For security purposes, change your SA password.
Use docker exec to run sqlcmd to change the password using Transact-SQL.
sudo docker exec -it sql1 /opt/mssql-tools/bin/sqlcmd \
-S localhost -U SA \
 -P "$(read -sp "Enter current SA password: "; echo "${REPLY}")" \
 -Q "ALTER LOGIN SA WITH PASSWORD=\"$(read -sp "Enter new SA password: "; echo "${REPLY}")\""
Connect to SQL Server
Start an interactive bash shell inside your running container. In the following example sql1 is name specified by the –name parameter when you created the container.
sudo docker exec -it sql1 "bash"
Once inside the container, connect locally with sqlcmd. Sqlcmd is not in the path by default, so you have to specify the full path.
/opt/mssql-tools/bin/sqlcmd -S localhost -U SA -P '<YourNewStrong!Passw0rd>'
After running SqlCmd, you can do normal database stuff: create databases, query data, etc.
Connect from outside the container
You can also connect to the SQL Server instance on your Docker machine from any external Linux, Windows, or macOS tool that supports SQL connections.
The following steps use sqlcmd outside of your container to connect to SQL Server running in the container. These steps assume that you already have the SQL Server command-line tools installed outside of your container. The same principals apply when using other tools, but the process of connecting is unique to each tool.
Find the IP address for the machine that hosts your container. On Linux, use ifconfig or ip addr. On Windows, use ipconfig.
Run sqlcmd specifying the IP address and the port mapped to port 1433 in your container. In this example, that is the same port, 1433, on the host machine. If you specified a different mapped port on the host machine, you would use it here.
sqlcmd -S <ip_address>,1433 -U SA -P '<YourNewStrong!Passw0rd>'
Embedded and IoT
.NET IoT
.NET Internet of Things (IoT) applications
Develop apps for IoT devices with the .NET IoT Libraries
dotnet/iot - This repo includes .NET Core implementations for various IoT boards, chips, displays and PCBs.
Process real-time IoT data streams with Azure Stream Analytics
Knowledge Base
Simple Raspberry Pi Control With .NET IoT and Python
Specific Devices
Quickstart - Use .NET to drive a Raspberry Pi Sense HAT
6502 Programming in C
What is the 6502?

From Wikipedia:
The MOS Technology 6502 (typically pronounced “sixty-five-oh-two”) is an 8-bit microprocessor that was designed by a small team led by Chuck Peddle for MOS Technology. The design team had formerly worked at Motorola on the Motorola 6800 project; the 6502 is essentially a simplified, less expensive and faster version of that design.
When it was introduced in 1975, the 6502 was the least expensive microprocessor on the market by a considerable margin. It initially sold for less than one-sixth the cost of competing designs from larger companies, such as the 6800 or Intel 8080. Its introduction caused rapid decreases in pricing across the entire processor market. Along with the Zilog Z80, it sparked a series of projects that resulted in the home computer revolution of the early 1980s.
Popular video game consoles and home computers of the 1980s and early 1990s, such as the Atari 2600, Atari 8-bit computers, Apple II, Nintendo Entertainment System, Commodore 64, Atari Lynx, BBC Micro and others, use the 6502 or variations of the basic design. Soon after the 6502’s introduction, MOS Technology was purchased outright by Commodore International, who continued to sell the microprocessor and licenses to other manufacturers. In the early days of the 6502, it was second-sourced by Rockwell and Synertek, and later licensed to other companies.
In 1981, the Western Design Center started development of a CMOS version, the 65C02. This continues to be widely used in embedded systems, with estimated production volumes in the hundreds of millions.
Installation
This assumes a Debian-based system.
sudo apt install cc65 cc65-doc
The following programs are installed (descriptions taken from https://cc65.github.io/doc/):
| Program | Description |
|---|---|
| ar65 | Archiver for object files generated by ca65. It allows to create archives, add or remove modules from archives, and to extract modules from existing archives. |
| ca65 | Macro assembler for the 6502, 65C02, and 65816 CPUs. It is used as a companion assembler for the cc65 crosscompiler, but it may also be used as a standalone product. |
| cc65 | C compiler for 6502 targets. It supports several 6502-based home computers such as the Commodore and Atari machines, but it easily is retargetable. |
| chrcvt65 | Vector font converter. It is able to convert a foreign font into the native format. |
| cl65 | Compile & link utility for cc65, the 6502 C compiler. It was designed as a smart frontend for the C compiler (cc65), the assembler (ca65), the object file converter (co65), and the linker (ld65). |
| co65 | Object file conversion utility. It converts o65 object files into the native object file format used by the cc65 tool chain. Since o65 is the file format used by cc65 for loadable drivers, the co65 utility allows (among other things) to link drivers statically to the generated executables instead of loading them from disk. |
| da65 | 6502/65C02 disassembler that is able to read user-supplied information about its input data, for better results. The output is ready for feeding into ca65, the macro assembler supplied with the cc65 C compiler. |
| grc65 | A compiler that can create GEOS headers and menus for cc65-compiled programs. |
| ld65 | The linker combines object files into an executable file. ld65 is highly configurable and uses configuration files for high flexibility. |
| od65 | Object file dump utility. It is able to output most parts of ca65-generated object files in readable form. |
| sim65 | Simulator for 6502 and 65C02 CPUs. It allows to test target independent code. |
| sp65 | Sprite and bitmap utility that is part of the cc65 development suite. It is used to convert graphics and bitmaps into the target formats of the supported machines. |
Get Started
Of course we’ll start with the ubiquitous “Hello, world”.
hello.c
#include <stdio.h>

int main()
{
    printf("Hello, world!\n");

    return(0);
}
Native
We can target our native platform (Linux) using the gcc compiler we’re already familiar with:
gcc hello.c -o hello
This gives us the following binary output:
hello ELF 64-bit LSB pie executable
6502
To target the 6502 processor, we use cl65 instead:
cl65 hello.c
This produces two output files:
hello.o   xo65 object
hello     Commodore 64 program
The default target is Commodore 64, but you can specify a different platform with the -t argument. The Apple II, for example:
cl65 -t apple2 hello.c
Output:
hello AppleSingle encoded Macintosh file
To see all of the available platforms, use –list-targets:
cl65 --list-targets
Testing
If you want to test your binary, use sim6502 as your target:
cl65 --target sim6502 hello.c
hello sim65 executable, version 2, 6502
Test using sim65:
sim65 hello
Hello, world!
You can get some additional info with the -v (verbose) argument:
sim65 -v hello
Loaded 'hello' at $0200-$0AE6
File version: 2
Reset: $0200
Hello, world!
PVExit ($00)
Detailed Example
The compile and link utility (cl65) simplifies the process of building a binary by combining multiple build steps into one. For this section, we’ll perform those steps individually.
We’ll start with another “Hello world!” example, but with a few tweaks to the hello.c source:
hello.c
#include <stdio.h>

extern const char text[];

int main() {
    printf("%s\n", text);

    return (0);
}
You’ll notice that our “Hello world!” text doesn’t appear in the source. Instead, we have a const char text[] declaration. The extern qualifier is a hint: We’ll actually define our text in a separate assembly file:
text.s
.export _text
_text:  .asciiz "Hello world!"
With both files in place, we’re ready to compile using cc65. I’m targeting Commodore 64 and I’ve also added a -O argument to optimize the output:
cc65 -O -t c64 hello.c
This will generate a hello.s assembly file:
hello.s
;
; File generated by cc65 v 2.18 - Ubuntu 2.19-1
;
    .fopt		compiler,"cc65 v 2.18 - Ubuntu 2.19-1"
    .setcpu		"6502"
    .smart		on
    .autoimport	on
    .case		on
    .debuginfo	off
    .importzp	sp, sreg, regsave, regbank
    .importzp	tmp1, tmp2, tmp3, tmp4, ptr1, ptr2, ptr3, ptr4
    .macpack	longbranch
    .forceimport	__STARTUP__
    .import		_printf
    .import		_text
    .export		_main

.segment	"RODATA"

L0003:
    .byte	$25,$53,$0D,$00

; ---------------------------------------------------------------
; int __near__ main (void)
; ---------------------------------------------------------------

.segment	"CODE"

.proc	_main: near

.segment	"CODE"

    lda     #<(L0003)
    ldx     #>(L0003)
    jsr     pushax
    lda     #<(_text)
    ldx     #>(_text)
    jsr     pushax
    ldy     #$04
    jsr     _printf
    ldx     #$00
    txa
    rts

.endproc
Now we can take our two assembly files (the one we created from scratch, and the one we generated) and build object files from them using the macro assembler:
ca65 hello.s
ca65 -t c64 text.s
hello.o    xo65 object, version 17, no debug info
text.o     xo65 object, version 17, no debug info
Finally, we use the linker to create our executable:
ld65 -o hello -t c64 hello.o text.o c64.lib
hello Commodore C64 program
Makefile
Here’s a Makefile, if you’d like to simplify those steps:
Makefile
TARGET = c64

COMPILER = cc65
ASSEMBLER = ca65
LINKER = ld65

default:
    @echo 'Targets:'
    @echo '  build'
    @echo '  clean'

build: hello

hello: hello.o text.o
    $(LINKER) -o hello -t $(TARGET) hello.o text.o $(TARGET).lib

hello.o: hello.s
    $(ASSEMBLER) hello.s

text.o: text.s
    $(ASSEMBLER) -t $(TARGET) text.s

hello.s: hello.c
    $(COMPILER) -O -t $(TARGET) hello.c

clean:
    @rm -f hello.s
    @rm -f *.o
    @rm -f hello
Testing
The 8-bit Workshop IDE provides a quick and easy way to test your binary.
- Go to https://8bitworkshop.com/
- Click the “Open 8bitworkshop IDE” button.
- Open the systems dropdown list in the upper-left corner of the screen and select “Computers”, “Commodore 64”
- Click the menu button next to the systems dropdown and select “Upload”.
- Browse to your hello binary and click “Open”.
- The IDE will ask if you’d like to open ‘hello’ as your main project file. Click “Open As New Project”.
The binary will be loaded and you should see output similar to this:
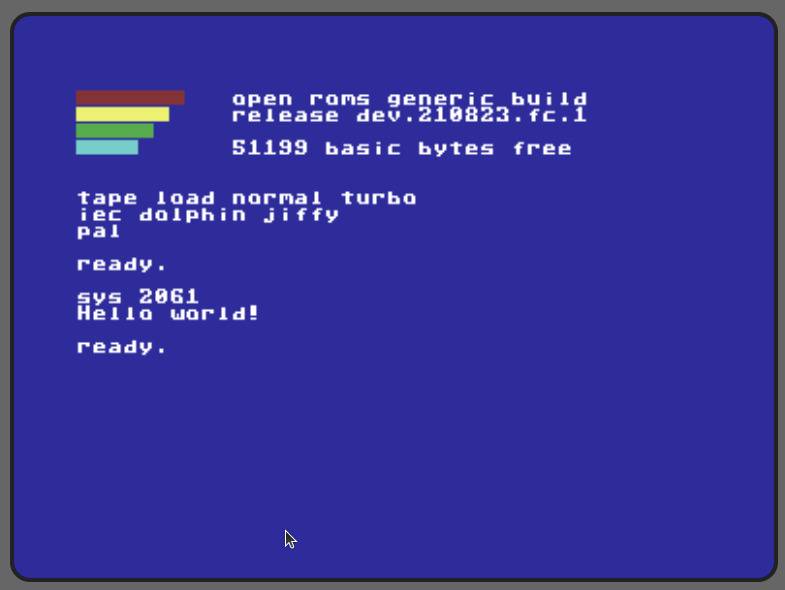
Next Steps
If you’d like to learn more, here are some sites to visit:
- The cc65 repo has lots of sample code.
- The cc65 website has a lot of information, including links to detailed documentation and the repo wiki.
- 8bitworkshop is a treasure trove of information about programming for old systems, including books and an online IDE where you can write code and see it emulated in real-time.
Arduino / Raspberry Pi Remote Sensor
This project will provide an introduction to the concept of the “Internet_of_Things”.
Technopedia defines Internet of Things as:
…a computing concept that describes a future where everyday physical objects will be connected to the Internet and be able to identify themselves to other devices. The term is closely identified with RFID as the method of communication, although it also may include other sensor technologies, wireless technologies or QR codes.
The IoT is significant because an object that can represent itself digitally becomes something greater than the object by itself. No longer does the object relate just to you, but is now connected to surrounding objects and database data. When many objects act in unison, they are known as having “ambient intelligence.”
Specifically, we will program a device to provide temperature data, and then make that data publicly available on the web.
(If you’d like to save some time typing in scripts, you can download them here.)
Architecture
Our component architecture will be as follows:
- The physical layer will be used to capture the temperature data. We will implement this using an Arduino Uno board and a temperature sensor.
- The coordination layer will be used to capture the temperature measurements from the physical layer and for sending the measurements to our application. This will be implemented using Node.js running on a Raspberry Pi. We will also use the Raspberry Pi as a development platform for the Arduino.
- The application layer will be used to visualize the measurements in real-time. This will be implemented using a data visualization cloud service called Plotly.
Note
This guide assumes that you already have your Raspberry Pi up and running.
Required Hardware
- Raspberry Pi If you tweak the instructions a bit, it’s not difficult to use a desktop PC or laptop instead of a Raspberry Pi. (Probably easier, in fact.) I’m using a Raspberry Pi – B+, not a Raspberry 2. You can probably use a different model, I just haven’t tried it.
- Arduino with USB cable. I’m using an Arduino Uno. As with the Raspberry Pi, you can probably use a different model.
- breadboard
- TMP36 temperature sensor Similar sensors don’t necessarily report the same temperature data, so keep that in mind if you make a substitution here. For example, the TMP36 reports data in Celsius, whereas the TMP35 reports in Kelvin.
- jumper wires (5)
Arduino Configuration
Wire up the Arduino as follows:
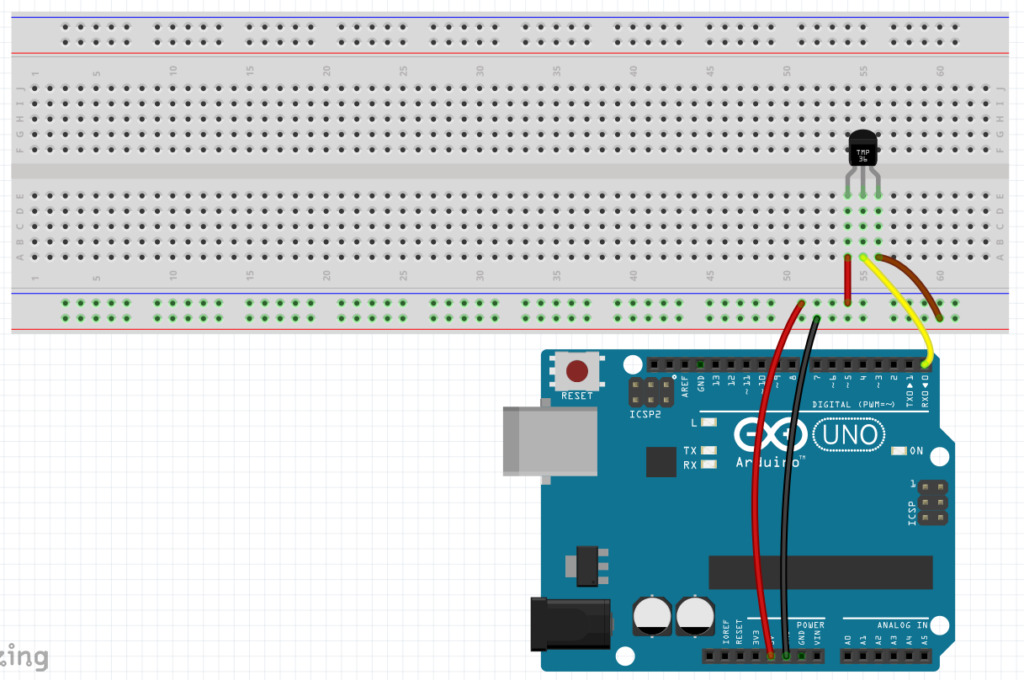
(I created this breadboard layout image in Fritzing.)
It’s a very simple setup. We provide power to the temperature sensor, and the sensor returns temperature data via digital pin 0.
Arduino IDE
To write code and upload it to the Arduino board, you’ll need the free Arduino IDE.
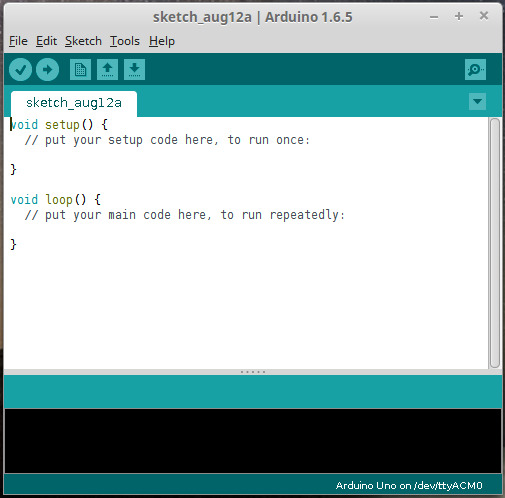
Versions are available for Windows, Mac, and Linux. Since we’re running it on the Raspberry Pi, we’ll be using the Linux version.
-
If you want the latest version, download and install it from here.
-
If using the latest version isn’t important to you (it isn’t required), you can install it from a terminal prompt using apt-get:
sudo apt-get install arduino
The Arduino IDE does have a few dependencies, and required about 80MB on my Raspberry Pi.
After you install the IDE, plug in the Arduino using the supplied USB cable, then run the IDE.
- Open the “Tools” menu, go to the “Board” section and make sure your Arduino model is selected.
- In the “Serial Port” section, make sure the serial port value is selected. Also, note the value of the serial port string. You’ll need it later. (It will look something like this: “/dev/ttyACM0”)
Processing source
Code for the Arduino is written in Processing. Processing is syntactically very similar to the C, C++, and Java languages. A code module for the Arduino is called a “sketch”.
This is the code we’ll use to get data from the temperature sensor. Type this code into the sketch editor in the Arduino IDE:
/* This is the pin getting the stream of temperature data. */
#define sensorPin 0

float Celsius, Fahrenheit;
int sensorValue;

void setup() {
	Serial.begin(9600);  /* Initialize the Serial communications */
}

void loop() {

	GetTemp();

	Serial.println(Fahrenheit);  /* You can easily change this to print Celsius if you want. */

	delay(2000);  /* Wait 2 seconds before getting the temperature again. */
}

void GetTemp() {
	sensorValue = analogRead(sensorPin);  /* Get the current temperature from the sensor. */

	/*
	* The data from the sensor is in mV (millivolts), where 10mV = 1 degree Celsius.
	* So if, for example, you receive a value of 220 from the sensor, this indicates
	* a temperature of 22 degrees Celsius.
	*/

	Celsius = sensorValue / 10;         /* Convert the sensor value to Celsius */
	Fahrenheit = (Celsius * 1.8) + 32;  /* Convert the Celsius value to Fahrenheit */
}
After you’ve typed in this source code, click the “Verify” button in the toolbar to check the syntax. If you’ve made any mistakes, correct them before continuing.
Once the code is verified, click the “Upload” button in the toolbar to write it to the Arduino’s flash memory.
Running with serial monitor
Once the sketch has been written to the Arduino, it will start running automatically. You can check the values being received from the temperature sensor by opening the serial monitor in the Arduino IDE. To do that, click the “Serial Monitor” button on the right side of the toolbar. A console window will open up, and you should see a stream of data similar to this:
86.0
86.0
86.2
86.2
86.0
85.8
85.8
85.8
Note
You may see values lower or higher than this. (The sensor on my Arduino seems to run a little hot.)
Now that we have the Arduino supplying temperature data, the next step is to make it available on the web.
Plotly account
Plotly is an online analytics and data visualization tool. It provides online graphing, analytics, and stats tools for individuals and collaboration, as well as scientific graphing libraries for Python, R, MATLAB, Perl, Julia, Arduino, and REST.
It also has a streaming API, which we’ll use to get our data to the web.
To set up a free Plotly account, go to the Plotly home page here. After you create your account, there are three pieces of information you’ll need to remember. We’ll be using them later:
- Username
- API key
- Streaming API token
Node.js
To get our data from the Arduino to Plotly, we’ll use Node.js.
Node.js is an open source, cross-platform runtime environment for server-side and networking applications. Node.js applications are written in JavaScript and can be run within the Node.js runtime on OS X, Microsoft Windows, Linux, and a handful of other operating systems.
First, make sure your system is up-to-date. Open a terminal and issue the following command:
sudo apt-get update

sudo apt-get upgrade -y
(Probably a good idea to reboot after this.)
Then, download and install node.js:
For the wget step, the latest as of this writing seems to be http://nodejs.org/dist/v0.11.9/, but I was not able to get this version to work. I used http://nodejs.org/dist/v0.10.16/.
wget http://nodejs.org/dist/v0.10.16/node-v0.10.16-linux-arm-pi.tar.gz

tar xvfz node-v0.10.16-linux-arm-pi.tar.gz

sudo mv node-v0.10.16-linux-arm-pi /opt/node/
Important
You need to retrieve the version from nodejs.org. The version in the repository does not work, so you can’t use apt-get to install it.
Configure your path:
echo 'export PATH="$PATH:/opt/node/bin"' >> ~/.bashrc

source ~/.bashrc
Node.js project setup
Open a terminal, and create a directory for your Node.js project. Change your working directory to the new directory. Example:
mkdir temp_nodejs

cd temp_nodejs
We’ll need a couple of additional libraries for our Node.js project, serialport and plotly. Install them using the following commands in your project folder:
npm install serialport

npm install plotly
If you get a “failed to fetch from registry” error when you try to use npm install, you may need to make the following change on your Raspberry Pi:
npm config set registry http://registry.npmjs.org/
(By default, npm install uses https://registry.npmjs.org)
Now we’re ready to create the Javascript file for Node.js to execute. Use the following as a template:
var serialport = require('serialport'),
		plotly = require('plotly')('Plotly_UserName', 'Plotly_API'),
		token = 'Plotly_Token';
var portName = '/dev/tty.usbmodem1411';
var sp = new serialport.SerialPort(portName, {
	baudRate: 9600,
	dataBits: 8,
	parity: 'none',
	stopBits: 1,
	flowControl: false,
	parser: serialport.parsers.readline("\r\n")
});

// helper function to get a nicely formatted date string
function getDateString() {
	var time = new Date().getTime();
	// 32400000 is (GMT+9 Japan)
	// for your timezone just multiply +/-GMT by 36000000
	var datestr = new Date(time + 32400000).toISOString().replace(/T/, ' ').replace(/Z/, '');
	return datestr;
}

var initdata = [{x: [], y: [], stream: {token: token, maxpoints: 500}}];
var initlayout = {fileopt: "extend", filename: "ambient-fahrenheit-temperature-sensor"};

plotly.plot(initdata, initlayout, function (err, msg) {
	if (err)
		return console.log(err)

	console.log(msg);
	var stream = plotly.stream(token, function (err, res) {
		console.log(err, res);
	});

	sp.on('data', function (input) {
		if (isNaN(input) || input > 1023)
			return;

		var streamObject = JSON.stringify({x: getDateString(), y: input});
		console.log(streamObject);
		stream.write(streamObject + '\n');
	});
});
Important
Make sure you change the portName value to match the serial port value from our “Arduino IDE” step. Also, change the Plotly_UserName, Plotly_API, and Plotly_Token text to match the values from the Plotly account you opened.
Node Server
Make sure your Arduino board is plugged in, then start your Node.js server by issuing the following command:
node server.js
You should see information similar to the following:
{ streamstatus: 'All Streams Go!',
  url: 'https://plot.ly/~username/44',
  message: '',
  warning: '',
  filename: 'ambient-fahrenheit-temperature-sensor',
  error: '' }
{"x":"2015-08-16 08:55:57.418","y":"87.80"}
{"x":"2015-08-16 08:55:59.417","y":"86.00"}
{"x":"2015-08-16 08:56:01.415","y":"86.00"}
{"x":"2015-08-16 08:56:03.414","y":"86.00"}
{"x":"2015-08-16 08:56:05.413","y":"86.00"}
This indicates that the Node.js server is receiving data from the Arduino board and sending it to Plotly. The server will continue to log data until you press [Ctrl-C] to stop it.
Plotly View
While the Node.js server is running, open a web browser and log in to your Plotly account. Click the “Organize” link at the top of the screen, then click the “Open Plot” button on the “ambient-fahrenheit-temperature-sensor” project.
After the project opens, you should see a graph similar to this, updating in real-time:

Plotly projects are public by default, so you are now sharing your real-time temperature data with the world!
If you’re wondering about that high first value, I’ve noticed that the first one or two values tend to be anomalous. This may be related to the sketch being initialized, the initial board reset, or something else.
Summary
Using some inexpensive, low-powered hardware, we were able to provide some (somewhat) useful information on the web for public consumption.
Hopefully this will inspire you to create some IoT projects of your own. Good luck!
Basic Arduino Uno Dev Setup in Linux (Debian-based)
Getting a basic development environment for the Arduino Uno up and running in Linux is straightforward. This uses the Arduino IDE.
- Open up Synaptic and install the “arduino” package. This will also install “arduino-core” and other dependencies.
- Grab your arduino, a breadboard, some wires, a resistor, and an LED, and wire up a quick test. (I used the CIRC-01 project from the Sparkfun Inventor’s Kit guide).
- Connect the Arduino USB cable to your PC, then plug in the Arduino board.
- Start up the Arduino IDE.
- Go to “Tools”, “Board”, and make sure “Arduino Uno” is selected.
- Go to “Tools”, “Serial Port” and select the port that your Arduino board is using.
- Go to “File”, “Examples”, “Basics” and click “Blink”. This will load a very simple bit of code that will cause the LED you wired up to blink on and off.
- Click the “Upload” button. If all is well, then the LED on the breadboard should start blinking.
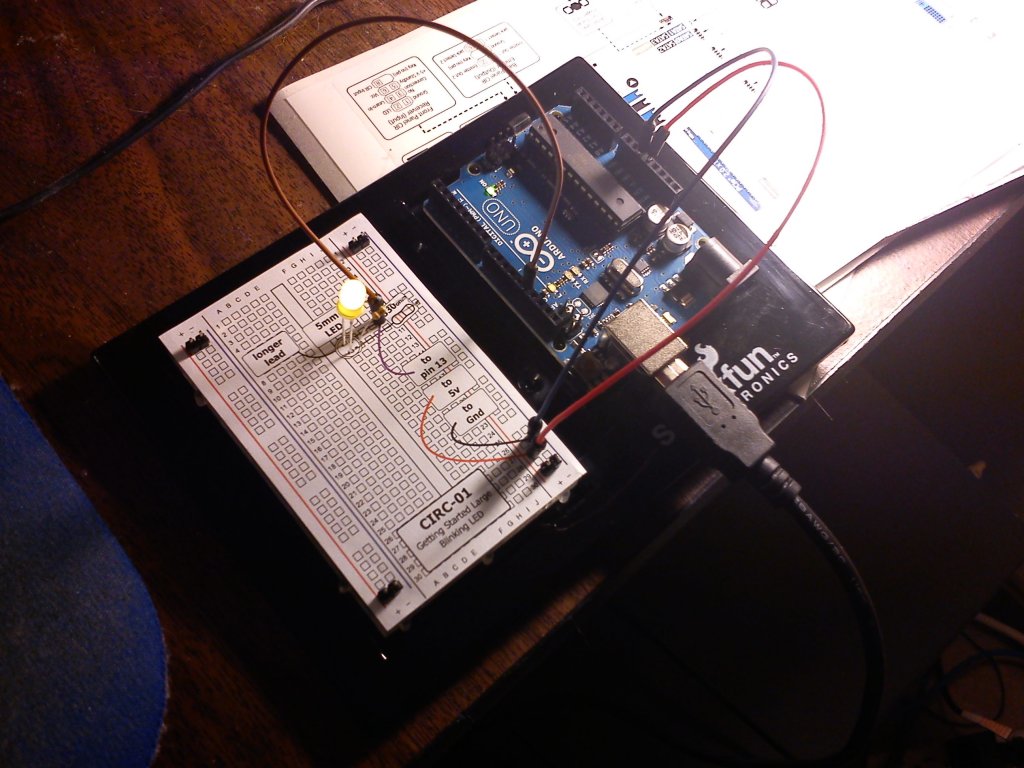
Command-Line Arduino
Prerequisites
Install Arduino tools:
sudo apt install --reinstall arduino
Make sure your user id is in the “dialout” group.
Installation
The easiest way to install the Arduino command line utility is to download the latest release package from here, and just extract it into a directory in your path. It’s a single executable (built with Go), so it won’t clutter things up.
Getting Started
I used this as a reference. It has a lot more detail.
Configuration File
Before you run for the first time, create a configuration file:
arduino-cli config init
Create Sketch / Add Some Code
Create a new sketch:
arduino-cli sketch new MyFirstSketch
A boilerplate sketch file is generated for you:
MyFirstSketch.ino
void setup() {
}

void loop() {
}
Edit the generated file, and fill in some details:
void setup() {
    pinMode(LED_BUILTIN, OUTPUT);
}

void loop() {
    digitalWrite(LED_BUILTIN, HIGH);
    delay(1000);
    digitalWrite(LED_BUILTIN, LOW);
    delay(1000);
}
Connect a Board
Update local cache of available platforms:
arduino-cli core update-index
After connecting your board, check to see if it’s recognized:
arduino-cli board list
Result should look something like this (I’m using an Uno):
Port         Type              Board Name  FQBN            Core
/dev/ttyACM0 Serial Port (USB) Arduino Uno arduino:avr:uno arduino:avr
Install the core for your board (refer to the first two segments of the FQBN):
arduino-cli core install arduino:avr
Compile and Upload the Sketch
Compile:
arduino-cli compile --fqbn arduino:avr:uno MyFirstSketch
Upload:
arduino-cli upload -p /dev/ttyACM0 --fqbn arduino:avr:uno MyFirstSketch
Makefile
This Makefile simplifies the compile and upload steps, and adds format, reset, and clean commands:
Makefile
ARDCMD=arduino-cli
FQBNSTR=arduino:avr:uno
PORT=/dev/ttyACM0
SKETCHNAME=MyFirstSketch
FORMATTER=clang-format -i

default:
    @echo 'Targets:'
    @echo '  compile  -- Compile sketch, but don''t upload it.'
    @echo '  upload   -- Compile and upload sketch.'
    @echo '  format   -- Beautify your sketch code.'
    @echo '  reset    -- Use to resolve Device Busy error.'
    @echo '  clean    -- Remove binaries and object files.'

compile:
    $(ARDCMD) compile --fqbn $(FQBNSTR) $(SKETCHNAME)

upload: compile
    $(ARDCMD) upload -p $(PORT) --fqbn $(FQBNSTR) $(SKETCHNAME)

format:
    $(FORMATTER) $(SKETCHNAME)/$(SKETCHNAME).ino

reset:
    fuser -k $(PORT)

clean:
    -rm -f $(SKETCHNAME)/*.hex
    -rm -f $(SKETCHNAME)/*.elf
ESP8266 MicroPython Project with OLED
Hardware
Parts needed:
- esp8266 board
- OLED 0.96 inch Display
- jumper wires
- breadboard
(All of this is included in the ESP32 Basic Starter Kit).
Follow this schematic:
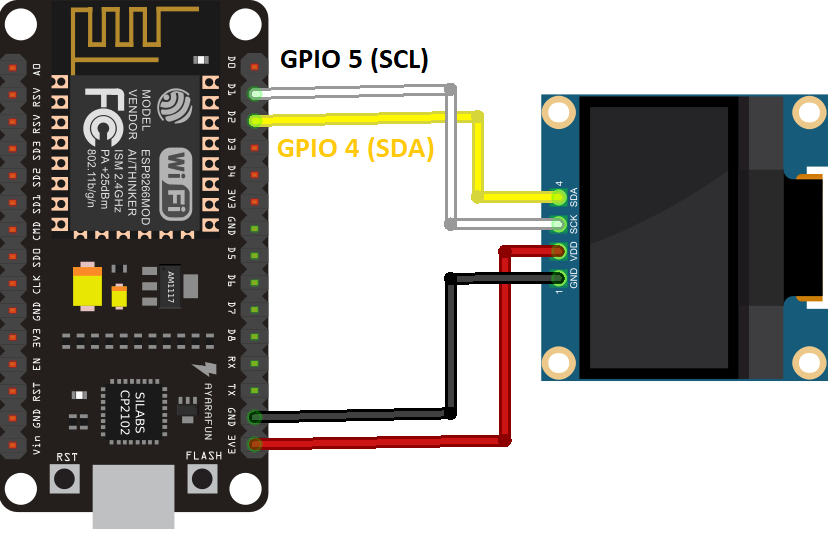
Connections:
| OLED | ESP8266 |
|---|---|
| VCC | 3.3V |
| GND | GND |
| SCL | GPIO 5 (D1) |
| SDA | GPIO 4 (D2) |
Software
Initialize Project
mkdir esp8266_oled

cd esp8266_oled

uv init
Add Dependencies
uv add esptool

uv add adafruit-ampy
Make sure you can communicate with the esp8266:
uv tool run --from esptool esptool.py chip_id
Flash MicroPython to the ESP8266
wget https://micropython.org/resources/firmware/ESP8266_GENERIC-20241129-v1.24.1.bin

uv tool run --from esptool esptool.py erase_flash

uv tool run --from esptool esptool.py --baud 460800 write_flash --flash_size=detect 0 ESP8266_GENERIC-20241129-v1.24.1.bin
Create Scripts
The MicroPython standard library doesn’t include support for the OLED by default. We’ll create a new ssd1306.py file and update it with the required code.
touch ssd1306.py
Copy the contents of https://github.com/RuiSantosdotme/ESP-MicroPython/raw/master/code/Others/OLED/ssd1306.py into the file:
# MicroPython SSD1306 OLED driver, I2C and SPI interfaces created by Adafruit

import time
import framebuf

# register definitions
SET_CONTRAST        = const(0x81)
SET_ENTIRE_ON       = const(0xa4)
SET_NORM_INV        = const(0xa6)
SET_DISP            = const(0xae)
SET_MEM_ADDR        = const(0x20)
SET_COL_ADDR        = const(0x21)
SET_PAGE_ADDR       = const(0x22)
SET_DISP_START_LINE = const(0x40)
SET_SEG_REMAP       = const(0xa0)
SET_MUX_RATIO       = const(0xa8)
SET_COM_OUT_DIR     = const(0xc0)
SET_DISP_OFFSET     = const(0xd3)
SET_COM_PIN_CFG     = const(0xda)
SET_DISP_CLK_DIV    = const(0xd5)
SET_PRECHARGE       = const(0xd9)
SET_VCOM_DESEL      = const(0xdb)
SET_CHARGE_PUMP     = const(0x8d)


class SSD1306:
    def __init__(self, width, height, external_vcc):
        self.width = width
        self.height = height
        self.external_vcc = external_vcc
        self.pages = self.height // 8
        # Note the subclass must initialize self.framebuf to a framebuffer.
        # This is necessary because the underlying data buffer is different
        # between I2C and SPI implementations (I2C needs an extra byte).
        self.poweron()
        self.init_display()

    def init_display(self):
        for cmd in (
            SET_DISP | 0x00, # off
            # address setting
            SET_MEM_ADDR, 0x00, # horizontal
            # resolution and layout
            SET_DISP_START_LINE | 0x00,
            SET_SEG_REMAP | 0x01, # column addr 127 mapped to SEG0
            SET_MUX_RATIO, self.height - 1,
            SET_COM_OUT_DIR | 0x08, # scan from COM[N] to COM0
            SET_DISP_OFFSET, 0x00,
            SET_COM_PIN_CFG, 0x02 if self.height == 32 else 0x12,
            # timing and driving scheme
            SET_DISP_CLK_DIV, 0x80,
            SET_PRECHARGE, 0x22 if self.external_vcc else 0xf1,
            SET_VCOM_DESEL, 0x30, # 0.83*Vcc
            # display
            SET_CONTRAST, 0xff, # maximum
            SET_ENTIRE_ON, # output follows RAM contents
            SET_NORM_INV, # not inverted
            # charge pump
            SET_CHARGE_PUMP, 0x10 if self.external_vcc else 0x14,
            SET_DISP | 0x01): # on
            self.write_cmd(cmd)
        self.fill(0)
        self.show()

    def poweroff(self):
        self.write_cmd(SET_DISP | 0x00)

    def contrast(self, contrast):
        self.write_cmd(SET_CONTRAST)
        self.write_cmd(contrast)

    def invert(self, invert):
        self.write_cmd(SET_NORM_INV | (invert & 1))

    def show(self):
        x0 = 0
        x1 = self.width - 1
        if self.width == 64:
            # displays with width of 64 pixels are shifted by 32
            x0 += 32
            x1 += 32
        self.write_cmd(SET_COL_ADDR)
        self.write_cmd(x0)
        self.write_cmd(x1)
        self.write_cmd(SET_PAGE_ADDR)
        self.write_cmd(0)
        self.write_cmd(self.pages - 1)
        self.write_framebuf()

    def fill(self, col):
        self.framebuf.fill(col)

    def pixel(self, x, y, col):
        self.framebuf.pixel(x, y, col)

    def scroll(self, dx, dy):
        self.framebuf.scroll(dx, dy)

    def text(self, string, x, y, col=1):
        self.framebuf.text(string, x, y, col)


class SSD1306_I2C(SSD1306):
    def __init__(self, width, height, i2c, addr=0x3c, external_vcc=False):
        self.i2c = i2c
        self.addr = addr
        self.temp = bytearray(2)
        # Add an extra byte to the data buffer to hold an I2C data/command byte
        # to use hardware-compatible I2C transactions.  A memoryview of the
        # buffer is used to mask this byte from the framebuffer operations
        # (without a major memory hit as memoryview doesn't copy to a separate
        # buffer).
        self.buffer = bytearray(((height // 8) * width) + 1)
        self.buffer[0] = 0x40  # Set first byte of data buffer to Co=0, D/C=1
        self.framebuf = framebuf.FrameBuffer1(memoryview(self.buffer)[1:], width, height)
        super().__init__(width, height, external_vcc)

    def write_cmd(self, cmd):
        self.temp[0] = 0x80 # Co=1, D/C#=0
        self.temp[1] = cmd
        self.i2c.writeto(self.addr, self.temp)

    def write_framebuf(self):
        # Blast out the frame buffer using a single I2C transaction to support
        # hardware I2C interfaces.
        self.i2c.writeto(self.addr, self.buffer)

    def poweron(self):
        pass


class SSD1306_SPI(SSD1306):
    def __init__(self, width, height, spi, dc, res, cs, external_vcc=False):
        self.rate = 10 * 1024 * 1024
        dc.init(dc.OUT, value=0)
        res.init(res.OUT, value=0)
        cs.init(cs.OUT, value=1)
        self.spi = spi
        self.dc = dc
        self.res = res
        self.cs = cs
        self.buffer = bytearray((height // 8) * width)
        self.framebuf = framebuf.FrameBuffer1(self.buffer, width, height)
        super().__init__(width, height, external_vcc)

    def write_cmd(self, cmd):
        self.spi.init(baudrate=self.rate, polarity=0, phase=0)
        self.cs.high()
        self.dc.low()
        self.cs.low()
        self.spi.write(bytearray([cmd]))
        self.cs.high()

    def write_framebuf(self):
        self.spi.init(baudrate=self.rate, polarity=0, phase=0)
        self.cs.high()
        self.dc.high()
        self.cs.low()
        self.spi.write(self.buffer)
        self.cs.high()

    def poweron(self):
        self.res.high()
        time.sleep_ms(1)
        self.res.low()
        time.sleep_ms(10)
        self.res.high()
Create and update main.py. This is our entry point.
touch main.py
- Copy contents of https://github.com/RuiSantosdotme/ESP-MicroPython/raw/master/code/Others/OLED/main.py into the file, then
- Comment the esp32 pin assignment and uncomment the esp8266 pin assignment
Contents should end up like this:
# Complete project details at https://RandomNerdTutorials.com/micropython-programming-with-esp32-and-esp8266/

from machine import Pin, SoftI2C
import ssd1306
from time import sleep

# ESP32 Pin assignment
# i2c = SoftI2C(scl=Pin(22), sda=Pin(21)) # esp32

# ESP8266 Pin assignment
i2c = SoftI2C(scl=Pin(5), sda=Pin(4))

oled_width = 128
oled_height = 64
oled = ssd1306.SSD1306_I2C(oled_width, oled_height, i2c)

oled.text('Hello, World!', 0, 0)
oled.text('Hello, World 2!', 0, 10)
oled.text('Hello, World 3!', 0, 20)

oled.show()
Upload Scripts to ESP3266
uv tool run --from adafruit-ampy ampy -p /dev/ttyUSB0 put ssd1306.py

uv tool run --from adafruit-ampy ampy -p /dev/ttyUSB0 put main.py

uv tool run --from adafruit-ampy ampy -p /dev/ttyUSB0 ls
Run the Main Script
uv tool run --from adafruit-ampy ampy -p /dev/ttyUSB0 run main.py
On the OLED display you should see this:
Hello, World!
Hello, World 2!
Hello, World 3!
You can learn more about what the code is doing here: https://randomnerdtutorials.com/micropython-oled-display-esp32-esp8266/
Implement a REST Service on a Nano RP2040
The is an Arduino Nano board with a Raspberry Pi RP2040 microcontroller that supports Bluetooth, WiFi, and machine learning. It has an onboard accelerometer, gyroscope, microphone, and temperature sensor.
With the built-in sensors and WiFi, it’s a good candidate for a remote monitoring solution. We’ll implement a simple REST service that returns the current temperature.
Toolset
Here’s what I’ll be using:
- Nano RP2040 board with a micro USB cable
- Arduino CLI
- Visual Studio Code with the Arduino Community Edition extension. This is a community fork of Microsoft’s (deprecated) Arduino extension.
Board Setup
Plug in your Nano RP2040 board and issue the following command:
arduino-cli board list
You should see something like this:
Port         Protocol Type              Board Name                  FQBN                                Core
/dev/ttyACM0 serial   Serial Port (USB) Arduino Nano RP2040 Connect arduino:mbed_nano:nanorp2040connect arduino:mbed_nano
You will probably need to install the core:
arduino-cli core install arduino:mbed_nano
We’ll be using three additional libraries:
| Name | Description |
|---|---|
| Arduino_LSM6DSOX | Access the IMU for accelerometer, gyroscope, and embedded temperature sensor. |
| ArduinoJson | A simple and efficient JSON library for embedded C++. |
| WiFiNINA | With this library you can instantiate Servers, Clients and send/receive UDP packets through WiFi. |
Install them:
arduino-cli lib install Arduino_LSM6DSOX

arduino-cli lib install ArduinoJson

arduino-cli lib install WiFiNINA
Project Structure / Setup
Create a directory named web_server_rest_temp.
Open the directory in VS Code.
Create a Makefile containing the following content:
ARDCMD=arduino-cli
FQBNSTR=arduino:mbed_nano:nanorp2040connect
PORT=/dev/ttyACM0
SKETCHNAME=web_server_rest_temp

default:
	@echo 'Targets:'
	@echo '  compile  -- Compile sketch, but don''t upload it.'
	@echo '  upload   -- Compile and upload sketch.'
	@echo '  monitor  -- Open the serial port monitor.'

compile:
	$(ARDCMD) compile --fqbn $(FQBNSTR) $(SKETCHNAME)

upload: compile
	$(ARDCMD) upload -p $(PORT) --fqbn $(FQBNSTR) $(SKETCHNAME)

monitor:
	$(ARDCMD) monitor -p $(PORT)
You can type out individual commands for compiling, uploading, and monitoring instead, but using a Makefile is more convenient.
Create a subdirectory, also named web_server_rest_temp.
In the subdirectory, create a file named arduino_secrets.h containing the following contents:
#define SECRET_SSID "wireless_network_name"           // The name of your wireless network
#define SECRET_PASSWORD "wireless_network_password"   // The password for your wireless network
#define SECRET_PORT 8090                              // The port that the REST service will run on
Update the defines to match your network settings.
For example, if you have a wireless network named “MyHomeWifi” and you use the password “MyN3tw0rkP@ssw0rd” to connect to it, your arduino_secrets.h file would look like this:
#define SECRET_SSID "MyHomeWifi"              // The name of your wireless network
#define SECRET_PASSWORD "MyN3tw0rkP@ssw0rd"   // The password for your wireless network
#define SECRET_PORT 8090                      // The port that the REST service will run on
In the same subdirectory, create a file named web_server_rest_temp.ino and give it the boilerplate Arduino contents:
void setup()
{

}

void loop()
{

}
Your project layout should now look like this:
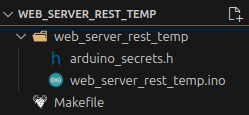
Keep web_server_rest_temp.ino open for editing.
Main Sketch
We’ll update web_server_rest_temp.ino incrementally and explain each update, then show a complete version at the end.
First, add your includes:
#include "arduino_secrets.h"
#include <Arduino_LSM6DSOX.h>
#include <ArduinoJson.h>
#include <WiFiNINA.h>
Then, initialize network settings:
char ssid[] = SECRET_SSID;     // network SSID (name)
char pass[] = SECRET_PASSWORD; // network password
int keyIndex = 0;              // network key index number (needed only for WEP)
int port = SECRET_PORT;
Set the initial status and instantiate the server:
int status = WL_IDLE_STATUS;
WiFiServer server(port);
Inside setup(), initialize serial communication at 9600 baud. (The serial monitor uses this)
Serial.begin(9600);
Make sure the IMU is available:
if (!IMU.begin())
{
	Serial.println("Failed to initialize IMU!");
	while (1)
		;
}
An inertial measurement unit (IMU) is an electronic device that measures and reports a body’s specific force, angular rate, and sometimes the orientation of the body, using a combination of accelerometers, gyroscopes, and sometimes magnetometers. When the magnetometer is included, IMUs are referred to as IMMUs.
Make sure the WiFi module is available:
if (WiFi.status() == WL_NO_MODULE)
{
	Serial.println("Communication with WiFi module failed!");
	while (true)
		;
}
See if the WiFi firmware is up to date:
String fv = WiFi.firmwareVersion();

if (fv < WIFI_FIRMWARE_LATEST_VERSION)
{
	Serial.println("Please upgrade the firmware");
}
If it isn’t, then display a message, but still continue.
Connect to the WiFi network:
while (status != WL_CONNECTED)
{
	Serial.print("Attempting to connect to Network named: ");
	Serial.println(ssid); // print the network name (SSID)

	status = WiFi.begin(ssid, pass);

	// wait 5 seconds for the connection:
	delay(5000);
}
Start the server, then print the WiFi status:
server.begin();

printWifiStatus();
The printWifiStatus() function is a new custom function that we need to add. It displays useful information about our new connection:
void printWifiStatus()
{
    // print the SSID of the network you're attached to:
    Serial.print("SSID: ");
    Serial.println(WiFi.SSID());

    // print your board's IP address:
    IPAddress ip = WiFi.localIP();
    Serial.print("IP Address: ");
    Serial.println(ip);

    // print the received signal strength:
    long rssi = WiFi.RSSI();
    Serial.print("signal strength (RSSI): ");
    Serial.print(rssi);
    Serial.println(" dBm");
}
That concludes our setup() code. Now we’re ready to move on to loop().
First, instantiate a WiFiClient. It will listen for incoming clients:
WiFiClient client = server.available();
Check to see when a client connects:
if (client)
{

}
When a client connects, print a message, then initialize a String that will hold incoming data from the client:
if (client)
{
	Serial.println("new client");

	String currentLine = "";
}
Prepare to perform some operations while the client is connected, but only while the client is still available:
if (client)
{
	Serial.println("new client");

	String currentLine = "";

	while (client.connected())
	{
		if (client.available())
		{
		}
	}
}
Inside the client.available() block:
// Read one character of the client request at a time:
char c = client.read();

// If the byte is a newline character:
if (c == '\n')
{
	// If currentline has been cleared, the request is finished, but it wasn't a known endpoint, so send a generic response:
	if (currentLine.length() == 0)
	{
		sendResponse(client, "Hello from Arduino RP2040! Valid endpoints are /Temperature/Current/F and /Temperature/Current/C", -99, "invalid");
		break;
	}
	else
		currentLine = ""; // If you got a newline, then clear currentLine
}
else if (c != '\r')
	// If you got anything else but a carriage return character, add it to the end of the currentLine:
	currentLine += c;
sendResponse() is another new custom function. It receives the following as arguments:
- A reference to the WiFiClient,
- a text message,
- a value, and
- a status
Inside the function:
- A standard HTTP response is sent.
- A JSON document object is created.
- The JSON document is populated with the message, value, and status.
- The JSON object is serialized back to the client.
void sendResponse(WiFiClient &client, char message[], int value, char status[])
{
    // Send a standard HTTP response
    client.println("HTTP/1.1 200 OK");
    client.println("Content-type: application/json");
    client.println("Connection: close");
    client.println();

    // Create a JSON object
    StaticJsonDocument<200> doc;

    doc["message"] = message;
    doc["value"] = value;
    doc["status"] = status;

    // Serialize JSON to client
    serializeJson(doc, client);
}
Returning to the loop() function, still inside the client.available() block, we now check to see if a specific endpoint was called by the client:
char request_unit = 'X';
if (currentLine.indexOf("GET /Temperature/Current/F") != -1)
	request_unit = 'F';
if (currentLine.indexOf("GET /Temperature/Current/C") != -1)
	request_unit = 'C';
We use request_unit to track calls to specific endpoints. If the client has asked for the current temperature in Fahrenheit or Celsius, we’ll want to respond accordingly:
if (request_unit == 'F' || request_unit == 'C')
{
	int current_temperature = (request_unit == 'F') ? getTemperature(true) : getTemperature(false);
	char temp_units[5];
	sprintf(temp_units, "°%s", (request_unit == 'F') ? "F" : "C");

	char message[50];
	sprintf(message, "Current temperature is %d %s", current_temperature, temp_units);

	sendResponse(client, message, current_temperature, "success");
	break;
}
If the client has asked for the temperature, we retrieve it with getTemperature(), format the data to return to the client, then send the response.
getTemperature() is another new function. It makes sure the IMU module is available, then retrieves the current temperature value from the IMU temperature sensor. The IMU returns the temperature in Celsius units, so the value is converted to Fahrenheit, if requested.
int getTemperature(bool as_fahrenheit)
{
    if (IMU.temperatureAvailable())
    {
        int temperature_deg = 0;
        IMU.readTemperature(temperature_deg);

        if (as_fahrenheit == true)
            temperature_deg = celsiusToFahrenheit(temperature_deg);

        return temperature_deg;
    }
    else
    {
        return -99;
    }
}
The celsiusToFahrenheit() function is also new:
int celsiusToFahrenheit(int celsius_value)
{
  return (celsius_value * (9 / 5)) + 32;
}
Returning to the loop() function, after the while (client.connected()) block, we perform some cleanup after the client disconnects:
client.stop();
Serial.println("client disconnected");
And that’s it! Our full sketch (web_server_rest_temp.ino) now looks like this:
#include "arduino_secrets.h"
#include <Arduino_LSM6DSOX.h>
#include <ArduinoJson.h>
#include <WiFiNINA.h>

char ssid[] = SECRET_SSID;     // network SSID (name)
char pass[] = SECRET_PASSWORD; // network password
int keyIndex = 0;              // network key index number (needed only for WEP)
int port = SECRET_PORT;

void setup()
{
    Serial.begin(9600);

    if (!IMU.begin())
    {
        Serial.println("Failed to initialize IMU!");
        while (1)
            ;
    }

    if (WiFi.status() == WL_NO_MODULE)
    {
        Serial.println("Communication with WiFi module failed!");
        while (true)
            ;
    }

    String fv = WiFi.firmwareVersion();

    if (fv < WIFI_FIRMWARE_LATEST_VERSION)
    {
        Serial.println("Please upgrade the firmware");
    }

    while (status != WL_CONNECTED)
    {
        Serial.print("Attempting to connect to Network named: ");
        Serial.println(ssid); // print the network name (SSID);

        // Connect to WPA/WPA2 network. Change this line if using open or WEP network:
        status = WiFi.begin(ssid, pass);
        // wait 5 seconds for connection:
        delay(5000);
    }

    server.begin();
    printWifiStatus();
}

void loop()
{
    WiFiClient client = server.available();

    if (client)
    {
        Serial.println("new client");

        String currentLine = "";

        while (client.connected())
        {
            if (client.available())
            {
                // Read one character of the client request at a time:
                char c = client.read();

                // If the byte is a newline character:
                if (c == '\n')
                {
                    // If currentline has been cleared, the request is finished, but it wasn't a known endpoint, so send a generic response:
                    if (currentLine.length() == 0)
                    {
                        sendResponse(client, "Hello from Arduino RP2040! Valid endpoints are /Temperature/Current/F and /Temperature/Current/C", -99, "invalid");
                        break;
                    }
                    else
                        currentLine = ""; // If you got a newline, then clear currentLine
                }
                else if (c != '\r')
                    // If you got anything else but a carriage return character, add it to the end of the currentLine:
                    currentLine += c;

                char request_unit = 'X';
                if (currentLine.indexOf("GET /Temperature/Current/F") != -1)
                    request_unit = 'F';
                if (currentLine.indexOf("GET /Temperature/Current/C") != -1)
                    request_unit = 'C';

                if (request_unit == 'F' || request_unit == 'C')
                {
                    int current_temperature = (request_unit == 'F') ? getTemperature(true) : getTemperature(false);
                    char temp_units[5];
                    sprintf(temp_units, "°%s", (request_unit == 'F') ? "F" : "C");

                    char message[50];
                    sprintf(message, "Current temperature is %d %s", current_temperature, temp_units);

                    sendResponse(client, message, current_temperature, "success");
                    break;
                }
            }
        }

        client.stop();
        Serial.println("client disconnected");
    }
}

void sendResponse(WiFiClient &client, char message[], int value, char status[])
{
    // Send a standard HTTP response
    client.println("HTTP/1.1 200 OK");
    client.println("Content-type: application/json");
    client.println("Connection: close");
    client.println();

    // Create a JSON object
    StaticJsonDocument<200> doc;

    doc["message"] = message;
    doc["value"] = value;
    doc["status"] = status;

    // Serialize JSON to client
    serializeJson(doc, client);
}

void printWifiStatus()
{
    // print the SSID of the network you're attached to:
    Serial.print("SSID: ");
    Serial.println(WiFi.SSID());

    // print your board's IP address:
    IPAddress ip = WiFi.localIP();
    Serial.print("IP Address: ");
    Serial.println(ip);

    // print the received signal strength:
    long rssi = WiFi.RSSI();
    Serial.print("signal strength (RSSI): ");
    Serial.print(rssi);
    Serial.println(" dBm");
}

int getTemperature(bool as_fahrenheit)
{
    if (IMU.temperatureAvailable())
    {
        int temperature_deg = 0;
        IMU.readTemperature(temperature_deg);

        if (as_fahrenheit == true)
            temperature_deg = celsiusToFahrenheit(temperature_deg);

        return temperature_deg;
    }
    else
    {
        return -99;
    }
}
Compile and Upload
Make sure the board is connected, then open a terminal.
Compile:
make compile
or
arduino-cli compile --fqbn arduino:mbed_nano:nanorp2040connect web_server_rest_temp
You should see something similar to this:
Sketch uses 112214 bytes (0%) of program storage space. Maximum is 16777216 bytes.
Global variables use 44552 bytes (16%) of dynamic memory, leaving 225784 bytes for local variables. Maximum is 270336 bytes.

Used library     Version
Arduino_LSM6DSOX 1.1.2
Wire
SPI
ArduinoJson      7.3.0
WiFiNINA         1.9.0

Used platform     Version
arduino:mbed_nano 4.2.1
Upload:
make upload
or
arduino-cli upload -p /dev/ttyACM0 --fqbn arduino:mbed_nano:nanorp2040connect web_server_rest_temp
You should see something similar to this:
...
New upload port: /dev/ttyACM0 (serial)
Start the monitor to check the status of the running server:
make monitor
or
arduino-cli monitor -p /dev/ttyACM0
Results will be similar to this:
Using default monitor configuration for board: arduino:mbed_nano:nanorp2040connect
Monitor port settings:
  baudrate=9600
  bits=8
  dtr=on
  parity=none
  rts=on
  stop_bits=1

Connecting to /dev/ttyACM0. Press CTRL-C to exit.
SSID: (network name)
IP Address: (server ip address)
signal strength (RSSI): -40 dBm
Call the Service
Now that we’ve completed our code, flashed the device, and our server is running, we’re ready to test it.
First, note the server address from the monitor above. I’ll use an example of 192.168.0.186.
There are many options for calling the service. You could use cURL:
curl --request GET --url http://192.168.0.186:8090/Temperature/Current/F
If you’re using a REST runner that recognizes .http files, your request will look something like this:
GET http://192.168.0.186:8090/Temperature/Current/F
You could also use a REST client like Postman or Insomnia. Since these are simple GET requests, you can even put the URL directly into a web browser. Regardless of how you call the service, though, you should see a response similar to this:
HTTP/1.1 200 OK
Content-type: application/json
Connection: close

{
  "message": "Current temperature is 70 °F",
  "value": 70,
  "status": "success"
}
If you call the service with an endpoint it doesn’t recognize, you’ll see this:
HTTP/1.1 200 OK
Content-type: application/json
Connection: close

{
  "message": "Hello from Arduino RP2040! Valid endpoints are /Temperature/Current/F and /Temperature/Current/C",
  "value": -99,
  "status": "invalid"
}
Next Steps
Now that your temperature monitoring service is up and running, a fun next step might be to go fully remote. You can easily test this by using a charger block. For example, I plugged my Nano RP2040 into a BLAVOR Solar Charger Power Bank.
MicroPython on ESP32
Download Firmware
https://micropython.org/download/
https://micropython.org/download/?port=esp32
ESP32 / WROOM: https://micropython.org/download/ESP32_GENERIC/
Download latest release .bin, e.g.: ESP32_GENERIC-20230426-v1.20.0.bin
Virtual Environment
python3 -m venv esp_venv

cd esp_venv

source bin/activate

pip install esptool
Installation
Plug in the esp32 board.
Check /dev and confirm device is devttyUSB0. If not, adjust instructions accordingly.
If you are putting MicroPython on your board for the first time then you should first erase the entire flash using:
esptool.py --chip esp32 --port /dev/ttyUSB0 erase_flash
From then on program the firmware starting at address 0x1000:
esptool.py --chip esp32 --port /dev/ttyUSB0 --baud 460800 write_flash -z 0x1000 esp32-20190125-v1.10.bin
Port Error
If you see this when running esptool.py:
A fatal error occurred: Could not open /dev/ttyUSB0, the port doesn't exist
You may need to add yourself to the dialout group:
sudo adduser <username> dialout
And maybe also this:
sudo chmod a+rw /dev/ttyUSB0
Access REPL
Install picocom:
sudo apt install picocom
Connect:
picocom /dev/ttyUSB0 -b115200
Hit enter a couple of times, and you’ll see the »> prompt.
Test:
>>> import machine
>>> pin = machine.Pin(2, machine.Pin.OUT)
>>> pin.on()
>>> pin.off()
Online IoT/Embedded Simulators
| Name | Type | Link |
|---|---|---|
| Tinkercad Circuits | many | https://www.tinkercad.com/learn/circuits |
| Wokwi | Arduino, ESP32, others | https://wokwi.com/ |
Note
Tinkercad Circuits is free, but requires an account
Programming Arduino (AVR) and Raspberry Pi Pico (ARM) in C
This article will document the steps required to blink the onboard LED (the “Hello World” of the hobbyist microcontroller world) on Arduino UNO and Raspberry Pi Pico boards.
This will use standards-compliant C code in a CLI environment.
Arduino (AVR)
AVR chips are used on Arduino boards. This section assumes that you’re using an Arduino Uno. If you’re using something else, you’ll need to update the command line arguments for avr-gcc and avrdude to reflect the chip model.
Requirements
Instructions assume a Debian-based system.
Required packages:
| Package Name | Description |
|---|---|
| binutils | The programs in this package are used to assemble, link and manipulate binary and object files. They may be used in conjunction with a compiler and various libraries to build programs. |
| gcc-avr | This is the GNU C compiler for AVR, a fairly portable optimizing compiler which supports multiple languages. This package includes support for C. |
| gdb-avr | This package has been compiled to target the avr architecture. GDB is a source-level debugger, capable of breaking programs at any specific line, displaying variable values, and determining where errors occurred. Currently, it works for C, C++, Fortran Modula 2 and Java programs. A must-have for any serious programmer. This package is primarily for avr developers and cross-compilers and is not needed by normal users or developers. |
| avr-libc | Standard library used for the development of C programs for the Atmel AVR micro controllers. This package contains static libraries as well as the header files needed. |
| avrdude | AVRDUDE is an open source utility to download/upload/manipulate the ROM and EEPROM contents of AVR microcontrollers using the in-system programming technique (ISP) |
Installation:
sudo apt install binutils gcc-avr gdb-avr avr-libc avrdude
Source
blink.c
#include <avr/io.h> // defines pins and ports
#include <util/delay.h>

#define BLINK_DELAY 500 // number of milliseconds to wait between LED toggles.

int main(void) {
    DDRB |= (1 << PB5); // Data Direction Register B: writing a 1 to the Pin B5
                        // bit enables output

    // Event loop (runs forever)
    while (1) {
    PORTB = 0b00100000; // turn on 5th LED bit/pin in PORT B (Pin13 in Arduino)
    _delay_ms(BLINK_DELAY);

    PORTB = 0b00000000; // turn off all bits/pins on PB
    _delay_ms(BLINK_DELAY);
    }

    return (0); // main() requires a return value, but this will never happen, as
                // the polling loop is infinite.
}
Makefile
FORMATTER = clang-format -i
ROOT_FILE_NAME = blink
SRC_FILE = $(ROOT_FILE_NAME).c
OBJ_FILE = $(ROOT_FILE_NAME).o
EXE_FILE = $(ROOT_FILE_NAME)
HEX_FILE = $(ROOT_FILE_NAME).hex

default:
    @echo 'Targets:'
    @echo '  compile'
    @echo '  link'
    @echo '  hex'
    @echo '  upload'
    @echo '  format'
    @echo '  clean'

$(OBJ_FILE): $(SRC_FILE)
    avr-gcc -Os -DF_CPU=16000000UL -mmcu=atmega328p -c -o $(OBJ_FILE) $(SRC_FILE)

compile: $(OBJ_FILE)

$(EXE_FILE): $(OBJ_FILE)
    avr-gcc -mmcu=atmega328p $(OBJ_FILE) -o $(EXE_FILE)

link: $(EXE_FILE)

$(HEX_FILE): $(EXE_FILE)
    avr-objcopy -O ihex -R .eeprom $(EXE_FILE) $(HEX_FILE)

hex: $(HEX_FILE)

upload: $(HEX_FILE)
    avrdude -F -V -c arduino -p ATMEGA328P -P /dev/ttyACM0 -b 115200 -U flash:w:$(HEX_FILE)

format:
    $(FORMATTER) $(SRC_FILE)

clean:
    -rm -f $(OBJ_FILE) $(EXE_FILE) $(HEX_FILE) $(SRC_FILE).orig
Build and Upload
To build the code, and upload to the Arduino, first plug in your Arduino board, and then:
make upload
What’s going on:
- avr-gcc produces an object file compatible with the AVR chipset, and then links it into a binary.
- Only the hex code is used by the chip, so avr-objcopy extracts it.
- avrdude uploads the hex code to the board.
Raspberry Pi Pico (ARM Cortex)
Requirements / Setup
cd ~/

mkdir pico

cd pico
Clone the pico-sdk and pico-examples repositories:
git clone -b master https://github.com/raspberrypi/pico-sdk.git

cd pico-sdk

git submodule update --init

cd ..

git clone -b master https://github.com/raspberrypi/pico-examples.git
Install the toolchain:
sudo apt update

sudo apt install cmake gcc-arm-none-eabi libnewlib-arm-none-eabi build-essential
Build
Create a build directory:
cd pico-examples

mkdir build

cd build
Set the SDK path:
export PICO_SDK_PATH=../../pico-sdk
Prepare the CMAKE build directory:
cmake ..
Build:
cd blink

make -j4
This produces the following outputs:
- blink.elf - This is used by the debugger
- blink.uf2 - This is the file to be uploaded to the RP2040
Load and Run
To load a .uf2 file onto the Pico, the board must be in BOOTSEL mode. To accomplish this:
- Hold down the BOOTSEL button on the Pico.
- Plug the micro USB cable into the Pico.
- Release the BOOTSEL button.
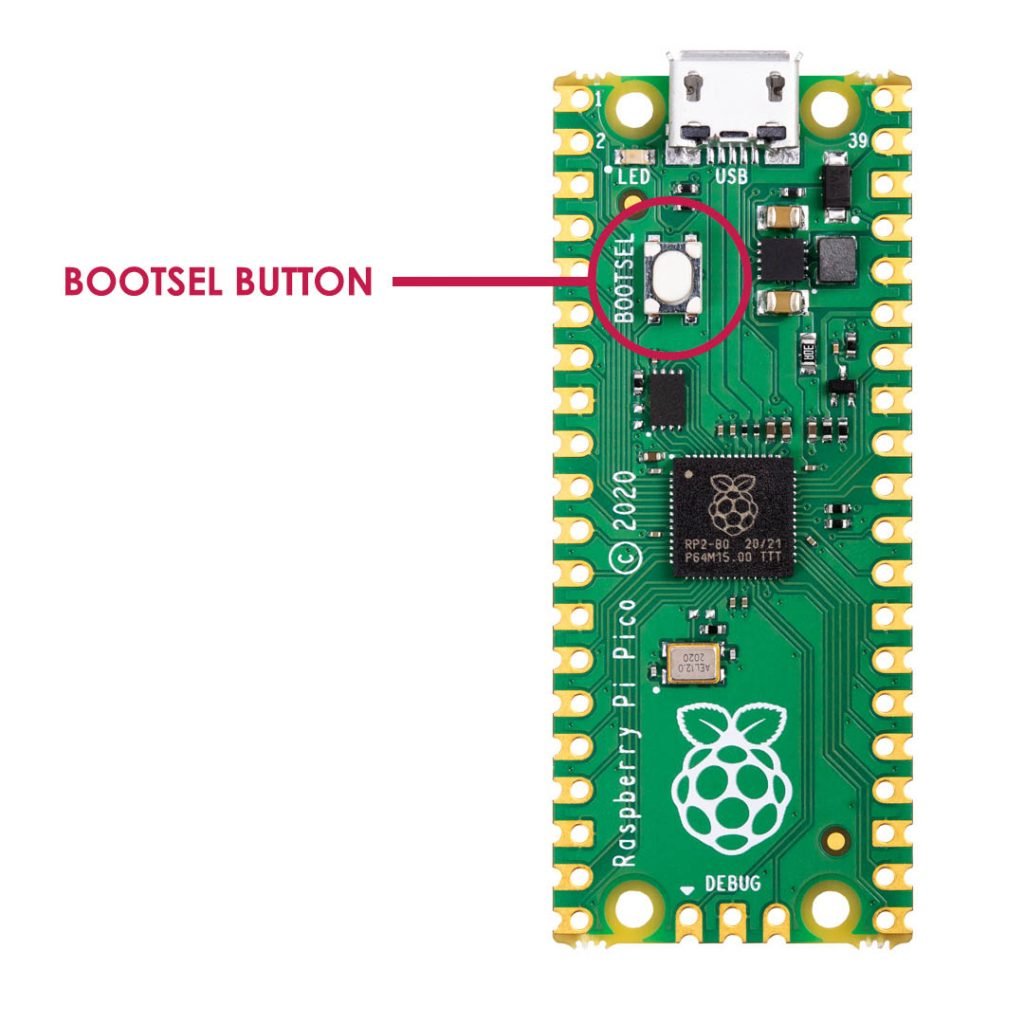
The Pico will mount as a USB mass storage device. To load the binary code we just created, drag and drop the blink.uf2 file to the mounted drive. The UF2 file will be loaded on the Pico, and the drive will automatically unmount.
Tip
If you want to load an updated UF2 file to the board, you must go through the same BOOTSEL steps, after first unplugging the board.
It can be a pain, having to unplug the board and plug it back in (in BOOTSEL mode) every time you want to apply an update. I recommend purchasing a microUSB cable with a switch. Then, instead of unplugging and plugging the cable every time, your BOOTSEL steps become:
- Switch off the micro USB cable.
- Hold down the BOOTSEL button on the Pico.
- Switch on the micro USB cable.
- Release the BOOTSEL button.
Make sure you purchase a cable that supports data transfer, not just power. This is the one I’m using, but any micro USB cable with data support should work.
The Code
blink.c
#include "pico/stdlib.h"

int main() {
#ifndef PICO_DEFAULT_LED_PIN
#warning blink example requires a board with a regular LED
#else
    const uint LED_PIN = PICO_DEFAULT_LED_PIN; // Default PIN number for the built-in LED

    gpio_init(LED_PIN); // Initialize the LED

    gpio_set_dir(LED_PIN, GPIO_OUT);

    // Never-ending polling loop
    while (true) {
        // Turn on the LED, then wait 1/2 second
        gpio_put(LED_PIN, 1);
        sleep_ms(500);

        // Turn off the LED, then wait 1/2 second
        gpio_put(LED_PIN, 0);
        sleep_ms(500);
    }
#endif
}
Remote Access for Raspberry Pi
If you’d like the ability to control your Pi from another computer, there are a couple of options available.
The first, and simplest, is SSH access. This will give you remote access via the command line.
SSH (Command Line Access)
SSH Setup
First, the SSH server needs to be enabled on the Pi. Start up the Pi and log in. Then, run raspi-config:
sudo raspi-config
On the initial screen, select “Advanced Options”:
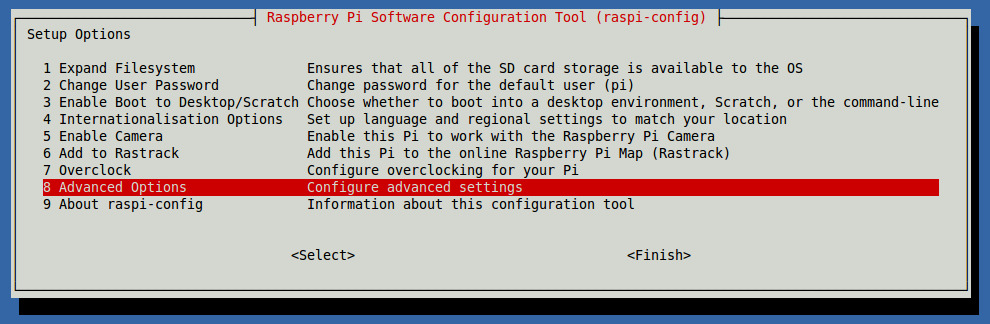
On the Advanced screen, select “SSH”:
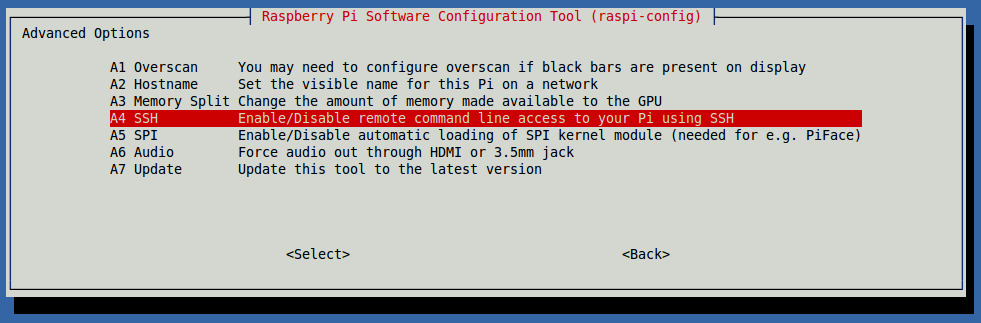
Select “Enable” to activate the SSH server:
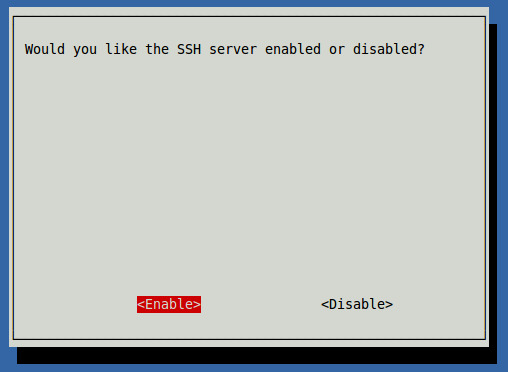
If activation was successful, you’ll see this:
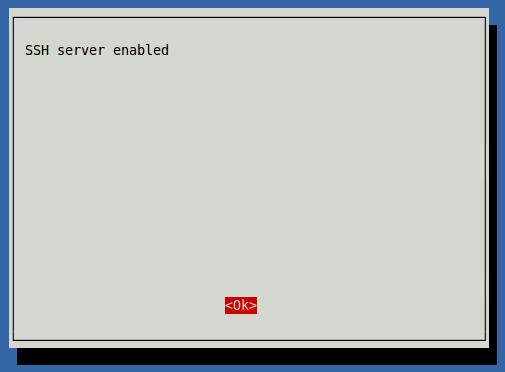
Exit raspi-config and restart the Pi.
After the Pi restarts, log in and use ifconfig to determine its IP address (You’ll need this for SSH access.):
sudo ifconfig
If you have the Pi hard-wired to your network, look for the IP address in the “eth#” section. If you are using a wireless adapter, look for the IP address in the “wlan#” section.
Client Access
Switch to the computer from which you want to access the Pi. (These instructions will assume a Linux client.)
Open a terminal and issue the following command:
ssh 192.168.1.13 -l pi
(Change the IP address in the command to match that of your Pi.)
You can also add an entry to the /etc/hosts file on your client machine if you’d like a “friendly name” to use when logging in. My Pi has a host name of “pisquared”, so I added an entry for this so that I can log in as follows:
ssh pisquared -l pi
You’ll be prompted for your Pi user’s password. After entering it, you should be sitting at a command line on the Pi. Example:
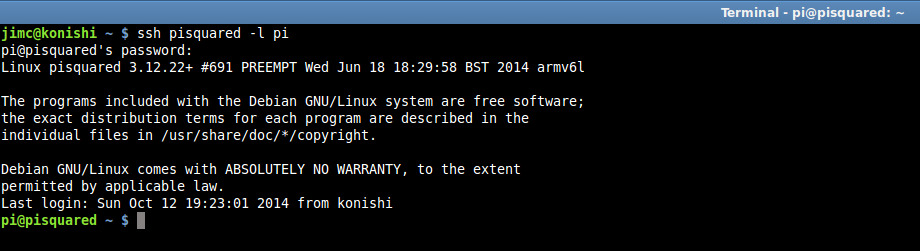
The first time you log in to the Pi, you’ll get a warning about it not being a known host. Answer “yes” to the prompt so that you won’t be warned again.
When you are finished with your session, type “exit” and [Enter] to log out and return to the client machine.
Secure File Copy
With SSH enabled, you can also use scp (Secure File Copy) to copy files between systems.
The scp command works very similarly to the cp command. For example, let’s assume you want to copy files from your host system to your Raspberry Pi, with the following setup:
- The hostname of the Raspberry Pi is “raspberry”.
- The username on the Raspberry Pi is “pi”.
- Your username on the host system is “johnd”.
- You want to copy all of the files in the “/home/johnd/transfer” directory on your host system to the “/home/pi/transfer” directory on the Raspberry Pi.
(Modify the values above as needed for your configuration.)
The command to accomplish this is:
scp /home/johnd/transfer/* pi@raspberry:/home/pi/transfer
You’ll be prompted for the password of the “pi” user, then the files will be copied, with a nice progress display.
If you want to copy files from the Raspberry Pi to your host system, it’s as easy as this:
scp pi@raspberry:/home/pi/transfer/* /home/johnd/transfer
VNC (Access with Graphical Interface)
If you’d like to access your Pi via a graphical interface, VNC provides the means.
VNC Server
First, you’ll need to install a VNC server on your Pi. Log in to the Pi, then issue these commands:
sudo apt-get update

sudo apt-get install tightvncserver
After installation is complete, start the VNC server as follows:
vncserver :1
You’ll be prompted to enter a password to use when accessing desktops. You are limited to 8 characters on the password. If you want separate read-only access, answer “y” to the “view-only password” prompt, otherwise answer “n”.
Client Access
To access the Pi from your client machine, you’ll need a VNC client. I’m using xtightvncviewer here, but there are plenty to choose from.
When you run the VNC viewer, you’ll be prompted for the address of the machine to connect to. Enter the IP address of your Pi, or the “friendly name” from your hosts file if you prefer. Append a “:1″ to indicate the port to connect to:
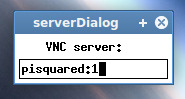
Then, you’ll be prompted for the remote access password you set up earlier:
After entering the password, the graphical desktop will display:
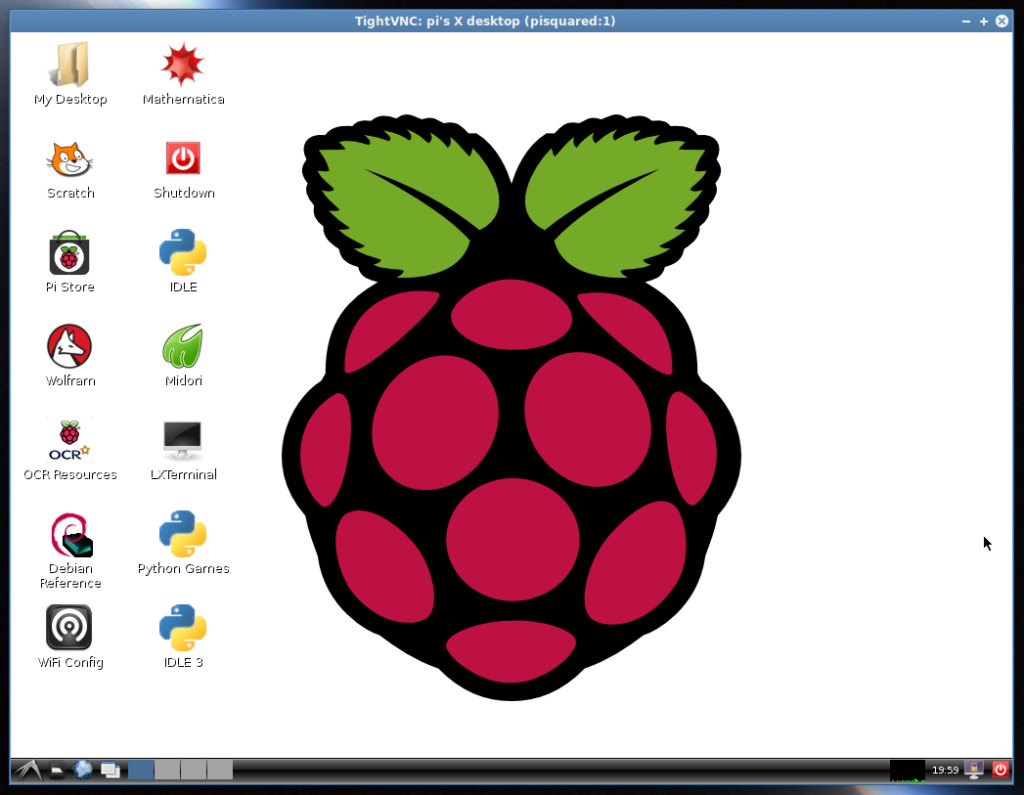
That’s it! When you’re finished, just close the VNC viewer.
All-In-One Client
If you’d like a nice all-in-one SSH/VNC client for Linux, I recommend Remmina.
Sense HAT
https://www.raspberrypi.com/documentation/accessories/sense-hat.html
Python
https://pythonhosted.org/sense-hat/
Simple Raspberry Pi Control With .NET IoT and Python
Follow the “Prerequisites” and “Prepare the hardware” instructions here. (Note: These instructions specify .NET SDK 5 or higher. We’ll actually be using .NET 6.)
Assumes that you’re using Linux on your development machine as well.
.NET
On the development machine, create a console application:
dotnet new console -o BlinkTutorial

cd BlinkTutorial
Add the Iot.Device.Bindings package to the project:
dotnet add package Iot.Device.Bindings --version 1.5.0-*
Replace the contents of Program.cs with the following code:
using System;
using System.Device.Gpio;
using System.Threading;

Console.WriteLine("Blinking LED. Press Ctrl+C to end.");
int pin = 18;
using var controller = new GpioController();
controller.OpenPin(pin, PinMode.Output);
bool ledOn = true;
while (true)
{
    controller.Write(pin, ((ledOn) ? PinValue.High : PinValue.Low));
    Thread.Sleep(1000);
    ledOn = !ledOn;
}
Make sure the application builds without errors:
dotnet build
Publish it:
dotnet publish -c Release -r linux-arm --self-contained true p:PublishSingleFile=true
Copy the application to the Raspberry Pi (adjust the remote machine name and path as needed):
scp -r bin/Release/net6.0/linux-arm/publish/* pi@raspi4-main:/home/pi/projects/BlinkTutorial
Log in to the Raspberry Pi, go to the publish directory, and run the application:
ssh pi@raspi4-main

cd projects/BlinkTutorial

./BlinkTutorial
Enjoy the blinking light!
Makefile, to simplify the steps:
REMOTE_USER_MACHINE = pi@raspi4-main

default:
    @echo 'Targets:'
    @echo '  build'
    @echo '  publish'
    @echo '  copy'
    @echo '  ssh'

build:
    dotnet build

publish:
    dotnet publish -c Release -r linux-arm --self-contained true /p:PublishSingleFile=true

copy:
    scp -r bin/Release/net6.0/linux-arm/publish/* $(REMOTE_USER_MACHINE):/home/pi/projects/BlinkTutorial

ssh:
    ssh $(REMOTE_USER_MACHINE)
Python
Log in to the Raspberry Pi:
ssh pi@raspi4-main
Create a directory for the Python script:
mkdir blink_tutorial

cd blink_tutorial
Install the gpio packages:
sudo apt-get install python-rpi.gpio python3-rpi.gpio
Create the script:
#!/usr/bin/python3

import RPi.GPIO as GPIO
from time import sleep

gpio_pin = 18
pause_seconds = 1

GPIO.setwarnings(False)
GPIO.setmode(GPIO.BCM)
GPIO.setup(gpio_pin, GPIO.OUT, initial=GPIO.LOW)

while True:
    GPIO.output(gpio_pin, GPIO.HIGH)
    sleep(pause_seconds)

    GPIO.output(gpio_pin, GPIO.LOW)
    sleep(pause_seconds)
Make the script executable, and run it:
chmod u+x blinking_led.py

./blinking_led.py
Enjoy the blinking light! (Again!)
Using UV To Manage a ESP8266 MicroPython Project
Background
The ESP8266 is a low-cost Wi-Fi microcontroller, with built-in TCP/IP networking software, and microcontroller capability, produced by Espressif Systems in Shanghai, China.
The chip was popularized in the English-speaking maker community in August 2014 via the ESP-01 module, made by a third-party manufacturer Ai-Thinker. This small module allows microcontrollers to connect to a Wi-Fi network and make simple TCP/IP connections using Hayes-style commands. However, at first, there was almost no English-language documentation on the chip and the commands it accepted. The very low price and the fact that there were very few external components on the module, which suggested that it could eventually be very inexpensive in volume, attracted many hackers to explore the module, the chip, and the software on it, as well as to translate the Chinese documentation.
from Wikipedia
I’m using the ESP32 Basic Starter Kit, which contains an ESP8266 module with the following specifications:
- Model : ESP8266MOD
- Vendor : AI-THINKER
- ISM : 2.4 GHz
- PA : +25 dBm
- Wireless : 802.11b/g/n
Project Setup
Adapted from here: https://docs.micropython.org/en/latest/esp8266/tutorial/intro.html
Make sure your ESP8266 is connected.
Initialize Project, Install ESP Tools
Create a project directory and cd into it:
mkdir esp_test

cd esp_test
Initialize the project:
uv init
The esptool utility is used to communicate with the ROM bootloader in Expressif chips. Add the esptool package:
uv add esptool
Show available commands:
uv tool run --from esptool esptool.py
Commands:
| Command Name | Description |
|---|---|
| load_ram | Download an image to RAM and execute |
| dump_mem | Dump arbitrary memory to disk |
| read_mem | Read arbitrary memory location |
| write_mem | Read-modify-write to arbitrary memory location |
| write_flash | Write a binary blob to flash |
| run | Run application code in flash |
| image_info | Dump headers from a binary file (bootloader or application) |
| make_image | Create an application image from binary files |
| elf2image | Create an application image from ELF file |
| read_mac | Read MAC address from OTP ROM |
| chip_id | Read Chip ID from OTP ROM |
| flash_id | Read SPI flash manufacturer and device ID |
| read_flash_status | Read SPI flash status register |
| write_flash_status | Write SPI flash status register |
| read_flash | Read SPI flash content |
| verify_flash | Verify a binary blob against flash |
| erase_flash | Perform Chip Erase on SPI flash |
| erase_region | Erase a region of the flash |
| read_flash_sfdp | Read SPI flash SFDP (Serial Flash Discoverable Parameters) |
| merge_bin | Merge multiple raw binary files into a single file for later flashing |
| get_security_info | Get some security-related data |
| version | Print esptool version |
Get chip information:
uv tool run --from esptool esptool.py chip_id
Output:
esptool.py v4.8.1
Found 33 serial ports
Serial port /dev/ttyUSB0
Connecting....
Detecting chip type... Unsupported detection protocol, switching and trying again...
Connecting....
Detecting chip type... ESP8266
Chip is ESP8266EX
Features: WiFi
Crystal is 26MHz
MAC: //(redacted)//
Uploading stub...
Running stub...
Stub running...
Chip ID: //(redacted)//
Hard resetting via RTS pin...
Install MicroPython
MicroPython is a software implementation of a programming language largely compatible with Python 3, written in C, that is optimized to run on a microcontroller.
MicroPython consists of a Python compiler to bytecode and a runtime interpreter of that bytecode. The user is presented with an interactive prompt (the REPL) to execute supported commands immediately. Included are a selection of core Python libraries; MicroPython includes modules which give the programmer access to low-level hardware.
from Wikipedia
Erase flash:
uv tool run --from esptool esptool.py erase_flash
Get the MicroPython firmware:
wget https://micropython.org/resources/firmware/ESP8266_GENERIC-20241129-v1.24.1.bin
Flash the firmware to the ESP8266:
uv tool run --from esptool esptool.py --baud 460800 write_flash --flash_size=detect 0 ESP8266_GENERIC-20241129-v1.24.1.bin
Test MicroPython
Install picocom (if needed) and connect to REPL:
sudo apt install picocom

picocom /dev/ttyUSB0 -b115200
Test the REPL:
>>> print('hello esp8266!')

hello esp8266!
Upload and Run a Python Script
Adapted from here: https://problemsolvingwithpython.com/12-MicroPython/12.06-Uploading-Code/
MicroPython Tool (ampy) is a utility to interact with a CircuitPython or MicroPython board over a serial connection.
Ampy is meant to be a simple command line tool to manipulate files and run code on a CircuitPython or MicroPython board over its serial connection. With ampy you can send files from your computer to the board’s file system, download files from a board to your computer, and even send a Python script to a board to be executed.
from PyPI
Install ampy:
uv add adafruit-ampy
Upload a script, then list the file contents of the microcontroller to confirm it’s there:
uv tool run --from adafruit-ampy ampy -p /dev/ttyUSB0 put hello.py

uv tool run --from adafruit-ampy ampy -p /dev/ttyUSB0 ls
Output:
/boot.py
/hello.py
Run the uploaded script:
uv tool run --from adafruit-ampy ampy -p /dev/ttyUSB0 run hello.py
Output:
Hello from esp-test!
Links
| Description | URL |
|---|---|
| ESP32 Technical Reference | https://www.espressif.com/sites/default/files/documentation/esp8266-technical_reference_en.pdf |
| ESP8266MOD Datasheet PDF – Wi-Fi Module – Espressif | https://www.datasheetcafe.com/esp8266mod-datasheet-wi-fi-module/ |
| MicroPython Downloads | https://micropython.org/download/ |
Java
File Operations in Java
Delete a File
Copied from here.
import java.io.File;

public class Delete {
  public static void main(String[] args) {
    String fileName = "file.txt";
    // A File object to represent the filename
    File f = new File(fileName);

    // Make sure the file or directory exists and isn't write protected
    if (!f.exists())
      throw new IllegalArgumentException(
          "Delete: no such file or directory: " + fileName);

    if (!f.canWrite())
      throw new IllegalArgumentException("Delete: write protected: "
          + fileName);

    // If it is a directory, make sure it is empty
    if (f.isDirectory()) {
      String[] files = f.list();
      if (files.length > 0)
        throw new IllegalArgumentException(
            "Delete: directory not empty: " + fileName);
    }

    // Attempt to delete it
    boolean success = f.delete();

    if (!success)
      throw new IllegalArgumentException("Delete: deletion failed");
  }
}
Rename a File
Copied from here.
// File (or directory) with old name
File file = new File("oldname");

// File (or directory) with new name
File file2 = new File("newname");
if(file2.exists()) throw new java.io.IOException("file exists");

// Rename file (or directory)
boolean success = file.renameTo(file2);
if (!success) {
    // File was not successfully renamed
}
Gradle Quick Start
Gradle is a build automation tool used mainly for Java, Android, and JVM-based projects, but it can build almost any type of software.
- Purpose: Automates compiling code, running tests, packaging apps (e.g., JAR/APK), publishing artifacts, and running custom tasks.
- Language: Build scripts are written in Groovy or Kotlin (files like build.gradle or build.gradle.kts).
- Dependency management: Automatically downloads and manages libraries from repositories like Maven Central.
- Performance: Uses incremental builds and build caching to avoid redoing work, making builds faster.
- Extensible: Has a rich plugin system (e.g., Java plugin, Android plugin) and allows you to write custom tasks.
Installation
Prerequisites
- Any major operating system
- Java Development Kit (JDK) version 17 or higher
Note
Gradle supports Kotlin and Groovy as the main build languages. Gradle ships with its own Kotlin and Groovy libraries, therefore they do not need to be installed. Existing installations are ignored by Gradle.
Linux Installation (manual)
Step 1 - Download the latest Gradle distribution
The distribution ZIP file comes in two flavors: Binary-only and Complete. I’ll be installing the Binary-only version.
Step 2 - Unpack the distribution
Unzip the distribution zip file in the directory of your choosing, e.g.:
sudo mkdir /opt/gradle

sudo unzip -d /opt/gradle gradle-9.3.1-bin.zip
Step 3 - Configure your system environment
export PATH=$PATH:/opt/gradle/gradle-9.3.1/bin
Verify the installation
gradle -v
Output will be similar to this:
------------------------------------------------------------
Gradle 9.3.0
------------------------------------------------------------

Build time:    2026-01-16 11:14:22 UTC
Revision:      701205ed2f78811508466c8e1952304c2ea869f5

Kotlin:        2.2.21
Groovy:        4.0.29
Ant:           Apache Ant(TM) version 1.10.15 compiled on August 25 2024
Launcher JVM:  21.0.9 (Ubuntu 21.0.9+10-Ubuntu-124.04)
Daemon JVM:    /usr/lib/jvm/java-21-openjdk-amd64 (no Daemon JVM specified, using current Java home)
OS:            Linux 6.14.0-37-generic amd64
IDE Setup
I’ll be using Visual Studio Code as my IDE. If you’re using something different (e.g., Intellij), it shouldn’t be difficult to adapt.
Install these VS Code extensions:
| Extension | Publisher | Marketplace Link |
|---|---|---|
| Language Support for Java by Red Hat | Red Hat | https://marketplace.visualstudio.com/items?itemName=redhat.java |
| Debugger for Java | Microsoft | https://marketplace.visualstudio.com/items?itemName=vscjava.vscode-java-debug |
| Gradle for Java | Microsoft | https://marketplace.visualstudio.com/items?itemName=vscjava.vscode-gradle |
| Project Manager for Java | Microsoft | https://marketplace.visualstudio.com/items?itemName=vscjava.vscode-java-dependency |
| Test Runner for Java | Microsoft | https://marketplace.visualstudio.com/items?itemName=vscjava.vscode-java-test |
Initialize a Project
mkdir project-name

cd project-name
Then:
gradle init --type java-application --dsl kotlin
(Accept the defaults)
Valid --type values:
| Type | Description |
|---|---|
| pom | Converts an existing Apache Maven build to Gradle |
| basic | A basic, empty, Gradle build |
| java-application | A command-line application implemented in Java |
| java-gradle-plugin | A Gradle plugin implemented in Java |
| java-library | A Java library |
| kotlin-application | A command-line application implemented in Kotlin/JVM |
| kotlin-gradle-plugin | A Gradle plugin implemented in Kotlin/JVM |
| kotlin-library | A Kotlin/JVM library |
| groovy-application | A command-line application implemented in Groovy |
| groovy-gradle-plugin | A Gradle plugin implemented in Groovy |
| groovy-library | A Groovy library |
| scala-application | A Scala application |
| scala-library | A Scala library |
| cpp-application | A command-line application implemented in C++ |
| cpp-library | A C++ library |
Valid --dsl values: kotlin and groovy.
Project Details
The Gradle configuration details can be found in app/build.gradle.kts:
/*
 * This file was generated by the Gradle 'init' task.
 *
 * This generated file contains a sample Java application project to get you started.
 * For more details on building Java & JVM projects, please refer to https://docs.gradle.org/9.3.0/userguide/building_java_projects.html in the Gradle documentation.
 */

plugins {
    // Apply the application plugin to add support for building a CLI application in Java.
    application
}

repositories {
    // Use Maven Central for resolving dependencies.
    mavenCentral()
}

dependencies {
    // Use JUnit Jupiter for testing.
    testImplementation(libs.junit.jupiter)

    testRuntimeOnly("org.junit.platform:junit-platform-launcher")

    // This dependency is used by the application.
    implementation(libs.guava)
}

// Apply a specific Java toolchain to ease working on different environments.
java {
    toolchain {
        languageVersion = JavaLanguageVersion.of(21)
    }
}

application {
    // Define the main class for the application.
    mainClass = "org.example.App"
}

tasks.named<Test>("test") {
    // Use JUnit Platform for unit tests.
    useJUnitPlatform()
}
A main class is generated in app/src/main/java/org/example/App.java:
/*
 * This source file was generated by the Gradle 'init' task
 */
package org.example;

public class App {
    public String getGreeting() {
        return "Hello World!";
    }

    public static void main(String[] args) {
        System.out.println(new App().getGreeting());
    }
}
A unit test is generated in app/src/test/java/org/example/AppTest.java:
/*
 * This source file was generated by the Gradle 'init' task
 */
package org.example;

import org.junit.jupiter.api.Test;
import static org.junit.jupiter.api.Assertions.*;

class AppTest {
    @Test void appHasAGreeting() {
        App classUnderTest = new App();
        assertNotNull(classUnderTest.getGreeting(), "app should have a greeting");
    }
}
Gradle Wrapper
The generated project includes Gradle wrapper shell (gradlew) and batch (gradlew.bat) scripts. These allow anyone to build the project without having to install Gradle manually.
You can see all of the tasks that the Gradle wrapper is configured to run within a specific project by invoking it like this:
./gradlew tasks
Example output (abbreviated):
> Task :tasks

------------------------------------------------------------
Tasks runnable from root project 'gradle-test'
------------------------------------------------------------

Application tasks
-----------------
run - Runs this project as a JVM application

Build tasks
-----------
assemble - Assembles the outputs of this project.
build - Assembles and tests this project.
buildDependents - Assembles and tests this project and all projects that depend on it.
buildNeeded - Assembles and tests this project and all projects it depends on.
classes - Assembles main classes.
clean - Deletes the build directory.
jar - Assembles a jar archive containing the classes of the 'main' feature.
testClasses - Assembles test classes.

Build Setup tasks
-----------------
init - Initializes a new Gradle build.
updateDaemonJvm - Generates or updates the Gradle Daemon JVM criteria.
wrapper - Generates Gradle wrapper files.

Distribution tasks
------------------
assembleDist - Assembles the main distributions
distTar - Bundles the project as a distribution.
distZip - Bundles the project as a distribution.
installDist - Installs the project as a distribution as-is.

Documentation tasks
-------------------
javadoc - Generates Javadoc API documentation for the 'main' feature.
Build the Project
Using the Gradle wrapper (in the project directory):
./gradlew build
Using the Gradle runner in VS Code:
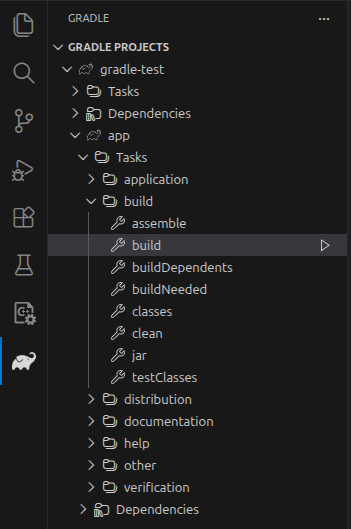
Run the Project
Using the Gradle wrapper:
./gradlew run
Using the Gradle runner in VS Code:
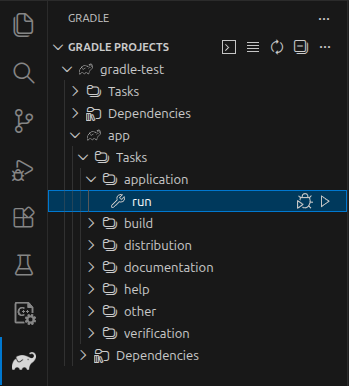
Output:
> Task :app:run
Hello World!

BUILD SUCCESSFUL in 1s
2 actionable tasks: 1 executed, 1 up-to-date
Configuration cache entry reused.
Run Unit Tests
Using the Gradle wrapper:
./gradlew test
Using the Gradle runner in VS Code:
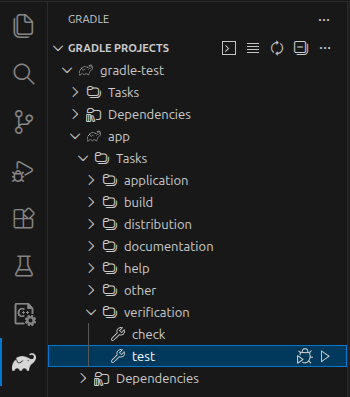
Output:
BUILD SUCCESSFUL in 1s
3 actionable tasks: 3 up-to-date
Configuration cache entry stored.
Fat Jar
If you want to generate a “fat jar” (a .jar file that contains your application and also all dependencies), first add this to app/build.gradle.kts:
tasks.jar {
    manifest {
        attributes["Main-Class"] = application.mainClass.get()
    }
    from({
        configurations.runtimeClasspath.get().map {
            if (it.isDirectory) it else zipTree(it)
        }
    })
    duplicatesStrategy = DuplicatesStrategy.EXCLUDE
}
Then, build your .jar file with this:
./gradlew jar
Finally, run your .jar with this:
java -jar app/build/libs/app.jar
Links
Gradle Home Page
| Description | URL |
|---|---|
| Home Page | https://gradle.org |
| Gradle downloads | https://gradle.org/releases |
| Gradle User Manual | https://docs.gradle.org/current/userguide/userguide.html |
| Installation guide | https://docs.gradle.org/current/userguide/installation.html |
| Beginner tutorial | https://docs.gradle.org/current/userguide/part1_gradle_init.html |
Other
| Description | URL |
|---|---|
| Oracle Java: Oracle’s Java distribution, with Oracle-specific licenses and subscriptions. | https://www.oracle.com/java/ |
| OpenJDK: Open-source reference implementation of Java. Free to use and redistribute. | https://openjdk.org/ |
| Kotlin: A general-purpose programming language derived from Java. | https://kotlinlang.org/ |
| Apache Groovy: A Java-syntax-compatible object-oriented programming language for the Java platform. | https://groovy-lang.org/ |
| Maven Central: Public repository for Java and JVM artifacts used by Apache Maven, Gradle, and other build tools. | https://central.sonatype.com |
Java Links
Learning Resources
Getting Started with Java in Visual Studio Code
Learn Java – Free Java Courses for Beginners - freecodecamp
Maven
Maven – Welcome to Apache Maven
Maven Central Repository Search (original)
Maven Example
Steps
Generate project:
mvn archetype:generate -DgroupId=com.example -DartifactId=my-console-app -DarchetypeArtifactId=maven-archetype-quickstart -DinteractiveMode=false
Edit pom.xml.
Add compiler source and target versions:
<properties>
  <maven.compiler.source>21</maven.compiler.source>
  <maven.compiler.target>21</maven.compiler.target>
</properties>
Specify the main class:
<build>
  <plugins>
    <plugin>
      <groupId>org.apache.maven.plugins</groupId>
      <artifactId>maven-jar-plugin</artifactId>
      <configuration>
        <archive>
          <manifest>
            <addClasspath>true</addClasspath>
            <mainClass>com.example.App</mainClass>
          </manifest>
        </archive>
      </configuration>
    </plugin>
  </plugins>
</build>
Build .jar:
mvn clean package
The .jar file is generated inside the target directory. Run it:
java -jar my-console-app-1.0-SNAPSHOT.jar
Output:
Hello World!
Add a Dependency
<dependency>
  <groupId>org.json</groupId>
  <artifactId>json</artifactId>
  <version>20250517</version>
</dependency>
Include Dependencies in Jar
Tip
If you use this, you no longer need the maven-jar-plugin plugin entry.
<plugin>
  <artifactId>maven-assembly-plugin</artifactId>
  <executions>
    <execution>
      <phase>package</phase>
      <goals>
        <goal>single</goal>
      </goals>
    </execution>
  </executions>
  <configuration>
    <descriptorRefs>
      <descriptorRef>jar-with-dependencies</descriptorRef>
    </descriptorRefs>
    <archive>
      <manifest>
        <addClasspath>true</addClasspath>
        <mainClass>com.example.App</mainClass>
      </manifest>
    </archive>
  </configuration>
</plugin>
Makefile
default:
    @echo 'Targets:'
    @echo '  package   -- Build the .jar file(s)'
    @echo '  list      -- Show .jar file(s)'
    @echo '  run       -- Run the "lite" .jar file (dependencies not included)'
    @echo '  run-full  -- Run the "full" .jar file (dependencies included)'

package:
    mvn clean package

list:
    cd target; ls -lh *.jar

run:
    cd target; java -jar my-console-app-1.0-SNAPSHOT.jar

run-full:
    cd target; java -jar my-console-app-1.0-SNAPSHOT-jar-with-dependencies.jar
Complete Updated Pom Example
<?xml version="1.0"?>
<project xmlns="http://maven.apache.org/POM/4.0.0" xmlns:xsi="http://www.w3.org/2001/XMLSchema-instance" xsi:schemaLocation="http://maven.apache.org/POM/4.0.0 http://maven.apache.org/maven-v4_0_0.xsd">
    <modelVersion>4.0.0</modelVersion>
    <groupId>com.example</groupId>
    <artifactId>my-console-app</artifactId>
    <packaging>jar</packaging>
    <version>1.0-SNAPSHOT</version>
    <name>my-console-app</name>
    <url>http://maven.apache.org</url>
    <dependencies>
    <dependency>
        <groupId>junit</groupId>
        <artifactId>junit</artifactId>
        <version>3.8.1</version>
        <scope>test</scope>
    </dependency>
    <dependency>
        <groupId>org.json</groupId>
        <artifactId>json</artifactId>
        <version>20250517</version>
    </dependency>
    </dependencies>
    <properties>
    <maven.compiler.source>21</maven.compiler.source>
    <maven.compiler.target>21</maven.compiler.target>
    </properties>
    <build>
    <plugins>
        <plugin>
        <artifactId>maven-assembly-plugin</artifactId>
        <executions>
            <execution>
            <phase>package</phase>
            <goals>
                <goal>single</goal>
            </goals>
            </execution>
        </executions>
        <configuration>
            <descriptorRefs>
            <descriptorRef>jar-with-dependencies</descriptorRef>
            </descriptorRefs>
            <archive>
            <manifest>
                <addClasspath>true</addClasspath>
                <mainClass>com.example.App</mainClass>
            </manifest>
            </archive>
        </configuration>
        </plugin>
    </plugins>
    </build>
</project>
Modify default Java runtime in Linux
If you have more than one version of Java installed in Linux, you may need to modify the default version. You can display the installed versions, and optionally modify the default, by invoking the following in a terminal session:
sudo update-alternatives --config java
Mainframe
JCL and Programming On the MVS Turnkey System
This assumes you’ve already set up, run, connected to, and logged in to an MVS Turnkey system. If not, you can find instructions here.
About
A job to be run consists of two parts:
- JCL to tell the mainframe how to run the program, and
- The actual program, written in a language with a supporting compiler on the mainframe.
// JCL comes first, and is prefixed by two slashes
The program source follows.
Important
The JCL message class must be set to ‘H’, or you won’t be able to see the output from your jobs.
The ‘H’ indicates to the system that the output should be ‘Held’, making it available for viewing in the OUTLIST utility, in Data Set Utilities.
COBOL
COBOL first appeared in 1959. The latest stable release was in 2014. It’s meant to be “English-like” in syntax.
COBOL is still widely deployed. For example, as of 2017, about 95 percent of ATM swipes use COBOL code, and it powers 80 percent of in-person transactions.
Create and Submit the Job
Your starting point should be the main screen:
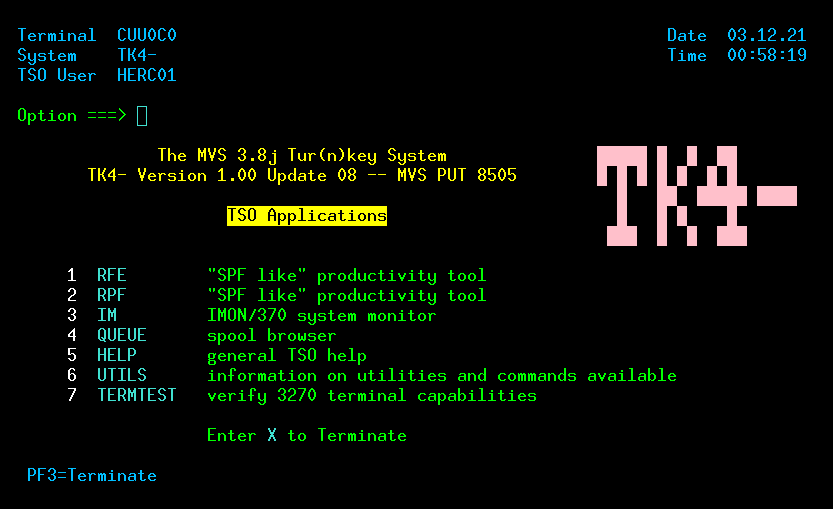
Enter ‘1’ to access the RFE tool:
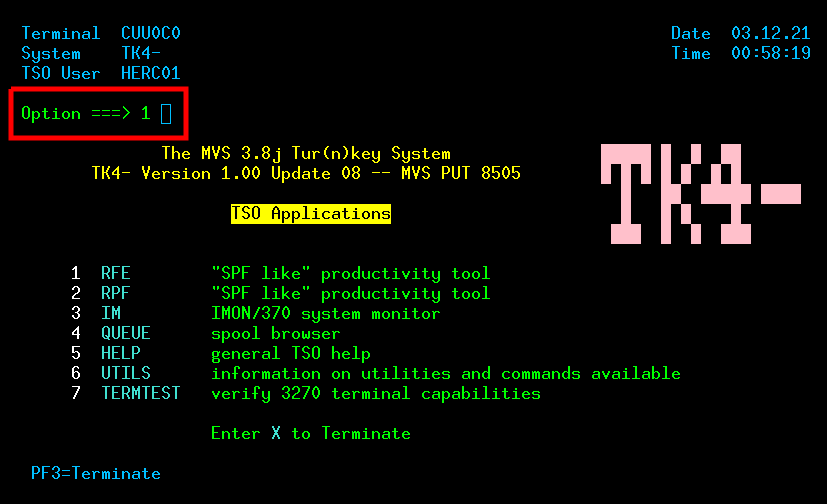
Enter ‘3’ to access utility functions:
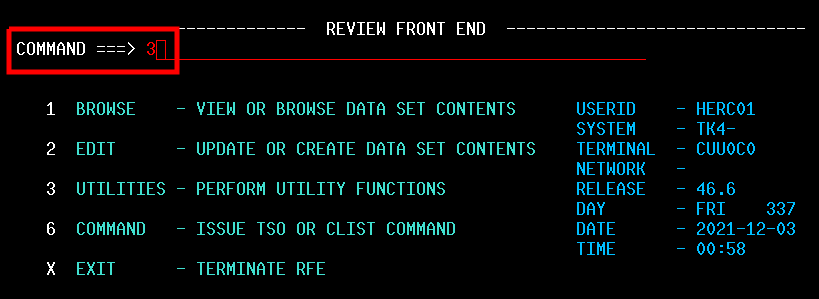
Enter ‘4’ to access the Data Set list:
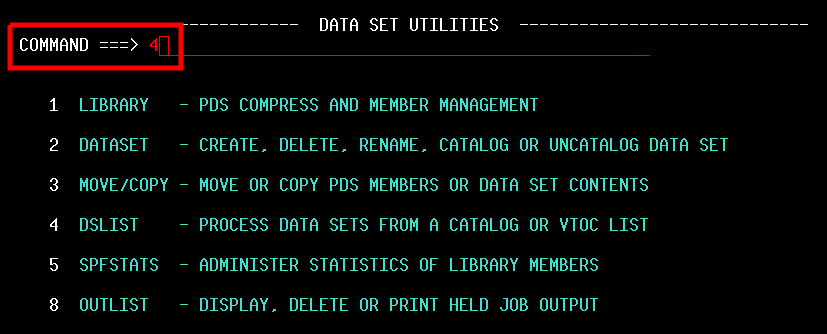
Enter ‘SYS2.JCLLIB’ to filter the Data Set list:
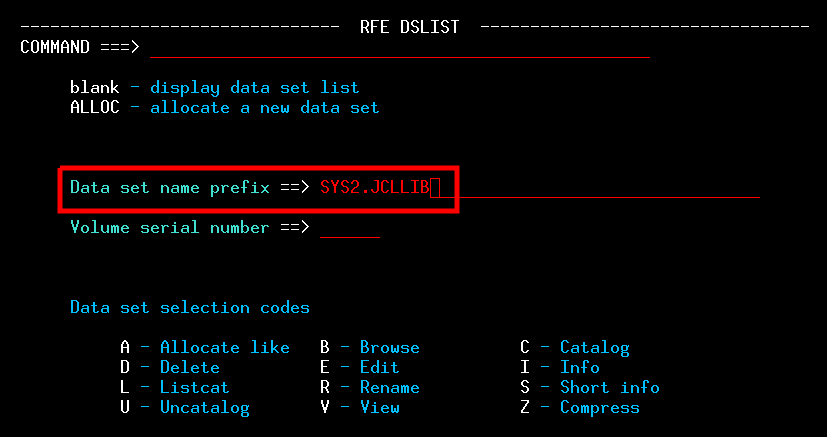
Tab to the detail line for SYS2.JCLLIB, then enter ‘e’ in the S column, for Edit:

The Data Set list will display:
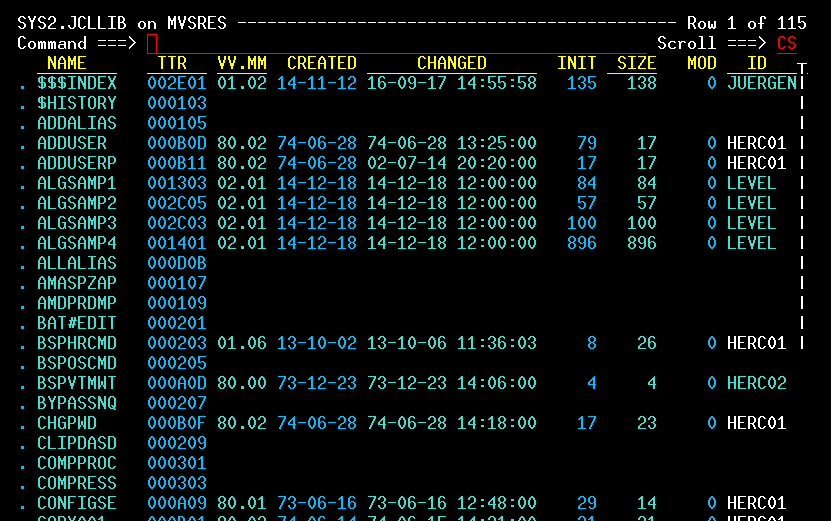
If you press [F8] (page down) a few times, you’ll see several Data Sets with names that begin with ‘TEST’. These are test programs for various languages:

We’ll be using TESTCOB as a template for our COBOL job. We don’t want to use it directly, creating a copy instead. The first thing to do is to create a new, empty Data Set, with the name NEWCOB:
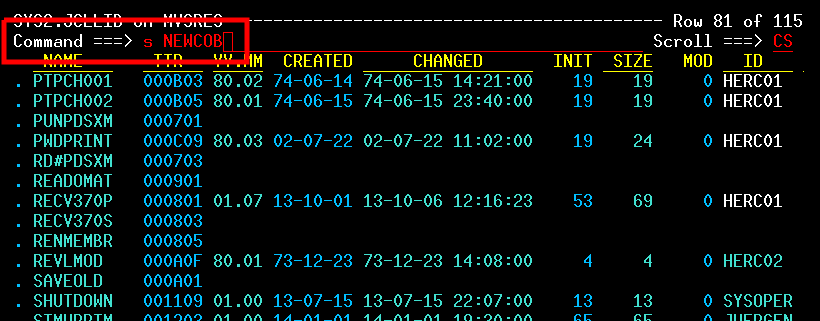
The new, empty Data Set opens in REVEDIT.
Next, we indicate that we want to populate it with a copy of the contents of TESTCOB:
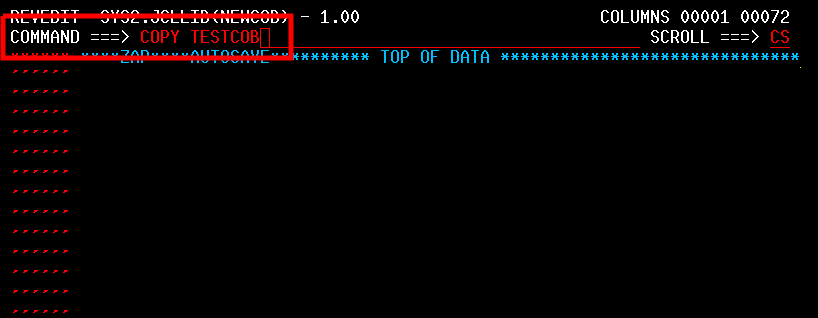
The editor will display the copied text:
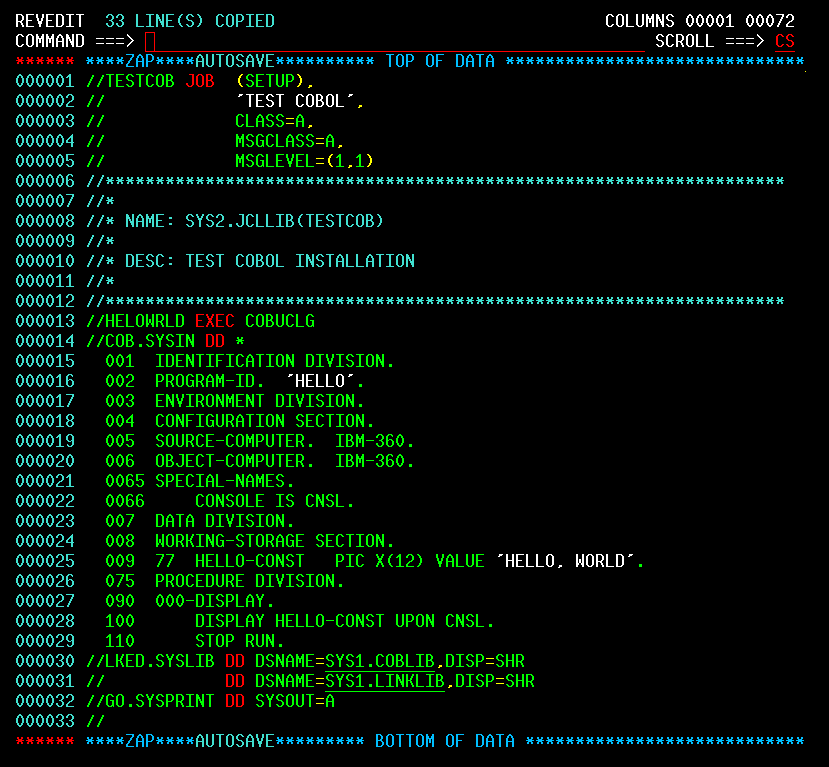
Make a few edits to the copied text. First, in line 0001, change TESTCOB to NEWCOB:

In line 0002, update the description:

Finally, in line 0004, change the MSGCLASS to ‘H’:
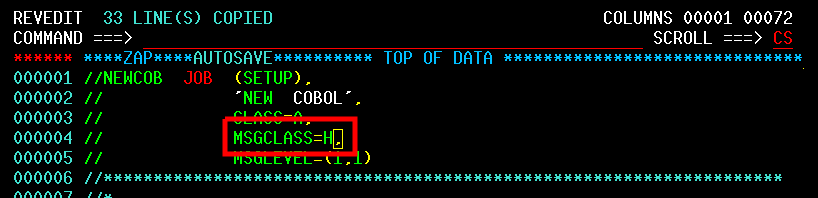
(This will ensure that the output from the job is retained and viewable after we run it)
Save your changes:
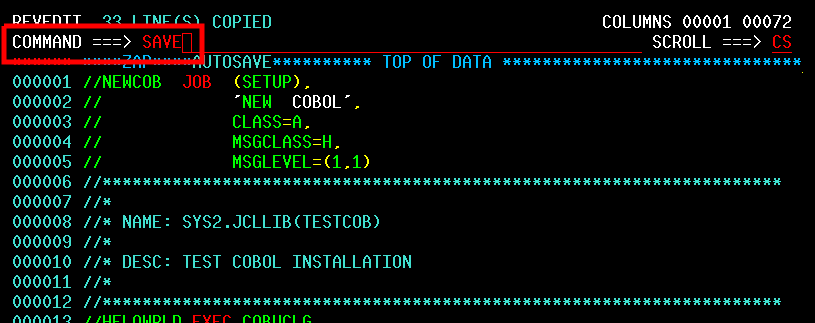
Submit the job:
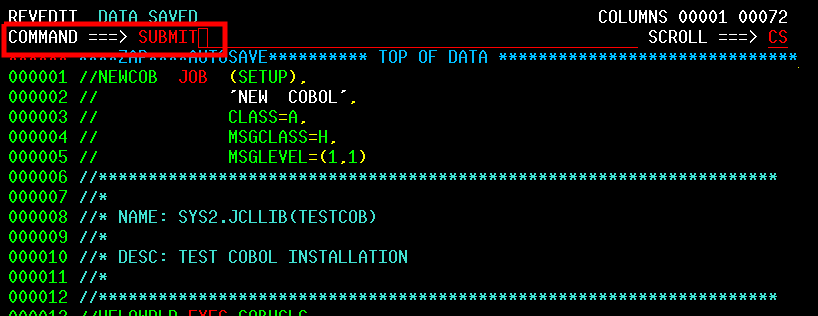
You’ll see a confirmation message, indicating that the job has been submitted:

Check the Results
If you aren’t already on the main screen, press [F3] until it’s displayed:
Enter ‘1’ to access the RFE tool:
Enter ‘3’ to access utility functions:
Enter ‘8’ to access held job output:
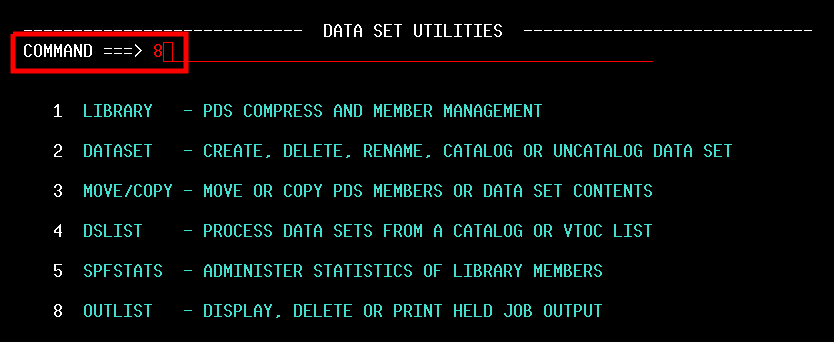
Enter ‘ST *’, indicating that you want to display all held jobs:

You’ll see ‘NEWCOB’, the job you recently submitted, at the end of the list:
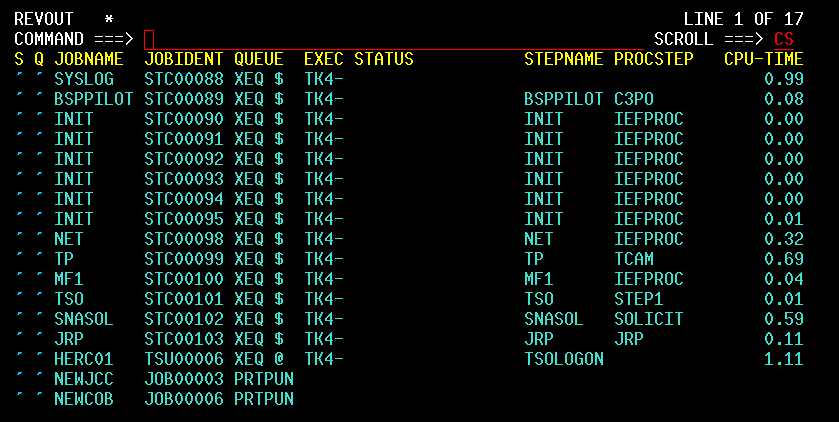
Enter ‘S’ in the S column for the NEWCOB job:
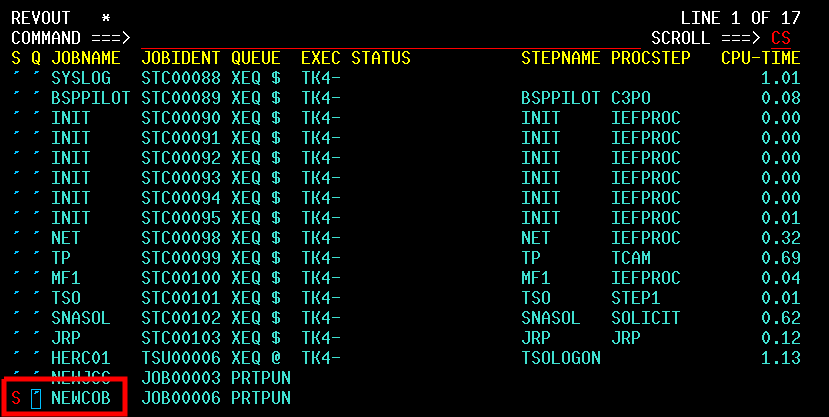
Job output is displayed:
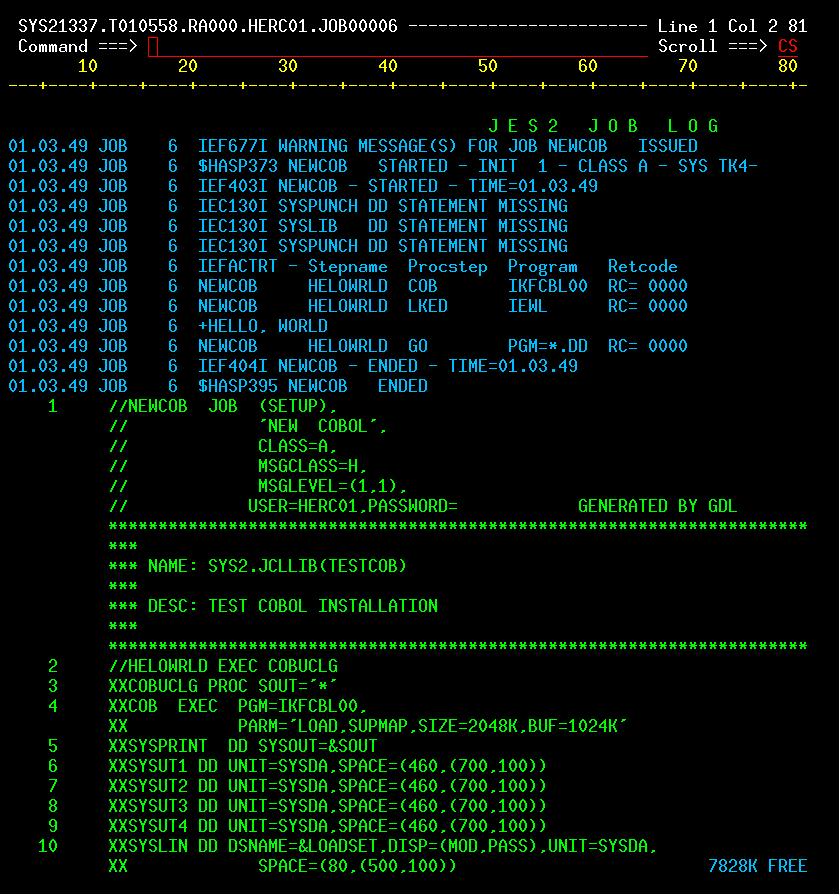
Press [F8] to page down, and you’ll see the ‘Hello World’ output:
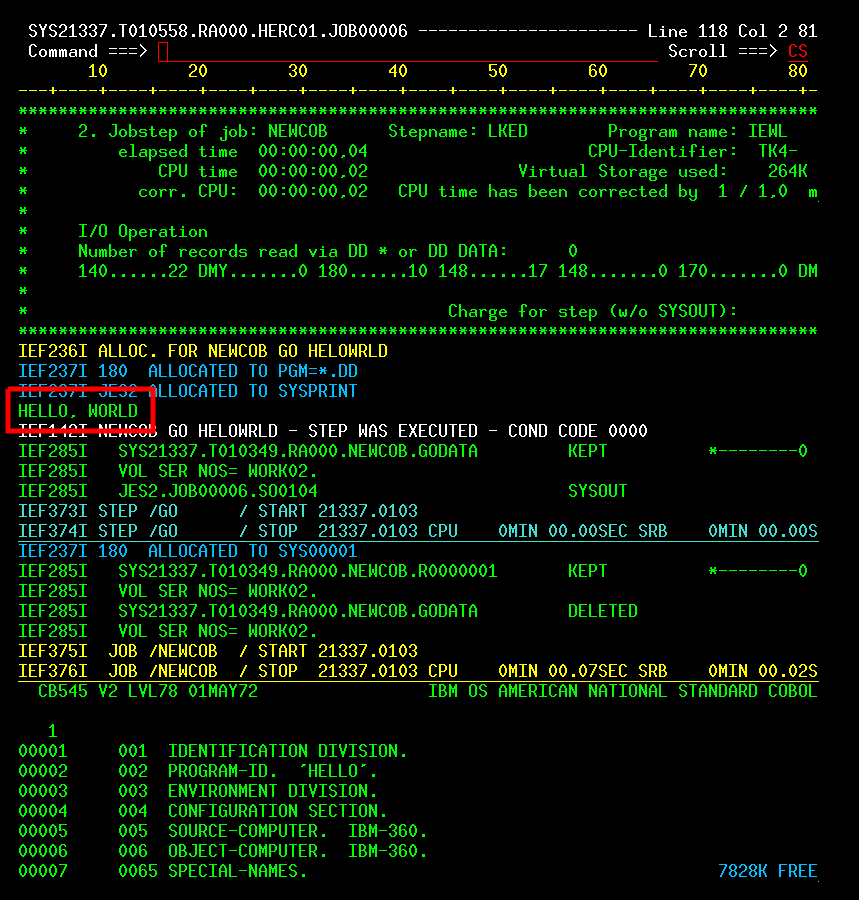
Press [F3] several times to return to the main screen.
FORTRAN
FORTRAN first appeared in 1957. The latest stable release was in 2018. It’s widely used in scientific and engineering applications.
Follow the COBOL instructions, with the following differences:
- Copy ‘TESTFORT’ instead of ‘TESTCOB’, and name it ‘NEWFORT’ instead of ‘NEWCOB’.
- When you edit NEWFORT, change the job name and description to indicate NEWFORT instead of NEWCOB.
PL/1
You may also see the name written as ‘PL/I’. It first appeared in 1964, and the latest stable release was in 2019.
Follow the COBOL instructions, with the following differences:
- Copy ‘TESTPL1’ instead of ‘TESTCOB’, and name it ‘NEWPL1’ instead of ‘NEWCOB’.
- When you edit NEWPL1, change the job name and description to indicate NEWPL1 instead of NEWCOB.
There’s an additional change, and it’s important:
Important
There’s a critical “gotcha” in Pl/1 programs. MVS requires a JOBLIB statement in the JCL, and it’s not included in the turnkey sample programs. The following additional line is required in the Data Set. This should be added as a new line at the end of the JCL section:
//JOBLIB DD DSN=SYS1.PL1LIB,DISP=SHR
Note
To add a new line in the editor, enter an ‘I’ in the first column of a row, and the new row will be inserted after. Example location:
Tip
You can also delete a line by entering a ‘D’ in the same location.
C
C first appeared in 1972, and the latest stable release was in 2018. It’s the most actively used “old language” by far, heavily used in operating system and kernel development, device drivers, and embedded development.
It’s a dangerous language: Memory management is tricky. But, it’s also extremely powerful, as it’s well suited for getting close to the hardware.
Follow the COBOL instructions, with the following differences:
- Copy ‘TESTJCC’ instead of ‘TESTCOB’, and name it ‘NEWJCC’ instead of ‘NEWCOB’. Use TESTJCC as your copy source, not TESTGCC. The GCC compiler ABENDs (throws an error) in the MVS Turnkey system.
- When you edit NEWJCC, change the job name and description to indicate NEWJCC instead of NEWCOB.
Mainframe Emulation on Raspberry Pi Zero
What You’ll Need
| Item | Description |
|---|---|
| MVS 3.8j Tur(n)key 4- System | Uses Hercules to emulate an IBM 3033 mainframe. The site has nice detailed documentation. |
| Raspberry Pi Zero W | This is the host machine for your emulated mainframe. Assumes you’ve already set up the OS. I used Raspbian. |
| Linux client system | This is the system you’ll use to connect to your emulated mainframe. I’m running Linux Mint 20.1 Cinnamon, but any distro should work. (Instructions do assume Debian-based tools, though.) You can also use Windows as your client system, but I’ll only be covering Linux setup in this article. |
| x3270 | IBM 3270 terminal emulator for the X Window System and Windows. |
Log in to your Raspberry Pi Zero W (or, log in from your client machine using SSH). Stay in a console session (don’t load a window manager). The Zero is pretty resource constrained, so we don’t want a GUI chewing up memory and CPU cycles.
Retrieve the MVS 3.8j Tur(n)key 4- System installation archive:
wget http://wotho.ethz.ch/tk4-/tk4-_v1.00_current.zip
Install (change the path to the zip as needed):
cd /opt

sudo mkdir mvs

sudo unzip /home/pi/Downloads/tk4-_v1.00_current.zip -d /opt/mvs/
Start (unattended mode):
cd /opt/mvs

sudo ./mvs
Startup can take several minutes. You’ll know it’s completed when you see a screen similar to this:
Leave the mvs script running.
Client Terminal (client machine)
Install x3270:
sudo apt install x3270
…and run it:
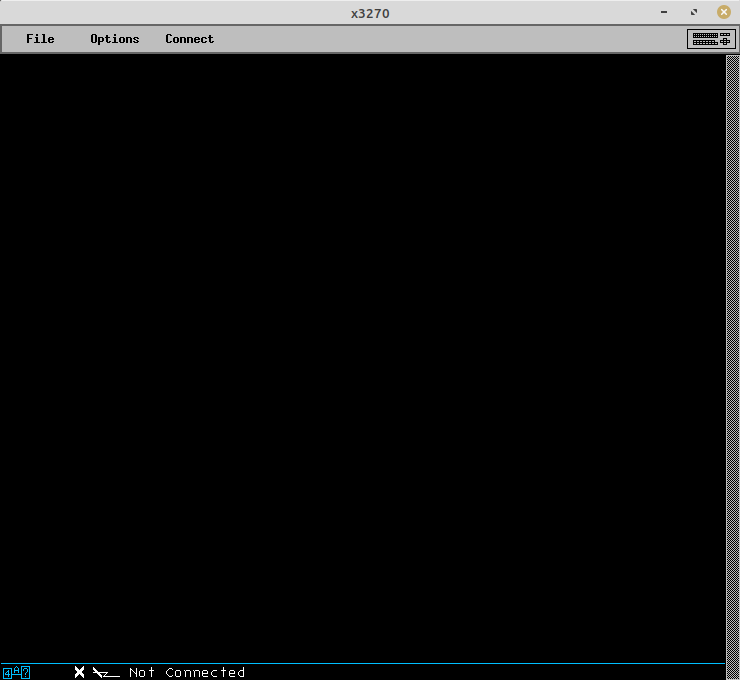
Click the “Connect” menu option, and connect to raspi-machine:3270 (raspi-machine should be changed to whatever host name your Raspberry Pi was set up with.) If it can’t resolve, you may need to use the IP address, or add an entry for your Raspberry Pi to your /etc/hosts file.
Logon a TSO Session
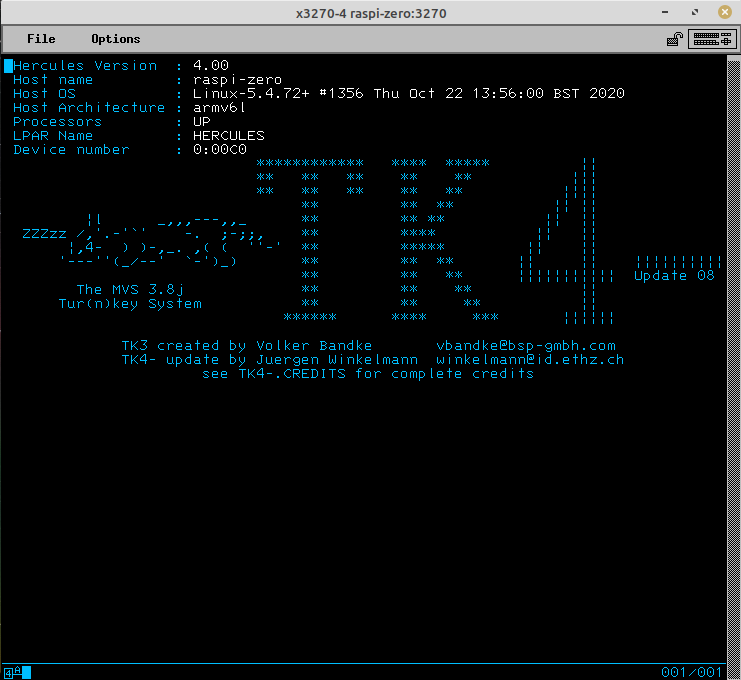
In this case press the 3270 RESET key followed by the CLEAR key to display the logon panel (RESET is needed if the keyboard is locked only). Otherwise the logon panel is displayed immediately.
Tip
For special x3270 keys, like RESET, CLEAR, and PF3, click the keyboard icon in the upper-right corner of the x3270 application, and you’ll be presented with a keypad.
Logon with one of the following users:
- HERC01 is a fully authorized user with full access to the RAKF users and profiles tables. The logon password is CUL8TR.
- HERC02 is a fully authorized user without access to the RAKF users and profiles tables. The logon password is CUL8TR.
- HERC03 is a regular user. The logon password is PASS4U.
- HERC04 is a regular user. The logon password is PASS4U.
- IBMUSER is a fully authorized user without access to the RAKF users and profiles tables. The logon password is IBMPASS. This account is meant to be used for recovery purposes only.
After the “Welcome to TSO” banner has been displayed, press ENTER. The system will entertain you with a fortune cookie. Press ENTER again. The TSO applications menu will display:
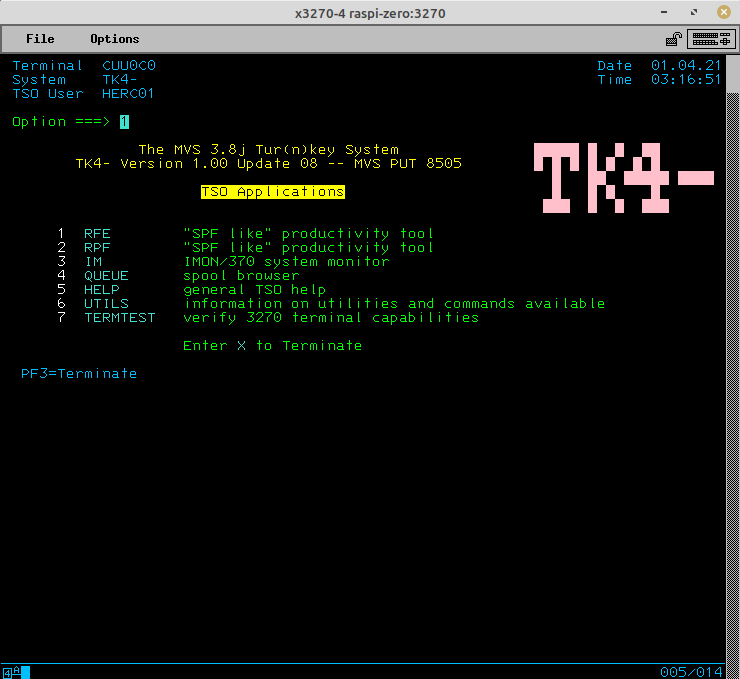
Congratulations! You’ve successfully configured your mainframe, and logged in to an operator session.
Logoff a TSO Session
- Exit any active application.
- Press PF3 to exit to the READY prompt.
- Enter logoff and press ENTER. The tn3270 session will not drop and the logon panel will be redisplayed. Disconnect the tn3270 session manually if you don’t want to logon again or enter a userid to relogon.
Stop the System
- Logon TSO user HERC01 or HERC02.
- Press PF3 from the TSO Applications menu to exit to the READY prompt.
- Type shutdown and press ENTER.
- Enter logoff and press ENTER.
After pausing 30 seconds the automated shutdown procedure will bring the system down and quit Hercules (which is equivalent to powering off the IBM 3033 mainframe).
What’s Next?
Now that your mainframe is up and running, what can you do with it? Things like:
- Run jobs with JCL
- Manage queues
- Printing
PHP
Get Started With Laravel
Laravel is an open-source PHP web framework. It follows the model-view-controller architectural pattern, and is based on Symfony.
To use it, you’ll first need the composer tool, which you can install from your package manager.
Then, install the Laravel CLI as follows:
composer global require laravel/installer
If it complains about ext-zip, similar to this:
laravel/installer v2.0.1 requires ext-zip * → the requested PHP extension zip is missing from your system.
…then determine which version of PHP you’re running, and install the appropriate PHP zip version:
php --version

sudo apt-get install php7.2-zip
After Laravel CLI is installed, you can create a new Laravel project as follows.
Example project named “blog”:
laravel new blog
If the Laravel CLI complains about ext-dom, install it as follows (making sure you’re referencing the correct PHP version):
sudo apt-get install php7.2-xml
Install php7-xml to avoid utf encode/decode issue
Issue
-
Try to run a local instance of the Dokuwiki installer, using PHP 7’s build-in dev server.
-
Get these errors:
PHP function utf8_encode is not available. Maybe your hosting provider disabled it for some reason?
PHP function utf8_decode is not available. Maybe your hosting provider disabled it for some reason?
Solution
Use your package manager to install the php7-xml package.
Passing a value in the URL for use by PHP
When you pass a value in a URL, like this: https://www.mysite.com/mypage.php?id=20
You can access the value (or values) passed as follows:
$myid = $_GET['id'];
PHP Login Script Tutorial
Simplified tutorial is here.
Warning
This tutorial is storing clear-text passwords in the database.
Prevent Code Injection In PHP
The htmlentities() function converts HTML into HTML entities. < would become <, and > would become >. By doing so, the browser can’t run HTML tags that a malicious user might try to inject.
For Example:
// data submitted by a malicious user
$maliciousInput = "<script type='text/javascript>'
alert('I am going to inject code! LULZ!')
</script>";
// convert HTML into HTML entities to prevent code injection
$safeInput = htmlentities($maliciousInput);
// now it's ok to display it
echo "$safeInput";
Output:
<script type="text/javascript>
alert('I am going to inject code! LULZ!')
</script>
If we did not use the htmlentities() function in the above example, the injected code would execute as intended by the malicious user.
Redirect in PHP
Use this in a index.php file when you want to automatically redirect a web user to a new location:
<?php
header( 'Location: target_url_here' );
?>
Slim Framework
System Requirements
- Your web server must support URL rewriting
- PHP 7.2 or newer
You’ll need the Composer tool. You can download it from the Composer website, or install it from your package manager.
New Project Setup
Go to the root folder of your project, and execute this command to install the Slim dependencies:
composer require slim/slim:"4.*"
The Slim files will be placed in your project’s vendor/ directory.
You’ll also need to install a PSR-7 implementation. Slim supports several . I used Slim PSR-7:
composer require slim/psr7
The PSR-7 files will also be placed in the vendor/ directory.
Create a public/ folder to hold your project files. You’ll now have two sub-directories in your project root, vendor/ and public/.
Create an .htaccess file in public/, and add the following contents:
RewriteEngine On
RewriteCond %{REQUEST_FILENAME} !-f
RewriteCond %{REQUEST_FILENAME} !-d
RewriteRule ^ index.php [QSA,L]
Create an index.php file in public/, and add the following contents:
<?php
use Psr\Http\Message\ResponseInterface as Response;
use Psr\Http\Message\ServerRequestInterface as Request;
use Slim\Factory\AppFactory;
require __DIR__ . '/../vendor/autoload.php';
$app = AppFactory::create();
$app->get('/', function ($request, $response, $args) {
$response->getBody()->write("Hello world!");
return $response;
});
$app->get('/value/{id}', function ($request, $response, $args) {
$passed_value = $args['id'];
$response->getBody()->write("Value is $passed_value");
return $response;
});
$app->run();
To test your new project, cd into public/, and start a PHP development server instance:
php -S localhost:8080
Open a web browser, and navigate to http://localhost:8080. You should see the following:
Hello world!
Navigate to http://localhost:8080/value/2. You should see the following:
Value is 2
You now have a simple starting configuration, with routing for the root URL, and also a simple RESTful endpoint at /value/{id}.
Deployment
The entire project folder must be deployed to your web server, but the project should be served from the public/ directory.
For example, let’s say that you want your new service to be published in a subdomain at https://myservice.your_domain_name.com/:
- Create a directory for your project on your web server, e.g., /home/username/www/myservice.
- Upload your entire project folder to /home/username/www/myservice.
- Configure the new subdomain https://myservice.your_domain_name.com/ to be served from /home/username/www/myservice/public.
Use a value from a posted form in PHP
When you post a form, the receiving page can process the form variables (in PHP) as follows:
$targetvar = $_POST['formvariablename'];
It’s also a good idea to make sure you handle special HTML characters properly:
$targetvar = htmlspecialchars($_POST['formvariablename']);
Verbose PHP Logging To Web Browser
I was doing some local PHP development using the built-in PHP web server, e.g.:
php -S localhost:5000
I had a failing statement, and all I was getting was an Internal Server Error message. I finally tracking down the problem by adding the following statements (temporarily) to my PHP code:
error_reporting(2047);
ini_set("display_errors",1);
This caused verbose logging to be dumped to my browser, allowing me to understand the problem.
Python
Bundling a Multiple Module Python Project Into a Zip File
A Python project with multiple modules can be bundled into a single .zip file for easy deployment, similar to a JAR file. This doesn’t manage dependencies (like Freeze or py2exe) but for systems where you know that the project dependencies (and a Python interpreter) are already installed, it makes using the project much easier.
Here’s a simple example. Let’s say you have a Python project with two modules: __main__.py and mygreeting.py. (For the .zip bundle to work, the entry point must be in a file named __main__.py)
main.py
import mygreeting
import sys
arg_count = len(sys.argv)
print('Number of arguments:', arg_count, 'argument(s).')
print('Argument List:', str(sys.argv))
greeter = mygreeting.MyGreeter()
greeter.say_hello("" if arg_count == 1 else sys.argv[1])
mygreeting.py
class MyGreeter:
def __init__(self) -> None:
pass
def say_hello(self, name = ""):
print("Hello there!" if name == "" else f"Hello, {name}!")
Compress all of the source files into a .zip file:
zip myapp.zip *.py
Then, execute the bundle with the Python interpreter:
python3 myapp.zip
Output:
Number of arguments: 1 argument(s).
Argument List: ['myapp.zip']
Hello there!
You can also pass arguments to the bundle:
python3 myapp.zip Jim
Output:
Number of arguments: 2 argument(s).
Argument List: ['myapp.zip', 'Jim']
Hello, Jim!
You can also make a bundle that can be run directly:
echo '#!/usr/bin/env python3' | cat - myapp.zip > myapp
chmod u+x myapp
Run it:
./myapp
Same output:
Number of arguments: 1 argument(s).
Argument List: ['myapp.zip']
Hello there!
You can copy the .zip or executable bundle anywhere on your system as a single file, and it will be runnable. Very handy!
Check an XML file to see if it is well-formed
This Python script will check a file (or all files in a directory tree) to verify that it/they contain well-formed XML.
import os
import string
import sys
from xml.dom.minidom import parse, parseString
def CheckFile(fileName):
try:
dom1 = parse(fileName)
if sys.argv[1] != '-rq':
print fileName + ' is OK'
except Exception as ex:
print fileName + ': ' + str(ex)
def RecursiveCheck():
for root, subFolders, files in os.walk('.'):
for file in files:
fullFileName = os.path.join(root,file)
fileName,fileExt = os.path.splitext(fullFileName)
if fileExt == '.xml' or fileExt == '.config' or fileExt == '.build':
CheckFile(fullFileName)
def UsageMessage():
print '\nUsage:\n'
print '\tSingle file:'
print '\t\tconfigchecker.py <inputfile.xml>'
print '\n'
print '\tRecursive, verbose:'
print '\t\tconfigchecker.py -r'
print '\n'
print '\tRecursive, reporting only errors:'
print '\t\tconfigchecker.py -rq'
### MAIN starts here ###
if len(sys.argv) != 2:
UsageMessage()
sys.exit(1)
print '\n'
if sys.argv[1] == '-r' or sys.argv[1] == '-rq':
RecursiveCheck()
else:
CheckFile(sys.argv[1])
Flask
Flask is a micro web framework written in Python. It is classified as a microframework because it does not require particular tools or libraries. It has no database abstraction layer, form validation, or any other components where pre-existing third-party libraries provide common functions. However, Flask supports extensions that can add application features as if they were implemented in Flask itself. Extensions exist for object-relational mappers, form validation, upload handling, various open authentication technologies and several common framework related tools.
Installation
Create an environment:
mkdir myproject
cd myproject
python3 -m venv .venv
Activate the environment:
. .venv/bin/activate
Install Flask:
pip3 install Flask
Source: https://flask.palletsprojects.com/en/2.3.x/installation/
Quick Start
Minimal application:
hello.py
from flask import Flask
app = Flask(__name__)
@app.route("/")
def hello_world():
return "<p>Hello, World!</p>"
Run dev server:
flask --app hello run
* Serving Flask app 'hello'
* Running on http://127.0.0.1:5000 (Press CTRL+C to quit)
Access from browser: http://127.0.0.1:5000/
Result:
Hello, World!
Source: https://flask.palletsprojects.com/en/2.3.x/quickstart/
Initialize Jupyter Project with UV
mkdir jupyter_project
cd jupyter_project
uv init
uv add ipykernel
(If you prefer, you can install ipykernel with the pip interface instead: uv pip install ipykernel -U –force-reinstall)
- Open project folder in VS Code. (Make sure you have the Python extension installed)
- Create a test.ipynb file and open it.
- Select the Python interpreter in the virtual environment.
Pandas Cheat Sheet
https://pypi.org/project/pandas/
Import
import pandas as pd
Series
Example inputs:
# list:
a = [1, 7, 2]
# dictionary:
kv = {"day1": 420, "day2": 380, "day3": 390}
Simple series, no labels:
myseries1 = pd.Series(a)
print(myseries1)
0 1
1 7
2 2
dtype: int64
Series with labels:
myseries2 = pd.Series(a, index=["x","y","z"])
print(myseries2)
x 1
y 7
z 2
dtype: int64
Key-value as series:
mykvseries = pd.Series(kv)
print(mykvseries)
day1 420
day2 380
day3 390
dtype: int64
Subset of key-value input:
mykvseries_filtered = pd.Series(kv, index = ["day1","day2"])
print(mykvseries_filtered)
day1 420
day2 380
dtype: int64
Dataframes
Input:
mydataset = {
'cars': ["BMW", "Volvo", "Ford"],
'passings': [3, 7, 2]
}
Load into a dataframe:
mydataframe = pd.DataFrame(mydataset)
print(mydataframe)
cars passings
0 BMW 3
1 Volvo 7
2 Ford 2
Load from a File
CSV:
df = pd.read_csv('data.csv')
JSON:
df = pd.read_json('data.json')
Simple Analysis
First 10 rows:
print(df.head(10))
Last 5 rows (default):
print(df.tail())
Dataset info:
print(df.info())
The result tells us the following:
- Row count and column count
- The name of each column, with the data type
- How many non-null values there are present in each column
Clean Empty Cells
Drop empty cells, placing the results in a new dataframe:
new_df = df.dropna()
Drop empty cells, modifying the original dataframe:
df.dropna(inplace = True)
Replace empty cells with a default value (130 in this example):
# WARNING: This affects all columns!
df.fillna(130, inplace = True)
Replace with a default value in a specific column:
df.fillna({"Calories": 130}, inplace=True)
Replace using the mean:
# Mean is the average value (the sum of all values divided by number of values).
x = df["Calories"].mean()
df.fillna({"Calories": x}, inplace=True)
Replace using the median:
# Median is the value in the middle, after you have sorted all values ascending.
x = df["Calories"].median()
df.fillna({"Calories": x}, inplace=True)
Replace using the mode:
# Mode is the value that appears most frequently.
x = df["Calories"].mode()[0]
df.fillna({"Calories": x}, inplace=True)
Clean Wrong Format
This example assumes that we have values that are not in a consistent format, but that can still be converted to a date:
df['Date'] = pd.to_datetime(df['Date'], format='mixed')
But, there may be some that can’t be converted at all. They will end up with NaT (not a time) values. We can remove them with this:
df.dropna(subset=['Date'], inplace = True)
Clean Wrong Data
Sometimes, data is just wrong, e.g., typos.
For simple fixes, we can update the row directly:
# Assign a value of 45 to the Duration column in row 7:
df.loc[7, 'Duration'] = 45
For large data sets, use rules-based updating:
# For each row with a Duration value larger than 120, assign a new value of 120:
for x in df.index:
if df.loc[x, "Duration"] > 120:
df.loc[x, "Duration"] = 120
Remove bad rows altogether:
# For each row with a Duration value larger than 120, drop the row:
for x in df.index:
if df.loc[x, "Duration"] > 120:
df.drop(x, inplace = True)
Remove Duplicates
Find duplicates:
print(df.duplicated())
Remove them:
df.drop_duplicates(inplace = True)
Correlation
The corr() method calculates the relationship between each column in a data set. The closer to 1 a correlation value is, the more closely related the columns are.
A positive correlation means values are likely to move together, e.g., if one goes up, the other probably will too. A negative correlation shows the opposite, e.g., if one goes up, the other is likely to go down.
df.corr()
Example output:
| Duration | Pulse | Maxpulse | Calories | |
|---|---|---|---|---|
| Duration | 1.000000 | -0.155408 | 0.009403 | 0.922717 |
| Pulse | -0.155408 | 1.000000 | 0.786535 | 0.025121 |
| Maxpulse | 0.009403 | 0.786535 | 1.000000 | 0.203813 |
| Calories | 0.922717 | 0.025121 | 0.203813 | 1.000000 |
Plotting
Import matplotlib:
import matplotlib.pyplot as plt
Line plot (default):
df.plot()
plt.show()
Scatter plot:
# You can use .corr() to check for strong correlation and determine good
# argument candidates for a scatter plot.
df.corr()
df.plot(kind = 'scatter', x = 'Duration', y = 'Calories')
plt.show()
Histogram:
df["Duration"].plot(kind = 'hist')
Pip Behind a Corporate Proxy
Call Pip like this:
pip3 install --trusted-host pypi.org --trusted-host pypi.python.org --trusted-host files.pythonhosted.org <package-name>
Without the trusted-host options, you get something similar to this:
Could not fetch URL https://pypi.python.org/simple/<package-name>/:
There was a problem confirming the ssl certificate: [SSL: CERTIFICATE_VERIFY_FAILED] certificate
verify failed (_ssl.c:777) - skipping
Python Libraries
Some useful Python libraries.
Beautiful Soup - web scraping
A library that makes it easy to scrape information from web pages. It sits atop an HTML or XML parser, providing Pythonic idioms for iterating, searching, and modifying the parse tree. – PyPI
https://www.crummy.com/software/BeautifulSoup/bs4/
https://pypi.org/project/beautifulsoup4/
Faker - fake data
A Python package that generates fake data for you. Whether you need to bootstrap your database, create good-looking XML documents, fill-in your persistence to stress test it, or anonymize data taken from a production service, Faker is for you. – PyPI
https://github.com/joke2k/faker
https://pypi.org/project/Faker/
FastAPI - web development and API
A modern, fast (high-performance), web framework for building APIs with Python based on standard Python type hints. – PyPI
https://pypi.org/project/fastapi/
Folium - maps
Builds on the data wrangling strengths of the Python ecosystem and the mapping strengths of the Leaflet.js library. Manipulate your data in Python, then visualize it in a Leaflet map via folium. – PyPI
https://github.com/python-visualization/folium
https://pypi.org/project/folium/
Matplotlib - data visualization
A comprehensive library for creating static, animated, and interactive visualizations in Python. – PyPI
https://pypi.org/project/matplotlib/
Pandas - data manipulation
A Python package that provides fast, flexible, and expressive data structures designed to make working with “relational” or “labeled” data both easy and intuitive. – PyPI
https://pypi.org/project/pandas/
Requests - HTTP
A simple, yet elegant, HTTP library. – PyPI
https://requests.readthedocs.io/
https://pypi.org/project/requests/
Rich - terminal styling
A Python library for rich text and beautiful formatting in the terminal. – PyPI
https://github.com/Textualize/rich
https://rich.readthedocs.io/en/latest/
https://pypi.org/project/rich/
Seaborn - statistical data visualization
A Python visualization library based on matplotlib. It provides a high-level interface for drawing attractive statistical graphics. – PyPI
https://pypi.org/project/seaborn/
Python Optimization and Language Binding
Python receives a lot of well deserved praise. Python code is clean and readable, and it’s easy to learn. There’s a vast library of 3rd-party packages providing support for thousands of tasks. It’s well supported, and has become the language of choice for many specializations, like machine learning and analytics.
One area where Python is sometimes criticized is performance. Being an interpreted language, it’s easy to understand where this concern comes from. For most tasks, though, pure Python performs quite well, and in areas where it does need a boost, there are optimization tricks that can be applied. We’ll discuss a few of those.
Note
Fully-implemented, runnable versions of all of the code mentioned in this article is available in my GitHub repo here.
A Task To Perform
The task we’ll implement will be to calculate the distance between two celestial objects. Our starting code will be a very small subset of another one of my projects: an implementation of many astronomical algorithms from the “Practical Astronomy with your Calculator or Spreadsheet” book. If you’re interested in learning more, you can find that project here. For the sake of this article, we’ll take the existing implementation of the angle_between_two_objects() method from the project.

Before we start working with the code, let’s talk a bit about what the angle_between_two_objects() method does. The method takes in a set of arguments describing the right ascension/declination coordinates for two different celestial objects (like stars), and then calculates the angular distance between them in degrees, minutes, and seconds. Right ascension and declination describe the position of an object in the night sky in much the same way that latitude and longitude is used to describe the location for something on the surface of the Earth. If you want to learn more about sky coordinates, I’ve put together a more detailed explanation here.
Let’s get started!
Setup
This is written with the assumption that you’ll be working in a Linux environment. Adapting it to Windows or Mac shouldn’t be difficult, though.
You’ll need Python 3, which should already be installed on your system.
If you want to work with Python code in a Jupyter notebook, the easiest way to do it is with Visual Studio Code, with the Python extension installed. Visual Studio Code is also the friendliest way to work with straight Python code, in my opinion.
Pure Python (no optimizations)
We’ll start with a straightforward Python implementation, with no optimizations. First, we need a couple of imports:
import math
import random
Then, some supporting methods:
# Convert Civil Time (hours,minutes,seconds) to Decimal Hours
def hms_dh(hours,minutes,seconds):
A = abs(seconds) / 60
B = (abs(minutes) + A) / 60
C = abs(hours) + B
return -C if ((hours < 0) or (minutes < 0) or (seconds < 0)) else C
# Convert Degree-Hours to Decimal Degrees
def dh_dd(degree_hours):
return degree_hours * 15
# Convert Degrees Minutes Seconds to Decimal Degrees
def dms_dd(degrees,minutes,seconds):
A = abs(seconds) / 60
B = (abs(minutes) + A) / 60
C = abs(degrees) + B
return -C if degrees < 0 or minutes < 0 or seconds < 0 else C
# Convert W value to Degrees
def degrees(W):
return W * 57.29577951
# Extract degrees, minutes, and seconds from decimal degrees
def dd_deg(decimal_degrees):
""" Return Degrees part of Decimal Degrees """
A = abs(decimal_degrees)
B = A * 3600
C = round(B - 60 * math.floor(B / 60),2)
D = 0 if C == 60 else C
E = B = 60 if C == 60 else B
return -math.floor(E/3600) if decimal_degrees < 0 else math.floor(E/3600)
def dd_min(decimal_degrees):
""" Return Minutes part of Decimal Degrees """
A = abs(decimal_degrees)
B = A * 3600
C = round(B - 60 * math.floor(B / 60),2)
D = 0 if C == 60 else C
E = B + 60 if C == 60 else B
return math.floor(E/60) % 60
def dd_sec(decimal_degrees):
""" Return Seconds part of Decimal Degrees """
A = abs(decimal_degrees)
B = A * 3600
C = round(B - 60 * math.floor(B / 60),2)
D = 0 if C == 60 else C
return D
Our method to calculate the angle:
# Calculate the angle between two celestial objects
def angle_between_two_objects(ra_long_1_hour_deg,ra_long_1_min,ra_long_1_sec,dec_lat_1_deg,dec_lat_1_min,dec_lat_1_sec,ra_long_2_hour_deg,ra_long_2_min,ra_long_2_sec,dec_lat_2_deg,dec_lat_2_min,dec_lat_2_sec,hour_or_degree):
ra_long_1_decimal = hms_dh(ra_long_1_hour_deg,ra_long_1_min,ra_long_1_sec) if hour_or_degree == "H" else dms_dd(ra_long_1_hour_deg,ra_long_1_min,ra_long_1_sec)
ra_long_1_deg = dh_dd(ra_long_1_decimal) if hour_or_degree == "H" else ra_long_1_decimal
ra_long_1_rad = math.radians(ra_long_1_deg)
dec_lat_1_deg1 = dms_dd(dec_lat_1_deg,dec_lat_1_min,dec_lat_1_sec)
dec_lat_1_rad = math.radians(dec_lat_1_deg1)
ra_long_2_decimal = hms_dh(ra_long_2_hour_deg,ra_long_2_min,ra_long_2_sec) if hour_or_degree == "H" else dms_dd(ra_long_2_hour_deg,ra_long_2_min,ra_long_2_sec)
ra_long_2_deg = dh_dd(ra_long_2_decimal) if hour_or_degree == "H" else ra_long_2_decimal
ra_long_2_rad = math.radians(ra_long_2_deg)
dec_lat_2_deg1 = dms_dd(dec_lat_2_deg,dec_lat_2_min,dec_lat_2_sec)
dec_lat_2_rad = math.radians(dec_lat_2_deg1)
cos_d = math.sin(dec_lat_1_rad) * math.sin(dec_lat_2_rad) + math.cos(dec_lat_1_rad) * math.cos(dec_lat_2_rad) * math.cos(ra_long_1_rad - ra_long_2_rad)
d_rad = math.acos(cos_d)
d_deg = degrees(d_rad)
angle_deg = dd_deg(d_deg)
angle_min = dd_min(d_deg)
angle_sec = dd_sec(d_deg)
return angle_deg,angle_min,angle_sec
Some code to make a single call to the method, to make sure everything’s working correctly:
# First object is at right ascension 5 hours 13 minutes 31.7 seconds, declination -8 degrees 13 minutes 30 seconds
# Second object is at right ascension 6 hours 44 minutes 13.4 seconds, declination -16 degrees 41 minutes 11 seconds
angle_deg,angle_min,angle_sec = angle_between_two_objects(5, 13, 31.7, -8, 13, 30, 6, 44, 13.4, -16, 41, 11, "H")
# Result (should be 23 degrees, 40 minutes, 25.86 seconds)
print(f"Result is {angle_deg} degrees, {angle_min} minutes, {angle_sec} seconds.")
And finally, multiple calls to the method, so that we can get a better idea of how it’s performing. (This code uses %time, available in Jupyter, to time the call.)
# Multiple Test Runs (timed)
def exec_tests():
for test_iter in range(1,1000):
right_ascension_hour = random.randrange(1,12)
angle_deg,angle_min,angle_sec = angle_between_two_objects(right_ascension_hour, 13, 31.7, -8, 13, 30, 6, 44, 13.4, -16, 41, 11, "H")
%time exec_tests()
Timing results:
CPU times: user 6.41 ms, sys: 235 µs, total: 6.64 ms
Wall time: 6.62 ms
Now we have working code calculating angular distance between objects, and we’ve established a baseline for how long it takes to run using pure Python. With that, we’ll move on to optimization.
Numba
Numba is a JIT compiler that translates Python into machine code. It doesn’t support the entire language, but it’s quite handy for optimizing subsets of code. It’s also (usually) very easy to implement.
Numba is an external package, so you’ll need to install it:
pip3 install numba
Add an import for Numba:
import math
import numba # new!
import random
Then, you mark individual methods for compilation with a simple decorator, like this:
@numba.jit
def hms_dh(hours,minutes,seconds):
A = abs(seconds) / 60
B = (abs(minutes) + A) / 60
C = abs(hours) + B
return -C if ((hours < 0) or (minutes < 0) or (seconds < 0)) else C
The decorator supports additional arguments for things like parallelization, but we’ll keep it simple.
I added the numba decorator to each of the support methods, and also to the angle_between_two_objects() method. Running the same timed test gave me the following results:
CPU times: user 3.78 ms, sys: 0 ns, total: 3.78 ms
Wall time: 3.74 ms
With no optimization beyond adding a simple decorator, our processing time is cut almost in half. Not bad at all!
But, what if you have highly optimized code in a language like C, with performance that you just can’t match in Python? Or, optimization aside, what if that C code is complex, mature, and well-tested, and you’d prefer to leverage it directly, instead of dealing with the effort of porting it?
There are several options available for this as well. We’ll explore a couple: ctypes and CFFI.
Language Bindings
As we prepare to implement language bindings in Python, our first step is to create something we can bind to. We’ll use C, and we’ll start with a header file:
abo_lib.h
#ifndef abo_lib
#define abo_lib
#define M_PI 3.14159265358979323846264338327
struct angle {
double angleDegrees, angleMinutes, angleSeconds;
};
typedef struct angle TAngle;
TAngle AngleBetweenTwoObjects(double raLong1HourDeg, double raLong1Min,
double raLong1Sec, double decLat1Deg,
double decLat1Min, double decLat1Sec,
double raLong2HourDeg, double raLong2Min,
double raLong2Sec, double decLat2Deg,
double decLat2Min, double decLat2Sec,
char hourOrDegree);
#endif
Next, we’ll implement our methods:
abo_lib.c
#include "abo_lib.h"
#include <math.h>
#include <stdbool.h>
#include <stdio.h>
#include <stdlib.h>
/**
* Round input to specified number of decimal places.
*/
double Round(double input, int places) {
bool isNegative = (input < 0) ? true : false;
long double multiplier = pow(10, places);
if (isNegative) {
input = fabs(input);
};
long double a = input * multiplier;
a = (a >= 0) ? a + 0.5 : a - 0.5;
double returnValue =
floor(a) / multiplier; // floor() gives good results for more places (7+)
// than the original (int) cast.
return (isNegative) ? -(returnValue) : returnValue;
}
/**
* Convert Civil Time (hours,minutes,seconds) to Decimal Hours
*/
double HmsToDh(double hours, double minutes, double seconds) {
double fHours = hours;
double fMinutes = minutes;
double fSeconds = seconds;
double a = fabs(fSeconds) / 60;
double b = (fabs(fMinutes) + a) / 60;
double c = fabs(fHours) + b;
return (fHours < 0 || fMinutes < 0 || fSeconds < 0) ? -c : c;
}
/**
* Convert Degrees Minutes Seconds to Decimal Degrees
*/
double DegreesMinutesSecondsToDecimalDegrees(double degrees, double minutes,
double seconds) {
double a = fabs(seconds) / 60;
double b = (fabs(minutes) + a) / 60;
double c = fabs(degrees) + b;
return (degrees < 0 || minutes < 0 || seconds < 0) ? -c : c;
}
/**
* Convert Degree-Hours to Decimal Degrees
*/
double DegreeHoursToDecimalDegrees(double degreeHours) {
return degreeHours * 15;
}
/**
* Convert Degrees to Radians
*/
double DegreesToRadians(double degrees) { return (degrees * M_PI) / 180; }
/**
* Convert W value to Degrees
*/
double WToDegrees(double w) { return w * 57.29577951; }
/**
* Extract Degrees part of Decimal Degrees
*/
double DecimalDegreesDegrees(double decimalDegrees) {
double a = fabs(decimalDegrees);
double b = a * 3600;
double c = Round(b - 60 * floor(b / 60), 2);
double e = (c == 60) ? 60 : b;
return (decimalDegrees < 0) ? -(floor(e / 3600)) : floor(e / 3600);
}
/**
* Extract Minutes part of Decimal Degrees
*/
double DecimalDegreesMinutes(double decimalDegrees) {
double a = fabs(decimalDegrees);
double b = a * 3600;
double c = Round(b - 60 * floor(b / 60), 2);
double e = (c == 60) ? b + 60 : b;
return (int)floor(e / 60) % 60;
}
/**
* Extract Seconds part of Decimal Degrees
*/
double DecimalDegreesSeconds(double decimalDegrees) {
double a = fabs(decimalDegrees);
double b = a * 3600;
double c = Round(b - 60 * floor(b / 60), 2);
double d = (c == 60) ? 0 : c;
return d;
}
/**
* Calculate the angle between two celestial objects, in
* degrees,minutes,seconds.
*/
TAngle AngleBetweenTwoObjects(double raLong1HourDeg, double raLong1Min,
double raLong1Sec, double decLat1Deg,
double decLat1Min, double decLat1Sec,
double raLong2HourDeg, double raLong2Min,
double raLong2Sec, double decLat2Deg,
double decLat2Min, double decLat2Sec,
char hourOrDegree) {
TAngle returnValue;
double raLong1Decimal = (hourOrDegree == 'H')
? HmsToDh(raLong1HourDeg, raLong1Min, raLong1Sec)
: DegreesMinutesSecondsToDecimalDegrees(
raLong1HourDeg, raLong1Min, raLong1Sec);
double raLong1Deg = (hourOrDegree == 'H')
? DegreeHoursToDecimalDegrees(raLong1Decimal)
: raLong1Decimal;
double raLong1Rad = DegreesToRadians(raLong1Deg);
double decLat1Deg1 =
DegreesMinutesSecondsToDecimalDegrees(decLat1Deg, decLat1Min, decLat1Sec);
double decLat1Rad = DegreesToRadians(decLat1Deg1);
double raLong2Decimal = (hourOrDegree == 'H')
? HmsToDh(raLong2HourDeg, raLong2Min, raLong2Sec)
: DegreesMinutesSecondsToDecimalDegrees(
raLong2HourDeg, raLong2Min, raLong2Sec);
double raLong2Deg = (hourOrDegree == 'H')
? DegreeHoursToDecimalDegrees(raLong2Decimal)
: raLong2Decimal;
double raLong2Rad = DegreesToRadians(raLong2Deg);
double decLat2Deg1 =
DegreesMinutesSecondsToDecimalDegrees(decLat2Deg, decLat2Min, decLat2Sec);
double decLat2Rad = DegreesToRadians(decLat2Deg1);
double cosD =
sin(decLat1Rad) * sin(decLat2Rad) +
cos(decLat1Rad) * cos(decLat2Rad) * cos(raLong1Rad - raLong2Rad);
double dRad = acos(cosD);
double dDeg = WToDegrees(dRad);
double angleDeg = DecimalDegreesDegrees(dDeg);
double angleMin = DecimalDegreesMinutes(dDeg);
double angleSec = DecimalDegreesSeconds(dDeg);
returnValue.angleDegrees = angleDeg;
returnValue.angleMinutes = angleMin;
returnValue.angleSeconds = angleSec;
return returnValue;
}
Then create a main() module, so we can test it as a pure C implementation first:
abo_client.c
/**
* Test client for the abo_lib library.
*/
#include "abo_lib.h"
#include <stdio.h>
int main() {
TAngle angle = AngleBetweenTwoObjects(5, 13, 31.7, -8, 13, 30, 6, 44, 13.4,
-16, 41, 11, 'H');
printf("The result is %f degrees %f minutes %f seconds.\n",
angle.angleDegrees, angle.angleMinutes, angle.angleSeconds);
return (0);
}
Build it:
gcc -c abo_client.c
gcc -c abo_lib.c
gcc -o abo_client abo_client.o abo_lib.o -lm
Run it:
./abo_client
Result:
The result is 23.000000 degrees 40.000000 minutes 25.860000 seconds.
Now that we know our C implementation is working, we can move on to accessing it from Python.
ctypes
The ctypes library provides access to foreign functions from Python. It has the advantage of maturity and availability. (It’s a part of the standard Python library. No need to install anything extra.)
Before we start to write our Python code, we need to build a shared library from our C implementation. Open a terminal, and run the following:
gcc -I. abo_lib.c -shared -o abo_lib.so
Then, you can write your Python code. First, import ctypes:
import ctypes as ct
Create a structure to hold our return value, and describe it for ctypes:
class TAngle(ct.Structure):
_fields_ = [
("angleDegrees", ct.c_double),
("angleMinutes", ct.c_double),
("angleSeconds", ct.c_double)
]
Load the shared library:
libc = ct.cdll.LoadLibrary("./abo_lib.so")
Then, call it:
libc.AngleBetweenTwoObjects.argtypes = [ct.c_double, ct.c_double, ct.c_double, ct.c_double, ct.c_double, ct.c_double, ct.c_double, ct.c_double, ct.c_double, ct.c_double, ct.c_double, ct.c_double, ct.c_char]
libc.AngleBetweenTwoObjects.restype = TAngle
angle_between_objects = libc.AngleBetweenTwoObjects(5, 13, 31.7, -8, 13, 30, 6, 44, 13.4, -16, 41, 11, b'H')
print(f"Angle between the two objects is {angle_between_objects.angleDegrees} degrees {angle_between_objects.angleMinutes} minutes {angle_between_objects.angleSeconds} seconds")
Result:
Angle between the two objects is 23.0 degrees 40.0 minutes 25.86 seconds
CFFI
CFFI is another foreign function library for Python. It’s newer than ctypes, and it offers a couple of advantages: Python code written to access it is considered more “Pythonic” (that is, more true to Python coding standards), and it’s faster.
CFFI is not part of the standard library, so you’ll need to install it:
pip3 install cffi
Then, write your Python code as follows. First, import CFFI:
from cffi import FFI
Then, initialize it, and describe the C code it’s accessing:
ffi = FFI()
ffi.cdef("""
typedef struct TAngle TAngle;
struct TAngle
{
double angleDegrees;
double angleMinutes;
double angleSeconds;
};
TAngle AngleBetweenTwoObjects(double raLong1HourDeg, double raLong1Min, double raLong1Sec, double decLat1Deg, double decLat1Min, double decLat1Sec, double raLong2HourDeg, double raLong2Min, double raLong2Sec, double decLat2Deg, double decLat2Min, double decLat2Sec, char hourOrDegree);
"""
)
Load the shared library:
lib = ffi.dlopen('./abo_lib.so')
Then, call it:
angle_between_objects = lib.AngleBetweenTwoObjects(5, 13, 31.7, -8, 13, 30, 6, 44, 13.4, -16, 41, 11, b'H')
print(f"Angle between the two objects is {angle_between_objects.angleDegrees} degrees {angle_between_objects.angleMinutes} minutes {angle_between_objects.angleSeconds} seconds")
Result:
Angle between the two objects is 23.0 degrees 40.0 minutes 25.86 seconds
Wrap Up
I hope this introduction to optimization and language binding for Python was helpful. Remember, you can see complete implementations by visiting the GitHub repo here. If you encounter problems, have questions, or have requests, you can either open an issue or join one of the discussions in the repo. Feedback is always appreciated. Thanks!
Python Tkinter Examples
#!/usr/bin/python
from Tkinter import Tk
from Tkinter import *
from tkMessageBox import *
def TakePicture():
print "Take Picture!"
def GetInfo():
print "Get info..."
def About():
showinfo('About', 'This is a simple example of a menu')
root = Tk()
root.wm_title("Grid Test")
menu = Menu(root)
root.config(menu=menu)
filemenu = Menu(menu)
menu.add_cascade(label="File", menu=filemenu)
filemenu.add_command(label="Exit", command=root.destroy)
toolmenu = Menu(menu)
menu.add_cascade(label="Tools", menu=toolmenu)
toolmenu.add_command(label="Take Picture", command=TakePicture)
helpmenu = Menu(menu)
menu.add_cascade(label="Help", menu=helpmenu)
helpmenu.add_command(label="About...", command=About)
btnInfo = Button(root, text='Info', width=20, command=GetInfo)
btnInfo.grid(row=1,column=0,padx=5,pady=5)
btnQuit = Button(root, text='Quit', width=20, command=root.destroy)
btnQuit.grid(row=1,column=1,padx=5,pady=5)
statusLabel = Label(root, text="Ready")
statusLabel.grid(row=2,column=0)
mainloop()
Requirements Files for Python
In Python, a requirements.txt file is used to keep track of the modules and packages used in a project.
Create a requirements.txt File
pip freeze > requirements.txt
Install Packages from requirements.txt
pip install -r requirements.txt
Maintain a requirements.txt File
See which packages are out of date:
pip list --outdated
Update package(s), as needed:
pip install -U package_name
Generate a new requirements.txt file:
pip freeze > requirements.txt
Single-File Dependency Management in Python Script Using UV
Make sure you already have uv installed.
I don’t have Numpy installed globally, so we’ll use that in our example script. Create a file named numpy_version.py with the following contents:
import numpy as np
def show_numpy_version():
print(np.__version__)
if __name__ == '__main__':
show_numpy_version()
If we try to run it as-is (python3 numpy_version.py) we see this:
Traceback (most recent call last):
File "numpy_version.py", line 1, in <module>
import numpy as np
ModuleNotFoundError: No module named 'numpy'
We can use uv to add inline metadata declaring the dependencies:
uv add --script numpy_version.py numpy
The script will be updated to look like this:
# /// script
# requires-python = ">=3.12"
# dependencies = [
# "numpy",
# ]
# ///
import numpy as np
def show_numpy_version():
print(np.__version__)
if __name__ == '__main__':
show_numpy_version()
Then, we use uv to run it:
uv run numpy_version.py
And we get this output:
Reading inline script metadata from `numpy_version.py`
2.2.1
We can make our script directly runnable by adding a shebang line at the top of the file:
#!/usr/bin/env -S uv run -q -s
…and making the script executable:
chmod u+x numpy_version.py
The -S argument to env is required in order for the run argument to be handled correctly.
Now we can run the script as ./numpy_version.py.
When we run the script like this, uv automatically manages the dependencies in an isolated environment. We can test this by trying to run the updated script directly with Python again:
python3 numpy_version.py
We get this, indicating that in a global context Numpy is still not installed:
Traceback (most recent call last):
File "numpy_version.py", line 10, in <module>
import numpy as np
ModuleNotFoundError: No module named 'numpy'
Our end result is a nice, clean, directly runnable, isolated script whose only execution requirement is that uv be installed.
The portability that this provides is really nice. I installed uv on a Le Potato and I was able to immediately run my script on the device with no changes. UV even automatically installed a CPython version to meet the Python version requirement. (The inline metadata specifies a Python version >= 3.12, but the global Python interpreter on the SBC is 3.11)
Version Mismatch in Python Package
I recently encountered a problem while I was trying to use Astropy v3.1.2. It was complaining about my Numpy version:
Traceback (most recent call last):
File "./body-local.py", line 3, in <module>
from astropy.time import Time
File "/home/username/.local/lib/python3.6/site-packages/astropy/__init__.py", line 121, in <module>
_check_numpy()
File "/home/username/.local/lib/python3.6/site-packages/astropy/__init__.py", line 115, in _check_numpy
raise ImportError(msg)
ImportError: Numpy version 1.13.0 or later must be installed to use Astropy
The strange part? When I checked my Numpy version, it reported 1.16.2.
After a bit of digging, I discovered that this behavior can occur when you have multiple versions of the same package installed. This can happen when you install a package globally //and// locally, or when packages are installed by other processes. In any case, the solution was this:
First, repeatedly uninstall the offending package until no more installations are found:
pip3 uninstall numpy
sudo pip3 uninstall numpy
Then, reinstall:
sudo pip3 install numpy
Virtual Environment for Python
The venv module provides support for creating lightweight “virtual environments” with their own site directories, optionally isolated from system site directories. Each virtual environment has its own Python binary (which matches the version of the binary that was used to create this environment) and can have its own independent set of installed Python packages in its site directories.
Initialize the Environment
python3 -m venv /path/to/new/virtual/environment
Activate the Environment
cd /path/to/new/virtual/environment
source ./bin/activate
Deactivate the Environment
deactivate
Bash Prompt
Bash prompt, normal:
username@hostname:~/current/path$
Bash prompt, with virtual environment activated:
(current_dir) username@hostname:~/current/path$
Rust
Cross-Compile Rust, Targeting Windows from Linux
Tested using Ubuntu MATE 21.10 as a host system. Instructions might require some adjustment for your distro. Assumes Rust is already installed.
Make sure it’s up-to-date:
rustup update
List currently installed toolchains:
rustup show
Default host: x86_64-unknown-linux-gnu
rustup home: /home/jimc/.rustup
stable-x86_64-unknown-linux-gnu (default)
rustc 1.56.0 (09c42c458 2021-10-18)
Your results may differ. Bottom line for me, though, is that I don’t yet have a Windows toolchain installed. I installed a Windows target and toolchain with this:
rustup target add x86_64-pc-windows-gnu
rustup toolchain install stable-x86_64-pc-windows-gnu
Create a test project:
mkdir crossplat
cd crossplat
cargo init --vcs none
A simple main() is generated:
main.rs
fn main() {
println!("Hello, world!");
}Make sure it builds and runs:
cargo run
Hello, world!
Install your distribution’s MinGW C compiler:
sudo apt install gcc-mingw-w64-x86-64
Build the project, targeting Windows:
cargo build --target x86_64-pc-windows-gnu
Checking the file type of the generated .exe shows us that it’s a binary for Windows:
file target/x86_64-pc-windows-gnu/debug/crossplat.exe
Result:
target/x86_64-pc-windows-gnu/debug/crossplat.exe: PE32+ executable (console) x86-64, for MS Windows
When you’re ready to deploy to your target system, build the release version with this:
cargo build --target x86_64-pc-windows-gnu --release
Publish to Crates.io
Before You Publish
API Token
- Log in at https://crates.io/
- Go to Account Settings, then API Tokens
- Click “New Token”
- Give it a unique name.
- Set an expiration date (optional)
- Select the scopes you need. I used
publish-new,publish-update, andyank. - Click “Generate Token”.
The generated API token value will look similar to this:
ciowhNhkHp4WpZCYjA27AENzrhO9c9T9m4r
It is stored on crates.io as a hash (for security), and is only displayed once. Make sure you document it in a safe place.
This step only needs to be done once, unless you forget your token value, or it becomes compromised. In that case, you’ll need to revoke it and generate a new one.
Log In
Open a terminal, and type:
cargo login
When prompted, paste your generated token.
This token will be stored locally in ~/.cargo/credentials.toml. If you ever need to use a different token, first logout:
cargo logout
This removes the token from your credentials file. Then, you can log in again.
Metadata in Cargo.toml
| Tag | Example |
|---|---|
| license | “MIT OR Apache-2.0” |
| description | “A short description of my package” |
| homepage | “https://serde.rs” |
| documentation | “https://docs.rs/bitflags” |
| repository | “https://github.com/rust-lang/cargo” |
| readme | “README.md” |
Source: https://doc.rust-lang.org/cargo/reference/manifest.html
Validate and Publish
Check your project for warnings and errors:
cargo package
You can also list the contents of the generated .crate file:
cargo package --list
When you’re ready to publish:
cargo publish
Sources
https://doc.rust-lang.org/cargo/reference/publishing.html
Rust Books (online)
The Little Book of Rust Books - a treasure-trove of Rust books
Introductory
The Rust Programming Language - “the book”
Rust Cookbook - a collection of example programs
Rustlings - Small exercises to get you used to reading and writing Rust code.
Embedded
The Embedonomicon - build a #![no_std] application from scratch
The Rust on ESP Book - comprehensive guide on using the Rust programming language with Espressif SoCs and modules.
Learn Embedded Rust WITHOUT Any Expensive Hardware - Rust ARM QEMU Cargo Tutorial (YouTube)
Rust Runs on EVERYTHING, Including the Arduino - Adventures in Embedded Rust Programming (YouTube)
Discovery
Other
mdBook - a command line tool to create books with Markdown
PyO3 user guide (introduction)
Rust/Cargo Behind a Corporate Proxy
Problem
Cargo can’t fetch external repositories because it is unable to validate the SSL connection due to a “man-in-the-middle” corporate proxy.
Solution
Go to your Rust installation folder. (Usually something like c:\Users\<username>\.cargo in Windows.)
Create a file called “config”.
Add the following lines to the file:
[http]
check-revoke = false
sslVerify = false
Misc
3D Printing and CNC
CAMotics - Open-Source Simulation & Computer Aided Machining
Cults - Download free 3D printer models・STL, OBJ, 3MF, CAD
How To: Smooth and Finish Your PLA Prints - Part 1
Numerical control (CNC) - Wikipedia
Polylactic acid (PLA) - Wikipedia
Print Quality Troubleshooting Guide
Virtual Printer - Use this virtual 3D printer to test your Print API calls.
FlashForge 3D Printer
Flashforge Finder 3D Printer Tutorial - Putting Glue on Printing Bed - YouTube
joseffallman/ffpp - FlashForge 3D printer protocol
slic3r-configs/docs/Flashforge Gcode protocol(open).md - FlashForge Gcode Protocol v1.04 (Partial)
G-Code and M-Code Commands
3D Printer G-code Commands: Main List & Quick Tutorial
Free CNC Tutorial - CNC Tutorial: CNC Programming with G Code Classes
G-code - Wikipedia
Slic3r - Open source 3D printing toolbox
STL
STL (file format) - Wikipedia
STLA Files - ASCII stereolithography files
AMD Ryzen 3 3200G with Radeon Vega Graphics Keeps Freezing
https://bbs.archlinux.org/viewtopic.php?id=252657
Angular Cheat Sheet
Create Application
ng new my-app
(ng is the Angular CLI)
Questions asked during project creation:
Angular routing? Yes/**No**
Stylesheet format?
* **CSS**
* SCSS
* Sass
* Less
Serve the Application
cd my-app
ng serve --open
ng serve builds the application and starts the development server.
The --open flag opens the running application in a browser.
Bundle for Distribution
First, go to the root of the project:
cd my-app
Then, you can build for dev:
ng build
Or for production, which will result in smaller files:
ng build --prod
Production files are generated in the dist/ directory.
Related
Angular CLI
The Angular CLI is used to create projects, generate application and library code, and perform a variety of ongoing development tasks such as testing, bundling, and deployment.
To install the Angular CLI, open a terminal window and run the following command:
npm install -g @angular/cli
The Angular CLI is invoked as ng.
More info here.
Bad owner or permissions on ssh config file
Sometimes, after you makes changes to a .ssh/config file, you’ll start to see the following error when you try to connect to a host:
Bad owner or permissions on /share/homes/admin/.ssh/config
This is because the permissions have been altered on the config file. Fix it with this:
chmod 700 ~/.ssh
chmod 600 ~/.ssh/*
Source: https://superuser.com/questions/1212402/bad-owner-or-permissions-on-ssh-config-file
Boot Linux Mint from flash drive on a netbook
Trying to boot Linux Mint from a flash drive on my EEE netbook, I see the following:
vesamenu.c32: Not a COM32R image
boot:
To continue booting, do the following from the “boot:” menu:
- hit tab
- type “live”
- press enter
Boot Linux to text mode
Note
This assumes that you’re using GRUB.
sudo vi /etc/default/grub
Change this line:
GRUB_CMDLINE_LINUX_DEFAULT="quiet splash"
to:
GRUB_CMDLINE_LINUX_DEFAULT="text"
Save the file, then:
sudo update-grub
sudo reboot
When you’re ready to go back to booting into graphical mode, change the value back to “quiet splash”.
Cache Resources Exhausted in Imagemagick
When you try to convert multiple image files into a single PDF, you may see a series of errors that look like this:
convert-im6.q16: cache resources exhausted `file1.jpg'
@ error/cache.c/OpenPixelCache/4095.
You can solve this by increasing the amount of memory available to Imagemagick. First, locate the Imagemagick policy file. It will be something like /etc/ImageMagick-6/policy.xml. Then, find a line that looks like this:
<policy domain="resource" name="disk" value="1GiB"/>
And increase the value, e.g.:
<policy domain="resource" name="disk" value="8GiB"/>
Clear Linux Cache
There are 3 types of caches in Linux:
PageCache is cached files. Files that were recently accessed are stored here so they will not need to be queried from the hard disk again, unless that file changes or the cache is cleared to make room for other data. This puts less read and write impact on a hard drive and increases speed since files can be read from RAM much faster.
Dentry and inode cache is directory and file attributes. This information goes hand in hand with PageCache, although it doesn’t contain the actual contents of any files. This cache also cuts down on disk input and ouput operations.
Clearing Caches
Caution
Assumes you’re using a distro with
systemd.
To clear PageCache only:
sudo sysctl vm.drop_caches=1
To clear dentries and inodes:
sudo sysctl vm.drop_caches=2
To clear PageCache, plus dentries and inodes:
sudo sysctl vm.drop_caches=3
Source: https://linuxconfig.org/clear-cache-on-linux
Component Not Found error in VirtualBox
After a reboot, I started getting a VERR_SUPDRV_COMPONENT_NOT_FOUND error when trying to start a VM in VirtualBox. This error is related to VirtualBox’s usage of the vboxnetflt driver. I found that this was caused by the fact that I had updated my Linux kernel, but VirtualBox was not aware of the change. The fix is as follows:
-
Open a Terminal session.
-
Issue the following command:
sudo /etc/init.d/vboxdrv setup
This will re-compile the VirtualBox kernel module, and everything should start working again.
Compress and Extract Entire Directory Tree With Tar
This assumes you are using tar in Linux or Cygwin.
First, open a terminal/bash session.
Change to the root directory you want to compress, then issue this command:
tar -cvzf archive_name.tgz *
To extract the archive file, copy it to an empty directory, then issue this command:
tar -xvf archive_name.tgz
Configuration of hddtemp
hddtemp shows the temperature of IDE and SCSI hard drives by reading S.M.A.R.T. information.
You can quickly configure various settings as follows:
sudo dpkg-reconfigure hddtemp
This allows you to configure things like:
- Allow non-root users to start hddtemp
- Run as daemon
- Port to use
Create An ISO File From a CD or DVD-ROM Using the Terminal
Insert the CD/DVD in the drive.
Open a terminal.
Install dcfldd, if it isn’t already:
sudo apt-get install dcfldd
Figure out where your CD/DVD is mounted:
mount
(On my system it’s mounted as /dev/sr0)
Unmount it:
umount /dev/sr0
Create the ISO image:
dcfldd if=/dev/sr0 of=image.iso
In the example above, “image.iso” will be created in the current directory. You can change the “of” argument to whatever you want, e.g., different name, full path, etc.
Display GRUB Menu
If your GRUB menu is not displaying and/or the shortcut key is being ignored, you can force a timed display as follows:
Edit the GRUB configuration:
sudo vi /etc/default/grub
If you see a line like GRUB_HIDDEN_TIMEOUT=0 or GRUB_TIMEOUT_STYLE=hidden, comment it out:
#GRUB_HIDDEN_TIMEOUT=0
Then, specify the amount of time you want the GRUB menu to display on startup, where ‘#’ is seconds:
GRUB_TIMEOUT=#
After making changes, run sudo update-grub to update the grub configuration.
Find Unique Instances of Text in Bash
If you need to find unique instances of text within a text file in bash, modify the following to suit:
cat file_name | grep "text_to_search_for" | sort | uniq
Flash Disk Image to SD Card
Download the image or zip file from a mirror or torrent.
Open a terminal session in the folder where you downloaded the image.
If it’s a zip file, extract the image file:
unzip <filename>.zip
Run df to see which devices are currently mounted:
df -h
Insert the SD card.
Run df again. The new device is your card. It will probably be something like “/dev/sdc1”. The last part (e.g. “1”) is the partition number, while the first part (e.g. “/dev/sdc”) is the actual device name. Note that multiple partitions of the device may be mounted separately, so you may see multiple entries like “/dev/sdc1”, “/dev/sdc2”, etc.
Unmount all partitions, e.g.:
umount /dev/sdc1
umount /dev/sdc2
Write the image file to the device as follows. (Make sure you use the device name, not the partition, and make sure the device name matches what you found in the df check above.)
Important
It is absolutely critical that you use the correct device name in this step. Using the wrong name can result in you wiping out the wrong drive!
sudo dd bs=4M status=progress if=<filename>.img of=/dev/sdc
A block size of 4M usually works, but if you have trouble, you should try 1M. Keep in mind that using a block size of 1M will take longer to write the image.
After the dd command finishes, flush the cache to ensure that all data is written:
sudo sync
Remove the SD card.
Install Node.js
The Node.js/NPM versions in the Linux package manager are usually pretty old, so it’s best to manually install a newer version.
First, go to https://nodejs.org and download either the LTS or Current binary archive, depending on your needs.
Then (update the VERSION and DISTRO values accordingly):
- Unzip the binary archive to
/usr/local/lib/nodejs.
VERSION=v10.15.0
DISTRO=linux-x64
sudo mkdir -p /usr/local/lib/nodejs
sudo tar -xJvf node-$VERSION-$DISTRO.tar.xz -C /usr/local/lib/nodejs
- Add the following at the end of
~/.profile:
# Nodejs
VERSION=v10.15.0
DISTRO=linux-x64
export PATH=/usr/local/lib/nodejs/node-$VERSION-$DISTRO/bin:$PATH
- Refresh your profile:
. ~/.profile
- Test the installation:
node -v
npm version
npx -v
Source: https://github.com/nodejs/help/wiki/Installation#how-to-install-nodejs-via-binary-archive-on-linux
Force SSL On Domain
Force all web traffic to use HTTPS
Insert the following lines of code in the .htaccess file in your website’s root folder.
Important
If you have existing code in your .htaccess, add this above where there are already rules with a similar starting prefix.
RewriteEngine On
RewriteCond %{SERVER_PORT} 80
RewriteRule ^(.*)$ https://www.yourdomain.com/$1 [R,L]
Be sure to replace www.yourdomain.com with your actual domain name.
Force a specific domain to use HTTPS (v1)
Use the following lines of code in the .htaccess file in your website’s root folder:
RewriteEngine On
RewriteCond %{HTTP_HOST} ^example\.com [NC]
RewriteCond %{SERVER_PORT} 80
RewriteRule ^(.*)$ https://www.yourdomain.com/$1 [R,L]
Make sure to replace example.com with the domain name you’re trying force to https. Additionally, you need to replace www.yourdomain.com with your actual domain name.
Force a specific domain to use HTTPS (v2)
This version works on subdomains too. Just put the code in the root folder of the subdomain.
RewriteEngine On
RewriteCond %{HTTPS} off
RewriteRule ^(.*)$ https://%{HTTP_HOST}%{REQUEST_URI} [L,R=301]
This is the one I’m currently using.
Force SSL on a specific folder
Insert the code below into a .htaccess file placed in that specific folder:
RewriteEngine On
RewriteCond %{SERVER_PORT} 80
RewriteCond %{REQUEST_URI} folder
RewriteRule ^(.*)$ https://www.yourdomain.com/folder/$1 [R,L]
Make sure you change the folder reference to the actual folder name. Then be sure to replace www.yourdomain.com/folder with your actual domain name and folder you want to force the SSL on.
Generating Thumbnails for Video and Audio Files In Ubuntu
Install Totem (if it isn’t already):
sudo apt install totem
Back up your thumbnailer configurations:
sudo cp /usr/share/thumbnailers/totem.thumbnailer /usr/share/thumbnailers/totem.thumbnailer.backup
sudo cp /usr/share/thumbnailers/ffmpegthumbnailer.thumbnailer /usr/share/thumbnailers/ffmpegthumbnailer.thumbnailer.backup
Replace /usr/share/thumbnailers/totem.thumbnailer with this:
[Thumbnailer Entry]
TryExec=/usr/bin/totem-video-thumbnailer
Exec=/usr/bin/totem-video-thumbnailer -s %s %u %o
MimeType=audio/x-pn-realaudio;audio/3gpp;audio/3gpp2;audio/aac;audio/ac3;audio/AMR;audio/AMR-WB;audio/basic;audio/dv;audio/eac3;audio/flac;audio/m4a;audio/midi;audio/mp1;audio/mp2;audio/mp3;audio/mp4;audio/mpeg;audio/mpg;audio/ogg;audio/opus;audio/prs.sid;audio/scpls;audio/vnd.rn-realaudio;audio/wav;audio/webm;audio/x-aac;audio/x-aiff;audio/x-ape;audio/x-flac;audio/x-gsm;audio/x-it;audio/x-m4a;audio/x-matroska;audio/x-mod;audio/x-mp1;audio/x-mp2;audio/x-mp3;audio/x-mpg;audio/x-mpeg;audio/x-ms-asf;audio/x-ms-asx;audio/x-ms-wax;audio/x-ms-wma;audio/x-musepack;audio/x-pn-aiff;audio/x-pn-au;audio/x-pn-wav;audio/x-pn-windows-acm;audio/x-realaudio;audio/x-real-audio;audio/x-s3m;audio/x-sbc;audio/x-shorten;audio/x-speex;audio/x-stm;audio/x-tta;audio/x-wav;audio/x-wavpack;audio/x-vorbis;audio/x-vorbis+ogg;audio/x-xm;application/x-flac;
Replace /usr/share/thumbnailers/ffmpegthumbnailer.thumbnailer with this:
[Thumbnailer Entry]
TryExec=ffmpegthumbnailer
Exec=ffmpegthumbnailer -i %i -o %o -s %s -f -m
MimeType=video/jpeg;video/mp4;video/mpeg;video/quicktime;video/x-ms-asf;video/x-ms-wm;video/x-ms-wmv;video/x-ms-asx;video/x-ms-wmx;video/x-ms-wvx;video/x-msvideo;video/x-flv;video/x-matroska;application/mxf;video/3gp;video/3gpp;video/dv;video/divx;video/fli;video/flv;video/mp2t;video/mp4v-es;video/msvideo;video/ogg;video/vivo;video/vnd.divx;video/vnd.mpegurl;video/vnd.rn-realvideo;video/vnd.vivo;video/webm;video/x-anim;video/x-avi;video/x-flc;video/x-fli;video/x-flic;video/x-m4v;video/x-mpeg;video/x-mpeg2;video/x-nsv;video/x-ogm+ogg;video/x-theora+ogg
Git Tips and Tricks
Git Setup
The values you set here will be used as defaults when you set up local repositories and connect to remote repositories.
git config --global user.name "Your Name Here"
git config --global user.email "your_email@example.com"
git config --global init.defaultBranch main
git config --list
Set values for a specific repository (you must be in the root directory of the repository when you issue these commands):
git config --local user.name "Your Name Here"
git config --local user.email "your_email@example.com"
Initialization
Initialize a local Git repository
cd <directory to add to source control>
git init
Initialize a local Git repository, based on a remote repository
This uses Github as an example.
- Open terminal.
- Create directory: mkdir ~/test-repo (Change “test-repo” to whatever you want.)
- Change to the new directory: cd ~/test-repo
- Initialize a local Git repository: git init
- Point your local repository to the remote repository: git remote add origin https://github.com/yourUserNameHere/test-repo.git
Sync local repo with remote
To sync your local repository with its associated remote repository, issue this command:
git fetch origin
You may need to retrieve and approve remote changes to force them into your local copy:
git checkout master
git merge origin/master
You should also be able to use “pull” to combine the fetch and merge into a single operation:
git pull origin
Clone a copy of a remote repository
cd <local_directory>
git clone https://github.com/<username>/<repository_name.git>
(This example uses GitHub. Modify it to whatever remote hosting site you need.)
Adding new files to a repository
This should be done before committing.
Add a single file:
git add <filename>
Add all new files:
git add
Update tracking for files that changed names or were deleted:
git add -u
To do both, use this:
git add -A
Commit changed files to a repository
After files have been added, you can commit them to be saved as an intermediate version:
git commit -m "message"
…where “message” is a useful description of what you did.
This only updates your local repo. If your repo is associated with a remote repository, the remote repo is not updated in this step.
Update remote repository
If you have saved local commits and you would like to update an associated remote repository:
git push
Branching
If you are working on a project with a version being shared by many people, you may not want to edit that version.
You can create a branch (and switch to it) with this command:
git checkout -b branchname
List available branches:
git branch
List remote branches:
git branch -r
List all branches:
git branch -a
(The branch you are on is marked with an asterisk.)
Refresh local list of remote branches:
git remote update origin --prune
If you have a remote branch, and you need to create/sync with it locally, do the following.
First, list remote branches, and note the name of the branch you want to create locally:
git branch -a
If, for example, the remote branch is named ‘remotes/origin/dev’, you can then create it locally, sync it, and switch to it with the following command:
git checkout -t remotes/origin/dev
If you want control over the naming of the local tracking branch, you can specify it as follows:
git checkout -t -b dev remotes/origin/dev
If master (or main) changes while you’re making changes in a branch, you can merge them into the branch as follows:
git checkout main
git pull
git checkout <branch_name>
git merge main
To push the current branch to a remote repository, creating a new branch on the remote:
git push origin <remote_branch_name>
If you are currently in a local branch, and you know the branch also exists in a remote repository, but a git pull fails, you may need to link the local branch to the server branch. For example, if the local and server branches are both named “dev”, you’d link them as follows:
git branch --set-upstream-to=origin/dev dev
To switch back to the master branch:
git checkout master
Delete a local branch:
git branch -D <branch-name>
Delete a remote branch:
git branch -r -D <branch-name>
Security
To bypass SSL verification, add this entry to .bashrc:
alias git='git -c http.sslVerify=false'
Important
Only use this if you know the network you’re using can be trusted. This setting leaves you open to man-in-the-middle attacks.
Git Setup For Specific Hosting Sites
Git Setup for Bitbucket
Set up your local directory:
mkdir /path/to/your/project
cd /path/to/your/project
git init
git remote add origin https://bitbucketid@bitbucket.org/bitbucketid/bitbucketproject.git
Create your first file, commit, and push:
echo "Your Name" >> contributors.txt
git add contributors.txt
git commit -m 'Initial commit with contributors'
git push -u origin master
Git Setup for GitHub (new)
mkdir -p ~/<projectname>
cd $_
echo "# <projectname>" >> README.md
git init
git add README.md
git commit -m "first commit"
git remote add origin https://github.com/<username>/<projectname>.git
git push -u origin master
Git Setup for GitHub (existing repository)
git remote add origin https://github.com/<username>/<projectname>.git
git push -u origin master
Automatic Authentication for GitHub, Bitbucket, and GitLab
Tired of being prompted for your userid and password every time you push local changes to your remote repository? Add the following to ~/.netrc.
For GitHub:
machine github.com
login <username>
password <password>
For Bitbucket:
machine bitbucket.org
login <username>
password <password>
For GitLab:
machine gitlab.com
login <username>
password <password>
(You can have all entries in the same file, if needed.)
More Git Tutorials and Reference
If you need more details, here are some comprehensive Git tutorials and references.
Official Tutorial – Hosted on the official Git site.
Pro Git – The entire book, hosted on the official Git site.
Vogella – A tutorial.
Atlassian Tutorials – A series of tutorials hosted on the Atlassian site. (These guys also host Bitbucket.)
Graphical sudo
If you want to set up a shortcut to a graphical program in Linux, and you need root privileges, you can execute the program with a graphical sudo prompt by prefixing it with gksu. For example, to run gvim as root, you’d use this as your command:
gksu gvim
Then, when the program runs, you’ll get a popup dialog box prompting you for your root password.
Hide website from search engines
Robots.txt
Sometimes when you’re developing a new web site, you may not have the site secured, but you may still not want it to be indexed by search engines. The quickest way to hide a site from all search engines is to create a robots.txt file with the following contents:
robots.txt
User-agent: *
Disallow: /
Disallow: /cgi-bin/
…then place the robots.txt file in the same location as your index.html. Once you’re ready to make your site visible to the search engines, either remove the robots.txt file, or adjust its contents as needed.
Links
McAnerin International has put together a very handy online tool to simplify building a robots.txt file. You can access it here.
There’s also a comprehensive article detailing various ways to hide content from search engines here.
Hostname On Linux
View
hostname
Result:
linux-host-name
Change
First:
sudo hostnamectl set-hostname new-linux-host-name
Then, update /etc/hosts entry to reflect the new name.
Finally, use hostname again to verify the change:
hostname
Result:
new-linux-host-name
How to install a .bundle file in Ubuntu Linux
Open a terminal, then:
sudo sh <filename>.bundle
HP Laptop Keyboard Not Working At Boot Start
Original article is for Linux Mint, but this affects Ubuntu as well.
Warning
This disables the caps lock indicator.
sudo vi /etc/default/grub
Update the GRUB command line to include the i8042 entry, e.g.:
GRUB_CMDLINE_LINUX_DEFAULT="quiet splash i8042.dumbkbd=1"
Save the file, then run sudo update-grub and reboot.
HTTP Status Codes
This is not a complete list. I’m just trying to list the most commonly used codes. The detail info comes from here.
Successful Responses
| Code | Description | Detail |
|---|---|---|
| 200 | OK | The request succeeded. The result and meaning of “success” depends on the HTTP method: GET: The resource has been fetched and transmitted in the message body, HEAD: Representation headers are included in the response without any message body, PUT or POST: The resource describing the result of the action is transmitted in the message body, and TRACE: The message body contains the request as received by the server. |
| 201 | Created | The request succeeded, and a new resource was created as a result. This is typically the response sent after POST requests, or some PUT requests. |
| 202 | Accepted | The request has been received but not yet acted upon. It is noncommittal, since there is no way in HTTP to later send an asynchronous response indicating the outcome of the request. It is intended for cases where another process or server handles the request, or for batch processing. |
| 204 | No Content | There is no content to send for this request, but the headers are useful. The user agent may update its cached headers for this resource with the new ones. |
Client Error Responses
| Code | Description | Detail |
|---|---|---|
| 400 | Bad Request | The server cannot or will not process the request due to something that is perceived to be a client error (e.g., malformed request syntax, invalid request message framing, or deceptive request routing). |
| 401 | Unauthorized | Although the HTTP standard specifies “unauthorized”, semantically this response means “unauthenticated”. That is, the client must authenticate itself to get the requested response. |
| 403 | Forbidden | The client does not have access rights to the content; that is, it is unauthorized, so the server is refusing to give the requested resource. Unlike 401 Unauthorized, the client’s identity is known to the server. |
| 404 | Not Found | The server cannot find the requested resource. In the browser, this means the URL is not recognized. In an API, this can also mean that the endpoint is valid but the resource itself does not exist. Servers may also send this response instead of 403 Forbidden to hide the existence of a resource from an unauthorized client. This response code is probably the most well known due to its frequent occurrence on the web. |
| 409 | Conflict | This response is sent when a request conflicts with the current state of the server. In WebDAV remote web authoring, 409 responses are errors sent to the client so that a user might be able to resolve a conflict and resubmit the request. |
| 422 | Unprocessable Entity | The request was well-formed but was unable to be followed due to semantic errors. |
Server Error Responses
| Code | Description | Detail |
|---|---|---|
| 500 | Internal Server Error | The server has encountered a situation it does not know how to handle. This error is generic, indicating that the server cannot find a more appropriate 5XX status code to respond with. |
| 502 | Bad Gateway | This error response means that the server, while working as a gateway to get a response needed to handle the request, got an invalid response. |
| 503 | Service Unavailable | The server is not ready to handle the request. Common causes are a server that is down for maintenance or that is overloaded. Note that together with this response, a user-friendly page explaining the problem should be sent. This response should be used for temporary conditions and the Retry-After HTTP header should, if possible, contain the estimated time before the recovery of the service. The webmaster must also take care about the caching-related headers that are sent along with this response, as these temporary condition responses should usually not be cached. |
| 504 | Gateway Timeout | This error response is given when the server is acting as a gateway and cannot get a response in time. |
Install Snapd on Debian
source: Linux Capable
Update Debian packages before Snapd installation:
sudo apt update && sudo apt upgrade
Install Snapd via APT command:
sudo apt install snapd
Verify Snapd installation:
snap version
Check the systemctl status of Snapd:
systemctl status snapd
If the service hasn’t activated, you can manually start it and enable it to start automatically at system boot using the following command:
sudo systemctl enable --now snapd.socket
Install Snap core:
sudo snap install core
Enable classic confinement for Snap packages:
sudo ln -s /var/lib/snapd/snap /snap
Install truetype fonts in Ubuntu Linux
- In a terminal:
mkdir ~/.fonts
-
Copy the font files to the new directory.
-
Restart any apps that need the new fonts.
List Hardware Information in Ubuntu and other Debian-based Linux
Open a terminal, and issue the following command:
sudo lshw
This executes the “list hardware” command, which will give you a useful summary of your installed hardware.
Making Colors in a GIF Transparent
(Assumes you are using GIMP)
- Open your image in GIMP.
- Right click the image and go to LAYERS then ADD ALPHA CHANNEL. You won’t notice anything happening, but don’t be concerned. It basically adds a transparent layer at the bottom of your image so when we erase the colors…..it shows the transparent layer. Which of course would show whatever was under it on the screen.
- Right-click on the image again and go to SELECT and then down to BY COLOR. A window that is all black opens up. Don’t change any of the settings….just use the defaults for now.
- Now click on the color in the image you want to be transparent. These colors will now show up outlined.
- Right-click on the image again and go to EDIT and then down to CLEAR. This should now erase the outlined color you just picked from the image and the “transparent gimp checkerbox” should show through. This is the Gimp’s way of showing you that section is now transparent.
- Right click on the image and choose SAVE AS and make sure to save as a GIF file if you want the transparency to work on the web.
Manually Install Firefox
Download Firefox from this page: https://www.mozilla.org/en-US/firefox/all/#product-desktop-release
Open a terminal and go to the folder where your download has been saved. For example:
cd ~/Downloads
Extract the contents of the downloaded file:
tar xjf firefox-*.tar.bz2
The following commands must be executed as root, or preceded by sudo.
Move the uncompressed Firefox folder to /opt:
mv firefox /opt
Create a symlink to the Firefox executable:
ln -s /opt/firefox/firefox /usr/local/bin/firefox
Download a copy of the desktop file:
wget https://raw.githubusercontent.com/mozilla/sumo-kb/main/install-firefox-linux/firefox.desktop -P /usr/local/share/applications
Markup and Code-Behind Examples for reveal.js
Markup
Animate Slide Transitions
The data-auto-animate decorator causes automatic display transition styling of matching header markup on slides.
<section data-auto-animate>
<h2>Slide One</h2>
<p>Contents</p>
</section>
<section data-auto-animate>
<h2>Slide Two</h2>
<p>Contents</p>
</section>
Block Quote
<blockquote>
Text of block quote.
</blockquote>
Fragments
Show text incrementally on a slide:
<section>
<h2>Fragments</h2>
<p>Hit the next arrow...</p>
<p class="fragment">... to step through ...</p>
<p><span class="fragment">... a</span> <span class="fragment">fragmented</span> <span class="fragment">slide.</span></p>
</section>
Image Backgrounds
<section data-background="image.png">
<h2>Data Backgrounds</h2>
</section>
Scale Image
<img src="image.png" class="stretch" />
Small Text
Nice formatting for long paragraphs.
<small>
Text of paragraph.
</small>
Syntax Highlighting
<p> <pre><code class="language-c"> printf("Hello!\n"); </code></pre> </p>
Customization
Default Background Image
Add this after the Reveal.initialize block:
for (var slide of document.getElementsByTagName('section')) {
if (!(slide.getAttribute('data-background') || slide.getAttribute('data-background-video') || slide.getAttribute('data-background-iframe') || slide.getAttribute('data-background-image'))) {
slide.setAttribute('data-background-image', 'img/default-background.png')
}
}
Make Text Stand Out
For text that is hard to read, you can make it stand out by enclosing it in a translucent box.
First, create a css/custom.js file, and add this style:
.background-box-black {
background-color: rgba(0, 0, 0, 0.8);
color: #fff;
padding: 20px;
}
Include the custom CSS in your index.html:
<link rel="stylesheet" href="css/custom.css">
Then, use it in a slide like this:
<section>
<div class="background-box-black">
<p>Some text!</p>
</div>
</section>
Here’s some additional CSS for enhancing text display:
.green-bold {
color: green;
font-weight: bold;
}
.red-bold {
color: red;
font-weight: bold;
}
.blue-bold {
color: blue;
font-weight: bold;
}
.simple-quote {
background-color: rgba(0, 0, 0, 0.8);
font-style: italic;
}
.force-italic {
font-style: italic;
}
Merge Images
Side-by-Side (vertical)
convert ./input/*.jpg -append output.jpg
Side-by-Side (horizontal)
convert ./input/*.jpg +append output.jpg
Overlay
composite -blend 80 -gravity center input1.png input2.jpg output.png
Migrating from Windows to Linux
Thinking about moving to Linux, but concerned about losing your favorite Windows applications?
Ease your fears by checking out Linux Equivalents to Windows Software, Linux Group Tests, and The Linux Alternative Project.
Also, check your hardware for compatibility here.
MiniDLNA - A lightweight, simple media server
If you’d like to set up a home media server, but you’re limited by memory and processing power, then MiniDLNA might be just what you’re looking for. It doesn’t have the bells-and-whistles of something like Plex Media Server, but it gets the job done, and all you need is a DLNA-compliant media client to access it.
The Digital Living Network Alliance (DLNA) was founded by a group of PC and consumer electronics companies in June 2003 to develop and promote a set of interoperability guidelines for sharing digital media among multimedia devices under the auspices of a certification standard.
from Wikipedia.
These instructions are for the Raspberry Pi 4, but MiniDLNA can be installed on just about any flavor of Linux, and it should be easy to adapt these instructions accordingly.
Requirements
A Raspberry Pi 4, running Rasbian. That’s it!
Setup
Ensure that your Raspberry Pi is up-to-date:
sudo apt update
sudo apt upgrade
Then, install MiniDLNA:
sudo apt install minidlna
The MiniDLNA daemon starts automatically after installation. It reads configuration information from /etc/minidlna.conf.
Edit the configuration file:
sudo vi /etc/minidlna.conf
Then, look for the section specifying the location(s) to scan for media files:
# * "A" for audio (eg. media_dir=A,/var/lib/minidlna/music)
# * "P" for pictures (eg. media_dir=P,/var/lib/minidlna/pictures)
# * "V" for video (eg. media_dir=V,/var/lib/minidlna/videos)
I created my media folders in my home directory, and my entries look like this:
media_dir=A,/home/pi/minidlna/music
media_dir=P,/home/pi/minidlna/pictures
media_dir=V,/home/pi/minidlna/video
The only other required setting is a friendly DLNA host name for your server. Look for this entry:
#friendly_name=
Uncomment it, and add a friendly name of your choosing, e.g.:
friendly_name=MyMediaServer
Your MiniDLNA installation is now ready to use.
Adding Media Files
Copy media files to the MiniDLNA folders appropriate for their type, e.g.:
- .mp3 files in /home/pi/minidlna/music
- .jpg files in /home/pi/minidlna/pictures
- .mp4 files in /home/pi/minidlna/video
The MiniDLNA daemon is sensitive to read permissions, so make your media readable by everyone:
chmod -R a+r /home/pi/minidlna
After adding media files, the MiniDLNA daemon must be restarted:
sudo systemctl restart minidlna
Client Access
The MiniDLNA server should be accessible by any DLNA-compliant media client on your network. Examples:
- Roku Media Player
- Universal Plug-n-Play in the VLC media player
Monitoring
You can check the status of your media server from a browser anywhere on your network by going to http://192.168.0.140:8200. (Change the IP address to match the address of your server.)
Modify Default Folders in Ubuntu Linux
vi ~/.config/user-dirs.dirs
Modify folder paths as needed.
Mount local folder as drive C in DOSBox
Running DOSBox in Linux you can mount a local folder as drive C: as follows:
Open a Terminal.
cd .dosbox
vi dosbox-0.##.conf
(Use whatever editor you want.)
Add the following line in the [autoexec] section:
mount c ~/local_path
You can also add additional drives, if you want. Just specify another unique drive letter and local path on a new line.
Neovim Qt Startup Error
It’s not a fatal error, but it’s annoying. If you see this when you start nvim-qt (in Ubuntu):
Failed to load module "atk-bridge": 'gtk_module_display_init': /usr/lib/x86_64-linux-gnu/gtk-2.0/modules/libgail.so: undefined symbol: gtk_module_display_init
You can fix it with this:
sudo apt install libatk-adaptor
NPM Cheat Sheet
Searchable NPM package repository: https://www.npmjs.com/
Update All Node Modules
(e.g., in a React or Angular project)
cd project_root
npm install
Install Specific Node Package
(e.g., in a React or Angular project)
cd project_root
npm install package_name
package_name will be added to the project’s package.json file.
Related
NT_STATUS_UNSUCCESSFUL error when browsing machines/shares in Ubuntu Linux
Here’s a workaround if you encounter this error when using smbtree or using the network browser in Nautilus:
- First edit the Samba config file:
vi /etc/samba/smb.conf
- Then, find the line
name resolve order = lmhosts host wins bcastand change toname resolve order = lmhosts wins bcast host
You may need to reboot in order for Nautilus to pick up the change.
PDF Conversion Policy Error
Error:
convert-im6.q16: attempt to perform an operation not allowed by the security policy `PDF' @ error/constitute.c/IsCoderAuthorized/421.
Cause: Parsing PDF was disabled in /etc/ImageMagick-7/policy.xml due to its inherent insecurity. The same thing did Ubuntu and perhaps more distros will follow as this is recommendation from security researchers.
Fix: Enable it locally by removing ‘PDF’ from below line: <policy domain=“coder” rights=“none” pattern=“{PS,PS2,PS3,EPS,PDF,XPS}” />
File to edit: /etc/ImageMagick-7/policy.xml
Source: https://bugs.archlinux.org/task/60580
Quarto Special Markup
Code Block with Filename
```{.c filename="main.c"}
#include <stdio.h>
int main() {
printf("Hello, world!\n");
return(0);
}
```
Callout Blocks
:::{.callout-note}
This is a note.
:::
:::{.callout-tip}
This is a tip.
:::
:::{.callout-warning}
This is a warning.
:::
:::{.callout-caution}
This is a caution.
:::
:::{.callout-important}
This is important!
:::
Spans
[This text is smallcaps]{.smallcaps}
[This text is underlined]{.underline}
[This text is highlighted]{.mark}
Diagrams
Quarto has native support for embedding Mermaid and Graphviz diagrams. This enables you to create flowcharts, sequence diagrams, state diagrams, Gantt charts, and more using a plain text syntax inspired by markdown.
For example, here we embed a flowchart created using Mermaid:
```{mermaid}
flowchart LR
A[Hard edge] --> B(Round edge)
B --> C{Decision}
C --> D[Result one]
C --> E[Result two]
```
Equations
inline math: $E = mc^{2}$
display math:
$$E = mc^{2}$$
Raw Content
```{=html}
<iframe src="https://quarto.org/" width="500" height="400"></iframe>
```
Videos
{{< video https://www.youtube.com/embed/wo9vZccmqwc >}}
Query Windows shares from the command line in Ubuntu Linux
If you find that network (Windows) shares are not being displayed in Nautilus (but are otherwise available), you can query them by opening a terminal and entering “smbtree”. For example, if you want to open a share on a Windows machine named “win2″, but you aren’t sure of the name, do this:
-
Open a terminal.
-
Type this:
smbtree
-
Note the name of the share in the list. For this example, we’ll say it’s “my files”.
-
Go to Nautilus, and type
smb://win2//my filesin the address bar, and hit “ENTER”.
React Cheat Sheet
Create
npx create-react-app my-app
Run (development environment)
cd my-app
npm start
Default development server will run at http://localhost:3000
Build / Publish
After you design and test the application, build with this:
npm run build
To deploy, upload the contents of the build directory to your web server.
Related
Recursive File Search
grep
grep -r --include="*.*" searchtext .
For example, to search all C# source files for instances of the the text “TODO”:
grep -r --include="*.cs" TODO .
Here’s an example that’s a little more readable:
grep -rin --include '*.json' -e 'globalmetadata' .
You can specify multiple extensions in –include like this:
grep -rin --include=\*.{json,cs} -e 'globalmetadata' .
C#
using System.IO;
string[] fileList =
Directory.GetFiles(Directory.GetCurrentDirectory(), "*.xml", SearchOption.AllDirectories);
Change the *.xml mask to whatever search pattern you want. The fileList array will contain a list of all matching files, with fully-qualified paths.
Ruby
Here’s how to implement a grep-like utility in Ruby which will recursively search subdirectories:
if (ARGV[0] == nil && ARGV[1] == nil)
puts ("Usage: rbfilesearch.rb ")
else
myFile = ARGV[0]
myText = ARGV[1]
Dir['**/*' + myFile + '*'].each do |path|
File.open( path ) do |f|
f.grep( /#{myText}/ ) do |line|
puts(path + " : " + line)
end
end
end
end
Rhythmbox tray icon plugin
The Rhythmbox tray icon is no longer available in newer versions of Ubuntu. Here’s how you can get it back: https://github.com/mendhak/rhythmbox-tray-icon.
Rip DVD in Ubuntu
Important
Please be a good citizen and only rip media that you own!
Dependencies
Install dvdbackup and ffmpeg:
sudo apt install dvdbackup ffmpeg
Most commercial DVDs are encrypted with CSS (the Content Scramble System), which attempts to restrict the software that can play a DVD. To enable reading of encrypted DVDs, you’ll also need to compile and install libdvdcss. This will step you through it:
sudo apt install libdvd-pkg && sudo dpkg-reconfigure libdvd-pkg
More info here.
Steps
Insert DVD and note mount path, e.g., /media/username/SIDEWAYS_169.
Extract VOB files for feature:
dvdbackup -i /media/username/SIDEWAYS_169 -o output -F -n "Sideways" -p
Browse to output/Sideways/VIDEO_TS.
Determine which .VOB files contain the actual movie. You can use Celluloid to preview. Remove non-feature .VOB files like trailers, making-of, etc.
Combine the remaining .VOB files into one:
cat *.VOB > Sideways.VOB
Convert the .VOB file to .mp4:
ffmpeg -i Sideways.VOB Sideways.mp4
Rsync as a Backup Solution
Rsync is a command-line utility that synchronizes sets of directories and files between file systems. It was written primarily for remote file copying, but it works really well for local file copies too.
Here’s an example, showing how I use it for backups:
rsync -lrt --delete /home/jdoe/Documents /media/HD2/fullsync
When you issue this command, you end up with a synchronized copy of the Documents folder on HD2 (HD2 is the target, /home/jdoe/Documents is the source/working copy). The target path ends up being /media/HD2/fullsync/Documents.
The command line arguments are as follows:
- -l copy symlinks as symlinks
- -r recurse into directories
- -t preserve modification times
- –delete delete extraneous files from destination directories (this ensures that when you delete a file in your source directory, it doesn’t hang around in your target directory)
There are plenty of additional command line arguments, but these are just the ones I use for my needs.
I’ve also created a Python script to simplify the backup process:
#!/usr/bin/python
import glob
import os
import os.path
import shlex
import statvfs
import subprocess
import sys
def ExecBackup(source, target, skipit):
try:
if skipit == True:
print "Skipped " + source
else:
if not os.path.exists(target):
os.makedirs(target)
if os.path.exists(source):
procName = 'rsync -lrt --delete "' + source + '" "' + target + '"'
myarg = shlex.split (procName)
myarg = myarg[:-1] + glob.glob(myarg[-1])
p = subprocess.Popen(myarg)
p.communicate()
print "Synced " + source
else:
print "Invalid source path: " + source
except Exception as ex:
print 'Call to ' + procName + ' failed: ' + str(ex)
### Main() starts here ###
# NOTE: The newTarget setting and ExecBackup calls are examples. Modify to suit your needs.
# Target folder for synchronized copies.
newTarget = '/media/HD2/fullsync'
# Each call to ExecBackup synchronizes a single directory and all of its subdirectories
ExecBackup('/home/jdoe/Documents',newTarget,False)
ExecBackup('/home/jdoe/Music',newTarget,False)
# Show free space remaining on target drive
f = os.statvfs(newTarget)
totalSize = (f[statvfs.F_BSIZE] * f[statvfs.F_BFREE]) / 1024/1024/1024
print '\nSpace remaining: ' + str(totalSize) + 'G'
print '\nFinished successfully.'
I use rsync in Linux, but there are various implementations available for Windows. You can find a list in the rsync Wikipedia entry here. If you want to use rsync in Windows, I personally recommend installing Cygwin. It will give you rsync, and also a lot of other really useful utilities.
Selective chmod for directories and files
Here’s how to apply one set of permissions to all files, and a different set of permissions to all directories, in Linux (example):
First cd to the directory containing the subdirectories and files you want to change. Then:
For directories:
find . -type d -exec chmod 755 {} \;
For files:
find . -type f -exec chmod 644 {} \;
(Change the 755 and 644 to the actual permissions you want)
Simple Web Server, Using Python or PHP
If you need a quick way to test web pages and you don’t want to go through the hassle (and overhead) of installing and configuring Apache, Python and PHP have web servers built right in!
Python 2
Change to the directory that contains your HTML files.
cd path/to/HTML/files
Start up the Python web server. This example will listen on port 8080, but you can use any port you want.
python -m SimpleHTTPServer 8080
Now, you access your files through http://localhost:8080.
You can also start an instance with CGI support. (The server will look for CGI scripts in path/to/HTML/files/cgi-bin by default)
python -m CGIHTTPServer 8080
I’ve only tested this with Python 2.x. My understanding is that SimpleHTTPServer and CGIHTTPServer are deprecated in Python 3 in favor of http.server.
Keep in mind that this only works for HTML/JavaScript files.
Python 3
Python 3 uses different syntax. After changing to the directory containing your HTML files, issue this command:
python3 -m http.server
If you need CGI support, use this:
python3 -m http.server --cgi
PHP
If you need support for server-side PHP programming, php.exe also has a web server built in. In the directory where your .php files reside, execute php.exe as follows:
php -S localhost:8080
Then, you can access your files through http://localhost:8080. Again, you can change the port to whatever you need.
If you need remote access to your files (from other machines on the local network), use this:
php -S 0.0.0.0:8080
Scripts
I put together a couple of scripts to simplify starting the server. (They both perform the same task. One is a bash script, the other is in Ruby. Use whichever you prefer.)
Bash version
#!/usr/bin/env bash
statusmsg(){
if [ $1 == "pysimple" ]; then
echo "Simple Web Server, using Python"
fi
if [ $1 == "pycgi" ]; then
echo "Simple Web Server w/ CGI Support, using Python"
fi
if [ $1 == "php" ]; then
echo "Simple Web Server, using PHP"
fi
if [ $1 == "phprem" ]; then
echo "Simple Web Server, using PHP, with remote access"
fi
echo "(Ctrl-C to exit the running server.)"
echo ""
}
usage(){
echo "USAGE:"
echo ""
echo " $0 pysimple <port_number> (starts a simple web server, using Python)"
echo " or"
echo " $0 pycgi <port_number> (starts a simple web server, with CGI support, using Python)"
echo " or"
echo " $0 php <port_number> (starts a simple web server, using PHP)"
echo " or"
echo " $0 phprem <port_number> (starts a simple web server, using PHP, with remote access)"
echo ""
echo "e.g.: '$0 pycgi 81' starts a simple web server with CGI support, using Python, listening on port 81."
exit
}
if [ $# -ne 2 ]; then
usage
fi
if [ $1 == "pysimple" ]; then
statusmsg $1
python -m SimpleHTTPServer $2
exit
fi
if [ $1 == "pycgi" ]; then
statusmsg $1
python -m CGIHTTPServer $2
exit
fi
if [ $1 == "php" ]; then
statusmsg $1
php -S localhost:$2
exit
fi
if [ $1 == "phprem" ]; then
statusmsg $1
php -S 0.0.0.0:$2
exit
fi
Ruby version
#!/usr/bin/env ruby
class WebMgr
attr_accessor :server_type
attr_accessor :server_port
attr_accessor :usage_message
def initialize
@usage_message =
"USAGE:\n" +
"\tlocalweb pysimple <port_number> (starts a simple web server, using Python)\n" +
"\tor\n" +
"\tlocalweb pycgi <port_number> (starts a simple web server, with CGI support, using Python)\n" +
"\tor\n" +
"\tlocalweb php <port_number> (starts a simple web server, using PHP)\n" +
"\tor\n" +
"\tlocalweb phprem <port_number> (starts a simple web server, using PHP, with remote access)\n"
if (ARGV[0] == nil)
@server_type = ''
else
@server_type = ARGV[0]
end
if (ARGV[1] == nil)
@server_port = 80
else
@server_port = ARGV[1]
end
end
def StartServer
case @server_type
when 'pysimple'
exec "python -m SimpleHTTPServer " + @server_port
when 'pycgi'
exec "python -m CGIHTTPServer " + @server_port
when 'php'
exec "php -S localhost:" + @server_port
when 'phprem'
exec "php -S 0.0.0.0:" + @server_port
else
puts @usage_message
end
end
end
### Main ###
begin
myWebMgr = WebMgr.new
if (ARGV[0] == nil)
puts myWebMgr.usage_message
else
myWebMgr.StartServer
end
rescue Exception => ex
puts "An exception occurred: " + ex
end
Need More?
If you need more horsepower, i.e., an easy to configure LAMP dev server, I highly recommend XAMPP. This will give you a full LAMP stack that won’t conflict with your existing setup.
Start an X Windows session in Cygwin
First, make sure you’ve installed X Windows with a window manager in Cygwin. (I use WindowMaker.) Start a bash session, and enter the following:
xinit -e wmaker
(If you are using a window manager other than WindowMaker, you’ll need to change “wmaker” to match its name.)
Stream Media from Ubuntu/Mint Linux to XBox360
UPDATE: uShare is still the best (in my opinion) way to quickly get a UPnP server running, with low overhead. If you’re interested in a more comprehensive solution, though, I recommend that you check out Plex Media Server. It’s a bit more work to set up, and also more taxing on your host machine, but very feature-rich. (It has a Roku client channel too, which uShare does not.)
I also have a newer article discussing MiniDLNA, another lightweight media server.
Original Article =====
The UPnP media server standard employed by Windows Media Center can be emulated using a utility called uShare.
sudo apt-get install ushare
Then, edit /etc/ushare.conf and make the following changes:
USHARE_NAME=uShareMedia # The name you want to be visible on your network.
# Interface to listen to (default is eth0).
USHARE_IFACE=eth1 # Change this to your active interface
# Port to listen to (default is random from IANA Dynamic Ports range)
# Ex : USHARE_PORT=49200
USHARE_PORT= # You probably won't need to change this.
# Port to listen for Telnet connections
# Ex : USHARE_TELNET_PORT=1337
USHARE_TELNET_PORT= # Same here.
# Directories to be shared (space or CSV list).
USHARE_DIR=/dir1,/dir2 # Point this to the directory/ies containing the media files you want to share.
# Use XboX 360 compatibility mode (yes/no)
USHARE_ENABLE_XBOX=yes # This one's important. Allows your XBox console to access the media share
# Use DLNA profile (yes/no)
# This is needed for PlayStation3 to work (among other devices)
USHARE_ENABLE_DLNA=yes
Use this command to start up the service:
ushare -xD
If you need to “cycle” the service (eg, to pick up new media files), use this:
killall -q ushare
ushare -xD
USB Plugs and Cables


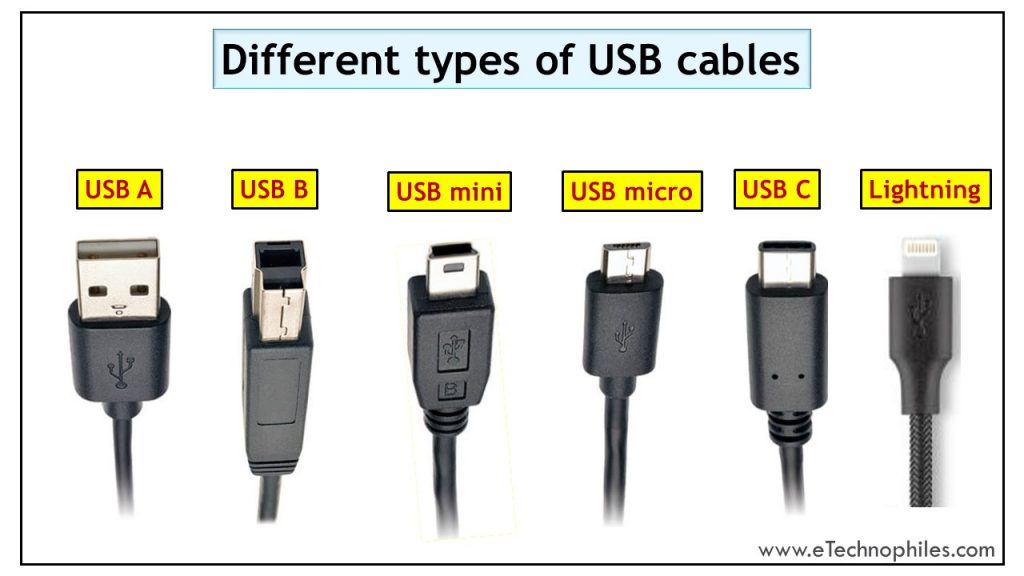
User Limit On Inotify Instances
Error Message
Example:
The configured user limit (128) on the number of inotify instances has been reached
This message means your system-wide limit for inotify instances (Linux file-watchers) is too low for what’s running (often IDEs, file indexers, dev servers, Docker, etc.). Fix it by raising the limits and/or stopping the process that’s consuming them.
Quick fix (temporary until reboot)
sudo sysctl -w fs.inotify.max_user_instances=1024
sudo sysctl -w fs.inotify.max_user_watches=524288
sudo sysctl -w fs.inotify.max_queued_events=65536
Make it permanent
Create a sysctl config file:
sudo tee /etc/sysctl.d/99-inotify.conf >/dev/null <<'EOF'
fs.inotify.max_user_instances=1024
fs.inotify.max_user_watches=524288
fs.inotify.max_queued_events=65536
EOF
Apply:
sudo sysctl --system
Using Your Router As A Wireless Repeater
For reference, the Archer router will be the one acting as the repeater. The main router is your existing router or ISP router etc.
-
Factory default the Archer router by holding the reset button for 15 seconds then release. Leave the Archer router in the same room of the main router.
-
Now you need to know the IP addressing subnet of your main router. For example, if you connect to your main router and you get an IP of 192.168.0.100, then the Archer router will be getting an IP of 192.168.0.250. It does not need to be .250, you can choose any number if it is not within your DHCP pool.
-
Use a computer where you can use an Ethernet cable to connect to one of the LAN ports of the Archer router and log into it. No other Ethernet cable needs to be connected, just the one from your computer.
-
Set the IP address of the Archer router. In the example below I am assuming my main router gives an IP of 192.168.0.x, select Save. You will probably get disconnected if so log back in with the new IP address given to the Archer router.
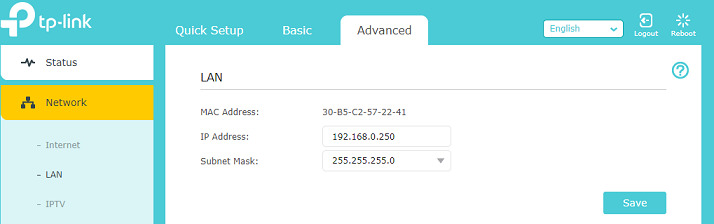
- Set up the WDS bridging which will connect the Archer router to the main router. Select the survey button and choose the network you want to connect to. You can only connect to either the 2.4GHz or the 5GHz. After you choose the network, enter the wireless password that you would normally use to connect to that wireless network. Say for example a visitor came over and wanted to connect to that same network, whichever wireless password you would use is what you enter there. Make sure to select the save button when you are done.
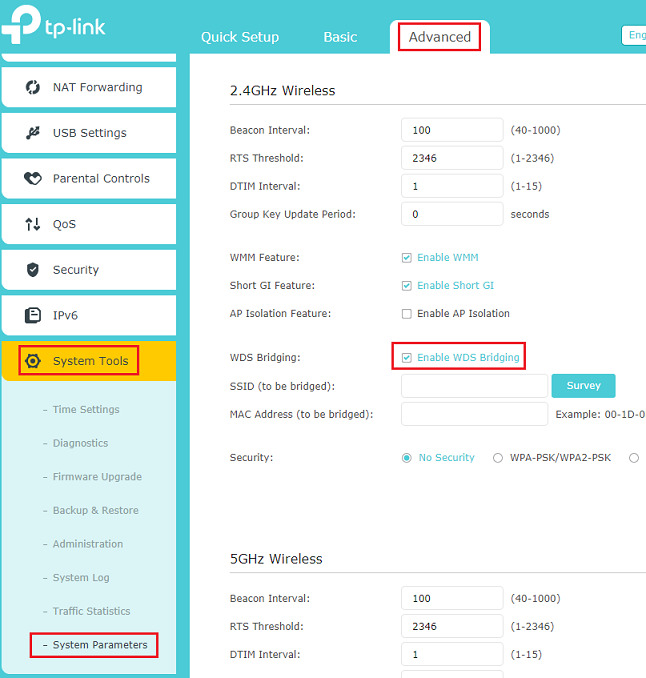
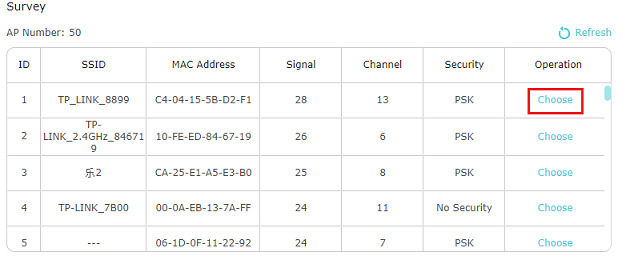
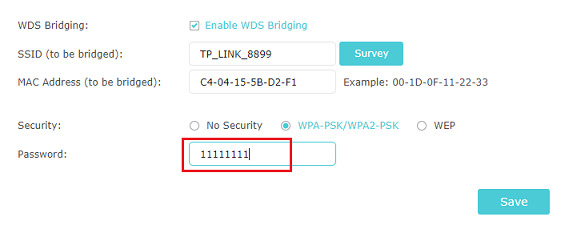
- Disable the DHCP server and save it.
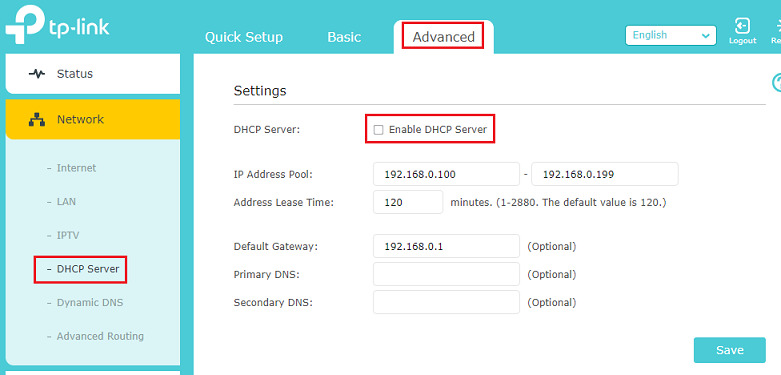
- Reboot the router either by selecting the reboot on the top right or pressing the power button behind the router and turning it back on.
Source: https://community.tp-link.com/us/home/kb/detail/396
Vim Tips and Tricks
Install new syntax file for Vim
- Download the .vim file.
- Copy it to
- Edit your .vimrc file.
- Add a line like this: “*au BufNewFile,BufRead .ft set filetype=ft”, where “ft” is the file extension and file type you are installing support for.
Custom Vim settings in Cygwin
If you want to have custom startup setting for Vim in a Cygwin session, do the following:
- Start a Cygwin Bash session.
- Go to “/usr/share/vim/vim72″. (You may need to modify the “72″ to match your installed version of Vim.)
- Copy vimrc_example.vim to ~/.vimrc
- Go to your home directory, edit the .vimrc file, and modify the settings to your liking.
Customize syntax highlighting in VIM by extension
Sometimes, VIM does not correctly apply syntax highlighting rules. In my case, I found that this happens a lot with Visual Basic files. You can override the syntax highlighting rules, forcing a set of syntax rules to be applied based on a file’s extension, as follows. For example, if you find that .cls (VB class files) are not being handled as Visual Basic files, add the following to your vimrc file:
au BufNewFile,BufRead *.cls set filetype=vb
For other file types, just add a line similar to the one above, changing the “*.cls” and “vb” values as needed.
Maximize Vim at startup
If you want Vim to be automatically maximized when you run it, enter the following as the last statement in your vimrc file: au GUIEnter * simalt ~x
Search and Replace
(from here)
The :substitute command searches for a text pattern, and replaces it with a text string. There are many options, but these are what you probably want:
:%s/foo/bar/g
…finds each occurrence of ‘foo’ (in all lines), and replaces it with ‘bar’.
:s/foo/bar/g
…finds each occurrence of ‘foo’ (in the current line only), and replaces it with ‘bar’.
:%s/foo/bar/gc
…changes each ‘foo’ to ‘bar’, but asks for confirmation first.
:%s/\<foo\>/bar/gc
…changes only whole words exactly matching ‘foo’ to ‘bar’; asks for confirmation.
:%s/foo/bar/gci
…changes each ‘foo’ (case insensitive) to ‘bar’; asks for confirmation. This may be wanted after using :set noignorecase to make searches case sensitive (the default).
:%s/foo/bar/gcI
…changes each ‘foo’ (case sensitive) to ‘bar’; asks for confirmation. This may be wanted after using :set ignorecase to make searches case insensitive.
Vue.js Cheat Sheet
Prerequisites
Install Node.js
Create Application
npm init vue@latest
Answer the scaffolding setup prompts:
- Project name: …
- Add TypeScript? … No / Yes
- Add JSX Support? … No / Yes
- Add Vue Router for Single Page Application development? … No / Yes
- Add Pinia for state management? … No / Yes
- Add Vitest for Unit testing? … No / Yes
- Add Cypress for both Unit and End-to-End testing? … No / Yes
- Add ESLint for code quality? … No / Yes
- Add Prettier for code formatting? … No / Yes
Install Dependencies / Run Application
cd <your-project-name>
npm install
npm run dev
Build For Production
npm run build
Web Frameworks, Libraries, and Plugins
Charts and Graphs
| Name | Description |
|---|---|
| Chartist.js | Simple responsive charts. |
| Flot | Attractive JavaScript plotting for jQuery. |
| jQuery Sparkline | This jQuery plugin generates sparklines (small inline charts) directly in the browser using data supplied either inline in the HTML, or via javascript. |
| Morris Charts | Morris is a pretty and powerful Charts Plugin with jQuery and Raphaël JS Library to make drawing simple charts easy. With Morris.js, you can create a wide variety of charts like line & area charts, bar charts and donut charts to fit you needs. It also works fine on mobile device such as iOS and android. |
Dates, Times, and Calendars
| Name | Description |
|---|---|
| Fullcalendar | FullCalendar is a jQuery plugin that provides a full-sized, drag & drop event calendar. It uses AJAX to fetch events on-the-fly and is easily configured to use your own feed format. It is visually customizable with a rich API. |
| jQuery Timepicker | The timepicker addon adds a timepicker to jQuery UI Datepicker, thus the datepicker and slider components (jQueryUI) are required for using any of these. In addition all datepicker options are still available through the timepicker addon. |
| Moment | Parse, validate, manipulate, and display dates in JavaScript. |
Game and 3D
| Name | Description |
|---|---|
| gameQuery | gameQuery is an easy to use jQuery plug-in to help make javascript game development easier by adding some simple game-related classes. |
| Phaser | A fast, free and fun open source framework for Canvas and WebGL powered browser games. |
| three.js | Three.js is a library that makes WebGL - 3D in the browser - easy to use. While a simple cube in raw WebGL would turn out hundreds of lines of Javascript and shader code, a Three.js equivalent is only a fraction of that. |
Maps
| Name | Description |
|---|---|
| JQVMap | JQVMap is a jQuery plugin that renders Vector Maps. It uses resizable Scalable Vector Graphics (SVG) for modern browsers like Firefox, Safari, Chrome, Opera and Internet Explorer 9. Legacy support for older versions of Internet Explorer 6-8 is provided via VML. |
| Leaflet.js | Leaflet is a modern open-source JavaScript library for mobile-friendly interactive maps. |
| OpenStreetMap | A high-performance, feature-packed library for all your mapping needs. |
Misc
| Name | Description |
|---|---|
| Bootstrap | Responsive framework. |
| D3 | D3 allows you to bind arbitrary data to a Document Object Model (DOM), and then apply data-driven transformations to the document. For example, you can use D3 to generate an HTML table from an array of numbers. Or, use the same data to create an interactive SVG bar chart with smooth transitions and interaction. |
| Datatables | DataTables is a plug-in for the jQuery Javascript library. It is a highly flexible tool, based upon the foundations of progressive enhancement, and will add advanced interaction controls to any HTML table. |
| fancyBox | fancyBox is a tool that offers a nice and elegant way to add zooming functionality for images, html content and multi-media on your webpages. |
| FormValidation | Form field validation support for Bootstrap, Foundation, Pure, Semantic UI, UIKit, and other frameworks. |
| Handlebars | Handlebars provides the power necessary to let you build semantic templates effectively with no frustration. |
| jQuery | jQuery is a fast, small, and feature-rich JavaScript library. It makes things like HTML document traversal and manipulation, event handling, animation, and Ajax much simpler with an easy-to-use API that works across a multitude of browsers. |
| jQuery-Knob | Nice, downward compatible, touchable, jQuery dial. |
| jQuery UI | jQuery UI is a curated set of user interface interactions, effects, widgets, and themes built on top of the jQuery JavaScript Library. Whether you’re building highly interactive web applications or you just need to add a date picker to a form control, jQuery UI is the perfect choice. |
| Justified Gallery | This is a JQuery plugin that allows you to create an high quality justified gallery of images. |
| Modernizr | Modernizr is a JavaScript library which is designed to detect HTML5 and CSS3 features in various browsers. Since the specifications for both HTML5 and CSS3 are only partially implemented or nonexistent in many browsers, it can be difficult to determine which techniques are available for use in rendering a page, and when it is necessary to avoid using a feature or to load a workaround such as a shim to emulate the feature. Modernizr aims to provide this feature detection in a complete and standardized manner. |
| RaphaelJS | Raphaël is a small JavaScript library that should simplify your work with vector graphics on the web. If you want to create your own specific chart or image crop and rotate widget, for example, you can achieve it simply and easily with this library. |
| Select2 | Select2 is a jQuery based replacement for select boxes. It supports searching, remote data sets, and infinite scrolling of results. |
| Springy | Springy is a force directed graph layout algorithm. |
| TinyMCE | TinyMCE is a platform independent web based Javascript HTML WYSIWYG editor control. |
| Widen FineUploader | Multiple file upload plugin with progress-bar, drag-and-drop, direct-to-S3 & Azure uploading, tons of other features. |
MVC
| Name | Description |
|---|---|
| Angular.js | Angular is an open-source web application framework maintained by Google and by a community of individual developers and corporations to address many of the challenges encountered in developing single-page applications. It aims to simplify both the development and the testing of such applications by providing a framework for client-side model–view–controller (MVC) architecture, along with components commonly used in rich Internet applications.\ \ The AngularJS library works by first reading the HTML page, which has embedded into it additional custom tag attributes. Angular interprets those attributes as directives to bind input or output parts of the page to a model that is represented by standard JavaScript variables. The values of those JavaScript variables can be manually set within the code, or retrieved from static or dynamic JSON resources. |
| Backbone.js | Backbone.js gives structure to web applications by providing models with key-value binding and custom events, collections with a rich API of enumerable functions, views with declarative event handling, and connects it all to your existing API over a RESTful JSON interface. |
Glossary
Inertial Measurement Unit (IMU)
An inertial measurement unit (IMU) is an electronic device that measures and reports a body’s specific force, angular rate, and sometimes the orientation of the body, using a combination of accelerometers, gyroscopes, and sometimes magnetometers. When the magnetometer is included, IMUs are referred to as IMMUs.
Wikipedia Contributors. “Inertial Measurement Unit.” Wikipedia, Wikimedia Foundation, 5 Aug. 2019, https://en.wikipedia.org/wiki/Inertial_measurement_unit.
Initial Program Load (IPL)
Initial Program Load, the process of loading the operating system of a mainframe into the computer’s main memory. IPL is the mainframe equivalent of booting or rebooting a personal computer.
Beal, Vangie. “IPL - Initial Program Load.” Webopedia, 10 June 2002, https://www.webopedia.com/definitions/ipl/.
Job Control Language (JCL)
Job Control Language is a name for scripting languages used on IBM mainframe operating systems to instruct the system on how to run a batch job or start a subsystem.
“Job Control Language.” Wikipedia, 9 Sept. 2023, https://en.wikipedia.org/wiki/Job_Control_Language.
Just-in-time compilation (JIT)
In computing, just-in-time (JIT) compilation (also dynamic translation or run-time compilations) is a way of executing computer code that involves compilation during execution of a program (at run time) rather than before execution. This may consist of source code translation but is more commonly bytecode translation to machine code, which is then executed directly. A system implementing a JIT compiler typically continuously analyses the code being executed and identifies parts of the code where the speedup gained from compilation or recompilation would outweigh the overhead of compiling that code.
“Just-In-Time Compilation.” Wikipedia, 10 Feb. 2020, https://en.wikipedia.org/wiki/Just-in-time_compilation.
Model–View–Controller (MVC)
Model–view–controller (MVC) is a software design pattern commonly used for developing user interfaces that divides the related program logic into three interconnected elements. This is done to separate internal representations of information from the ways information is presented to and accepted from the user.
Wikipedia Contributors. “Model–View–Controller.” Wikipedia, Wikimedia Foundation, 21 Jan. 2019, https://en.wikipedia.org/wiki/Model%E2%80%93view%E2%80%93controller.
Multiple Virtual Storage (MVS)
Multiple Virtual Storage, more commonly called MVS, was the most commonly used operating system on the System/370 and System/390 IBM mainframe computers. IBM developed MVS, along with OS/VS1 and SVS, as a successor to OS/360. It is unrelated to IBM’s other mainframe operating system lines, e.g., VSE, VM, TPF.
Wikipedia Contributors. “MVS.” Wikipedia, Wikimedia Foundation, 7 July 2025, https://en.wikipedia.org/wiki/MVS.
Resource Access Control Facility (RACF)
Resource Access Control Facility, or RACF, provides the tools to help the installation manage access to critical resources.
“Z/OS Basic Skills.” Ibm.com, 28 June 2023, https://www.ibm.com/support/knowledgecenter/zosbasics/com.ibm.zos.zsecurity/zsecc_042.htm. Accessed 16 July 2025.
Real-time locating system (RTLS)
Real-time locating systems (RTLS), also known as real-time tracking systems, are used to automatically identify and track the location of objects or people in real time, usually within a building or other contained area. Wireless RTLS tags are attached to objects or worn by people, and in most RTLS, fixed reference points receive wireless signals from tags to determine their location. Examples of real-time locating systems include tracking automobiles through an assembly line, locating pallets of merchandise in a warehouse, or finding medical equipment in a hospital.
Wikipedia Contributors. “Real-Time Locating System.” Wikipedia, Wikimedia Foundation, 25 June 2019, https://en.wikipedia.org/wiki/Real-time_locating_system.
Time Sharing Option (TSO)
Time Sharing Option (TSO) is an interactive time-sharing environment for IBM mainframe operating systems, including OS/360 MVT, OS/VS2 (SVS), MVS, OS/390, and z/OS.
Wikipedia Contributors. “Time Sharing Option.” Wikipedia, Wikimedia Foundation, 7 July 2025, https://en.wikipedia.org/wiki/Time_Sharing_Option.
Windows Communication Foundation (WCF)
Windows Communication Foundation (WCF) is a framework for building service-oriented applications. Using WCF, you can send data as asynchronous messages from one service endpoint to another. A service endpoint can be part of a continuously available service hosted by IIS, or it can be a service hosted in an application. An endpoint can be a client of a service that requests data from a service endpoint. The messages can be as simple as a single character or word sent as XML, or as complex as a stream of binary data.
Mconnew. “What Is Windows Communication Foundation - WCF.” WCF | Microsoft Learn, https://learn.microsoft.com/en-us/dotnet/framework/wcf/whats-wcf. Accessed 29 Nov. 2025.